Grandstream Networks Multiple UCM6510 IPPBX How To Interconnect Download Page 4


                                                  How To Interconnect Multiple UCM6510 IPPBX                                  Page 3 of 8 


CONNECT TWO UCM6510 USING PEER SIP TRUNK 


CREATE PEER SIP TRUNK FOR UCM6510 


On the UCM6510-A web GUI, create a Peer SIP Trunk by navigating to 

PBX

->

Basic/Call Routes

->

VoIP 

Trunks

 a

nd click on “Create New SIP Trunk”.   

 
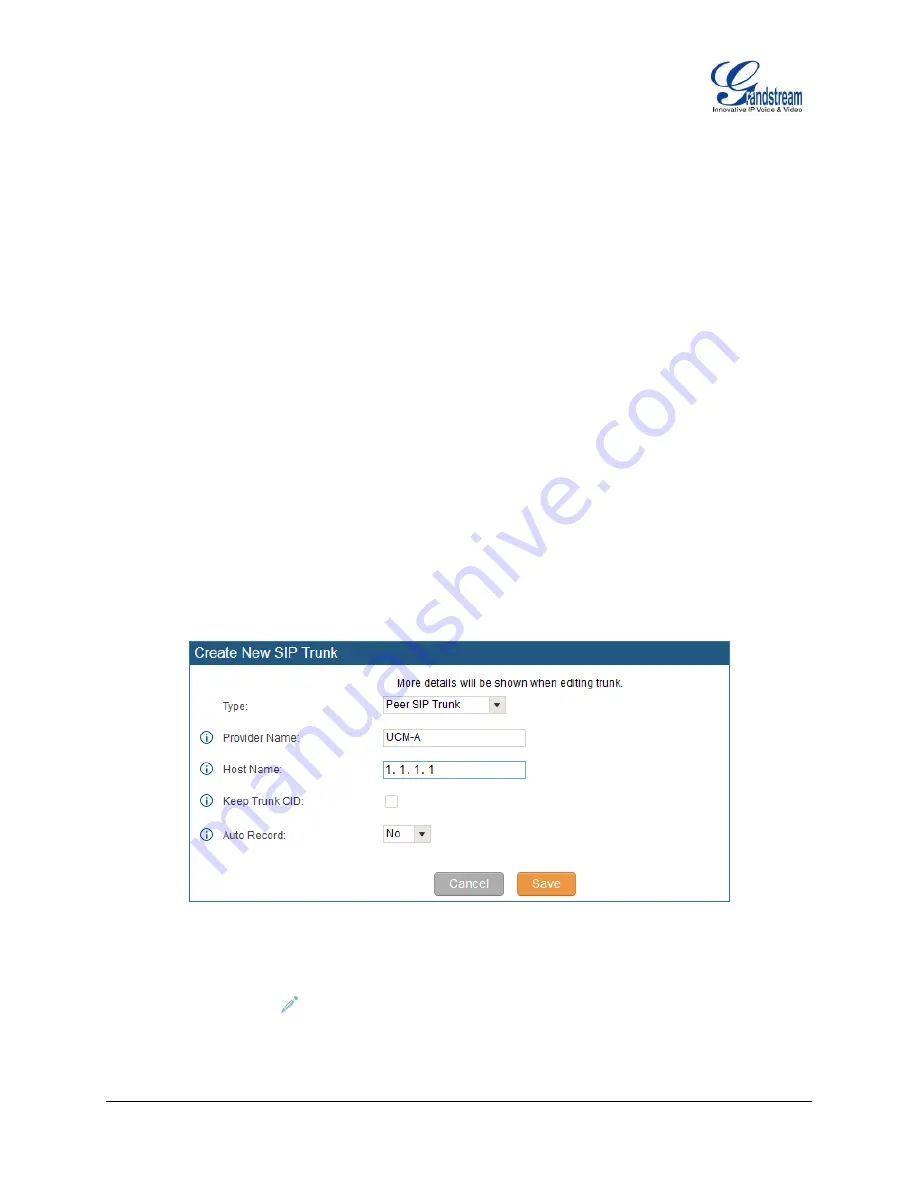
In the “Create New SIP Trunk” dialog: 


Select “Peer SIP Trunk” for option “Type”. 


Enter a name to identify the trunk in option 

“Provider Name”. This is mainly for reference purpose. In 

this example 

“UCM-A” is used. 


For option 

“Host Name”


enter the IP address/domain of the other UCM6510 to be peered. In this case 

1.1.1.1 is the IP address of UCM6510-A. 


Click 

“Save” 

when done.   


Figure 1: SIP Trunk - Create New SIP Trunk 


After clicking 

“Save” the new VoIP trunk will be displayed under 

PBX

->

Basic/Call Routes

->

VoIP 

Trunks

. Click on icon

to edit the trunk. 


Summary of Contents for Multiple UCM6510 IPPBX

Page 1: ...Grandstream Networks Inc How To Interconnect Multiple UCM6510 IPPBX...

Page 2: ...k Set Enable Qualify 4 Figure 3 SIP Trunk Trunk Status 4 Figure 4 Outbound Rule Create New Outbound Rule 6 Figure 5 Inbound Rule Create New Inbound Rule 7 This document is subject to change without no...

Page 3: ...ation to interconnect two UCM6510s In this example we will be using two UCM6510s and name them UCM6510 A and UCM6510 B for the following illustration This is typically applied to the scenario where us...

Page 4: ...alog Select Peer SIP Trunk for option Type Enter a name to identify the trunk in option Provider Name This is mainly for reference purpose In this example UCM A is used For option Host Name enter the...

Page 5: ...heck box This is a SIP option that allows UCM6510 A to monitor the status of UCM6510 B Figure 2 SIP Trunk Set Enable Qualify Click Save when done Once the trunk has been created and Enable Qualify is...

Page 6: ...IP address or domain name CONFIGURE OUTBOUND RULE ON UCM6510 On the UCM6510 A web GUI go to PBX Basic Call Routes Outbound Routes to create a new outbound rule This would allow the extension on the U...

Page 7: ...that has a leading 1 it will use this route and send the call out to the UCM6510 B Note These steps will also apply to UCM6510 B when configuring the outbound route from UCM6510 B to the UCM6510 A The...

Page 8: ...nbound rule In this example the UCM6510 A inbound rule needs be configured so that when UCM6510 B dials a UCM6510 A extension the call can be routed to the specified user On the UCM6510 A configure th...

Page 9: ...which will route the call based on the digits dialed by the UCM6510 B user These steps will also be used to create an inbound rule on the UCM6510 B When an extension user on UCM6510 A dials a number...

Reviews: