background image


P a g e

 |


5


HT801 Administration Guide 

Table of Tables 

Table 1: HT801 Features at a Glance ......................................................................................................... 10


Table 2: HT801 Technical Specifications .................................................................................................... 10


Table 3: Definition of the HT801 Connectors .............................................................................................. 12


Table 4: HT801 LEDs Pattern Description .................................................................................................. 14


Table 5: Voice Prompt Menu ....................................................................................................................... 15


Table 6: Status Page Definitions ................................................................................................................. 19


Table 7: Basic Settings Page ...................................................................................................................... 20


Table 8: Advanced Settings ......................................................................................................................... 21


Table 9: FXS Port ........................................................................................................................................ 26


Table 10: HT801 Call Features ................................................................................................................... 41


Table of Figures


Figure 1: HT801 Package Contents ............................................................................................................ 12


Figure 2: HT801 Back Panel ....................................................................................................................... 12


Figure 3: Connecting the HT801 ................................................................................................................. 13


Figure 4: HT801 LEDs Pattern .................................................................................................................... 13


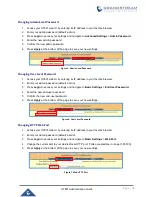
Figure 5: Admin Level Password ................................................................................................................ 18


Figure 6: User Level Password ................................................................................................................... 18


Figure 7: Web HTTP Port ............................................................................................................................ 18


Figure 8: SIP Accounts Settings.................................................................................................................. 40


Figure 9: Account Status ............................................................................................................................. 40


Figure 10: Firmware Upgrade Page ............................................................................................................ 43


Summary of Contents for HT801

Page 1: ...Grandstream Networks Inc HT801 Analog Telephone Adaptor Administration Guide ...

Page 2: ...electronic version of this user manual is available for download here http www grandstream com support Grandstream is a registered trademark and Grandstream logo is trademark of Grandstream Networks Inc in the United States Europe and other countries CAUTION Changes or modifications to this product not expressly approved by Grandstream or operation of this product in any way other than as detailed...

Page 3: ...se GPL Grandstream uses software under the specific terms of the GPL Please see the GNU General Public License GPL for the exact terms and conditions of the license Grandstream GNU GPL related source code can be downloaded from Grandstream web site from http www grandstream com support faq gnu general public license gnu gpl information download ...

Page 4: ...ue Phone 15 Understanding HT801 Interactive Voice Prompt Response Menu 15 Configuration via Web Browser 17 Accessing the Web UI 17 Web UI Access Level Management 17 Saving the Configuration Changes 17 Changing Admin Level Password 18 Changing User Level Password 18 Changing HTTP Web Port 18 Web Configuration Pages Definitions 19 Status Page Definitions 19 Basic Settings Page Definitions 20 Advance...

Page 5: ...ocal Directory 44 Upgrading via Local TFTP HTTP Servers 44 Firmware and Configuration File Prefix and Postfix 44 Managing Firmware and Configuration File Download 45 Configuration File Download 45 RESTORE FACTORY DEFAULT SETTINGS 46 Using the Reset Button 46 Using the IVR Command 46 Reset from Web Interface Reset Type 47 EXPERIENCING HT801 48 ...

Page 6: ...s Page Definitions 19 Table 7 Basic Settings Page 20 Table 8 Advanced Settings 21 Table 9 FXS Port 26 Table 10 HT801 Call Features 41 Table of Figures Figure 1 HT801 Package Contents 12 Figure 2 HT801 Back Panel 12 Figure 3 Connecting the HT801 13 Figure 4 HT801 LEDs Pattern 13 Figure 5 Admin Level Password 18 Figure 6 User Level Password 18 Figure 7 Web HTTP Port 18 Figure 8 SIP Accounts Settings...

Page 7: ...801 And it covers the topic of connecting and configuring the HT801 making basic operations and the call features Please visit http www grandstream com support to download the latest HT801 User Guide This guide covers following topics Product overview Getting started Configuration guide Upgrade and provisioning Restore factory default settings ...

Page 8: ... significant changes from previous versions of administration guide for HT801 Only major new features or major document updates are listed here Minor updates for corrections or editing are not documented here Firmware Version 1 0 3 2 This is the initial version for HT801 ...

Page 9: ...ACE EXAMPLES http www grandstream com sites default files Resources HT801_web_gui zip 1 Screenshot of Login Page 2 Screenshots of Status Page 3 Screenshots of Basic Settings Page 4 Screenshots of Advanced Settings Page 5 Screenshots of FXS Port Page ...

Page 10: ...ed LAN and Internet connections The Grandstream Handy Tone HT801 is a new addition to the popular Handy Tone ATA product family This manual will help you learn how to operate and manage your Handy Tone and make the best use of its many upgraded features including simple and quick installation 3 way conferencing direct IP IP Calling and new provisioning support among other features This HT801 is ve...

Page 11: ...ettings for the HT801 Table 2 HT801 Technical Specifications Interfaces Telephone Interfaces One 1 RJ11 FXS port Network Interface One 1 10 100Mbps auto sensing Ethernet port RJ45 LED Indicators POWER INTERNET PHONE Factory Reset Button Yes Voice Fax Modem Telephony Features Caller ID display or block call waiting flash blind or attended transfer forward hold do not disturb 3 way conference HT801 ...

Page 12: ...CP NTP TFTP TELNET STUN SIP RFC3261 SIP over TCP TLS SRTP TR 069 QoS Layer 3 ToS DiffServ MPLS DTMF Methods In audio RFC2833 and or SIP INFO Provisioning and Control HTTP HTTPS TELNET TFTP TR 069 secure and automated provisioning using AES encryption syslog Security Media SRTP Control TLS SIPS HTTPS Management Syslog support telnet remote management using web browser Physical Universal Power Suppl...

Page 13: ...ing missing contact your system administrator HT801 Ports Description The following figure describes the different ports on the back panel of the HT801 Figure 2 HT801 Back Panel Table 3 Definition of the HT801 Connectors Phone Connects the analog phones fax machines to the phone adapter using an RJ 11 telephone cable Internet port Connects the phone adapter to your router or gateway using an Ether...

Page 14: ...or LAN port of the HT801 and connect the other end of the Ethernet cable to an uplink port a router or a modem etc 3 Insert the power adapter into the HT801 and connect it to a wall outlet 4 Power Ethernet and Phone LEDs will be solidly lit when the HT801 is ready for use Figure 3 Connecting the HT801 HT801 LEDs Pattern There are three 3 LED buttons that help you manage the status of your Handy To...

Page 15: ...ing up Internet LED The Ethernet LED lights up when the HT801 is connected to your network through the Ethernet port and it flashes when there is data being sent or received Phone LED The phone LED indicates status of the FXS port phone on the back panel OFF Unregistered ON Solid Blue Registered and Available Blinking every second Off Hook Busy Slow blinking FXS LEDs indicates voicemail ...

Page 16: ... be announced Understanding HT801 Interactive Voice Prompt Response Menu The HT801 has a built in voice prompt menu for simple device configuration which lists actions commands menu choices and descriptions The IVR menu works with any phone connected to the HT801 Pick up the handset and dial to use the IVR menu Table 5 Voice Prompt Menu Menu Voice Prompt Options Main Menu Enter a Menu Option Press...

Page 17: ...ware Upgrade Firmware upgrade mode Press 9 to toggle among the following three options always check check when pre suffix changes never upgrade 47 Direct IP Calling Enter the target IP address to make a direct IP call after dial tone See Make a Direct IP Call 86 Voice Mail Access to your voice mails messages 99 RESET Press 9 to reboot the device Enter MAC address to restore factory default setting...

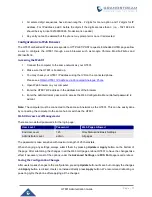
Page 18: ...owser 6 Enter the administrator s password to access the Web Configuration Menu default password is admin Note The computer must be connected to the same sub network as the HT801 This can be easily done by connecting the computer to the same hub or switch as the HT801 Web UI Access Level Management There are two default passwords for the login page User Level Password Web Pages Allowed End User Le...

Page 19: ...in your favorite browser 2 Enter your admin password default admin 3 Press Login to access your settings and navigate to Basic Settings End User Password 4 Enter the new end user password 5 Confirm the new end user password 6 Press Apply at the bottom of the page to save your new settings Figure 6 User Level Password Changing HTTP Web Port 1 Access your HT801 web UI by entering its IP address in y...

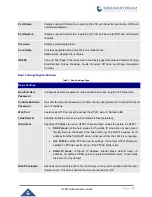
Page 20: ...roubleshooting The MAC address will be used for provisioning and can be found on the label on original box and on the label located on the bottom panel of the device IP Address Displays assigned IP address Example 192 168 5 110 Product Model Displays product model info Default is HT801 Hardware Version Displays the hardware revision information and the part number Software version Program Specifie...

Page 21: ...er password to confirm change user password on web GUI to avoid typo or mistakes Web Port Customizes HTTP port used to access the HT801 web UI Default is 80 Telnet Server Enables Disables access via telnet Default is Yes activated IP Address Specifies IP Address to use on HT801 There are three modes to operate the HT801 DHCP mode all the field values for the static IP mode are not used even though...

Page 22: ... using DHCP Option 2 it will override selected time zone If set to No the analogue adapter will use selected time zone even if provided by DHCP server The Default setting is Yes Language Configures the languages of the voice prompt and web interface except Spanish that it is only in IVR Available languages English Chinese or Spanish IVR Reset Type Gives the administrator the option to restore defa...

Page 23: ...3 the device will restart the TCP IP stack If the STUN server does not respond when the device boots up the feature is disabled Default setting is No Use DNS to detect network connectivity Uses DNS to detect WAN side network problems Default setting is No Verify host when using HTTPS Enables disables the host verification when using HTTPS Upgrade via Selects firmware upgrade provisioning method TF...

Page 24: ...DHCP even though Config Server Path is left blank 3CX Auto Provision Sends multicast SUBSCRIBE message for provisioning at booting stage used for PnP Plug and Play configuration Default is Yes Automatic Upgrade Specifies when the firmware upgrade process will be initiated there are 4 options No The HT801 will only do upgrade once at boot up Default is No Check every X minutes User needs to specify...

Page 25: ...ne system to enable the CPE WAN Management Protocol TR 069 Default setting is No ACS URL Specifies URL of TR 069 Auto Configuration Servers e g http acs mycompany com or IP address ACS Username Enters username to authenticate to ACS ACS Password Enters password to authenticate to ACS Periodic Inform Enable Sends periodic inform packets to ACS Default is No Periodic Inform Interval Sets frequency t...

Page 26: ...tp www itu int ITU T inr forms files tones 0203 pdf Prompt Tone Access Code Specifies the key pattern to get Prompt Tone Maximum 20 digits Lock Keypad Update Locks configuration update via keypad Default is No Disable Voice Prompt Removes ability to use integrated voice prompt menu configuration Default is No Disable Direct IP Call Deactivates Direct IP to IP calling function Default is No NTP Ser...

Page 27: ...192 168 1 14 GS_LOG 00 0b 82 00 a1 be 000 Ethernet link is up Send SIP Log Configures the HT801 to send a replicate of the SIP packets on the syslog Default is No Download Device Configuration Downloads actual device configuration file in xml format Download Device XML Configuration Downloads actual device configuration file in xml format Upload Firmware Allows the user to upgrade the firmware wit...

Page 28: ...efault is No SIP transport Selects transport protocol for SIP packets UDP or TCP or TLS Please make sure your SIP Server or network environment supports SIP over the selected transport method Default is UDP NAT Traversal Indicates type of NAT for the account This parameter configures whether the NAT traversal mechanism is activated Users could select the mechanism from No Keep alive STUN UPnP Defa...

Page 29: ...n is performed by sending a REGISTER message with Contact set to and Expires 0 parameters to the SIP server This will unregister the SIP account under the concerned FXS page Default is No Outgoing Call Without Registration Enables the ability to place outgoing calls even if the account is not registered if allowed by ITSP device will not be able to receive incoming calls Default is No Register Exp...

Page 30: ... SIP Port Controls whether to use configured or random SIP ports This is usually necessary when multiple HT801 are behind the same NAT Default is No Use Random RTP Port Controls whether to use configured or random RTP ports This is usually necessary when multiple HT801 are behind the same NAT Default is No Hold Target Before Refer Allows user to hold the phone call before refer it If set to No the...

Page 31: ...count SIP Settings Allow Incoming SIP Messages from SIP Proxy Only Checks SIP address of the Request URI in the incoming SIP message if it doesn t match the SIP server address of the account the call will be rejected Default is No Use Privacy Header Adds Privacy header if special feature is set to Default and not CBCOM Use P Preferred Identity Header Adds PPI header if special feature is set to De...

Page 32: ...or call control when both channels are in use Enable Call Features Enables do not disturb call forward and other call features via the local feature codes on the base Otherwise ITSP feature codes can be used Default is Yes Off Hook Auto Dial Configures a user ID or extension number that is automatically dialed when off hook Only the user part of a SIP address needs to be entered The HT801 will aut...

Page 33: ...Call Waiting Disables receiving a second incoming call when the line is engaged Default is No Disable Call Waiting Caller ID Disables displaying caller ID when receiving a second incoming call Default is No Disable Call Waiting Tone Disables playing call waiting tone during active call when receiving a second incoming call The CWCID will still be displayed Default is No Disable Connected Line ID D...

Page 34: ...nd error Default is No This feature is NOT designed to work with and should NOT be enabled for direct IP to IP calling Dial Plan Prefix Adds specified prefix to dialed number Use as Dial Key Treats as the Send or Dial key If set to No this key can be included as part of the dialed number Default is Yes Dial Plan Dial Plan Rules 1 Accept Digits 1 2 3 4 5 6 7 8 9 0 A a B b C c D d 2 Grammar x any di...

Page 35: ...case should be predefined inside dial plan feature An example dial plan will be x which allows the user to dial followed by any length of numbers SUBSCRIBE for MWI Sends SUBSCRIBE periodically depends on Register Expiration parameter for message waiting indication Default is No Send Anonymous Sets From Privacy and P_Asserted_Identity headers in outgoing INVITE message to anonymous blocking caller ...

Page 36: ...h the session timer Default is No Enable 100rel Appends 100rel attribute to the value of the required header of the initial signaling messages Default is No Add Auth Header on Initial REGISTER Adds Authentication header with blank nonce attribute in the initial SIP REGISTER request Default is No Use First Matching Vocoder in 200OK SDP Includes only the first matching vocoder in its 200OK response ...

Page 37: ... 600ms Note not all vocoders can meet the high requirement Medium initial 100ms min 20ms max 200ms Low initial 50ms min 10ms max 100ms SRTP Mode Selects SRTP mode to use Disabled Enabled but not forced or Enabled and forced Default is Disabled It uses SDP Security Description to exchange key Please refer to SDES https tools ietf org html rfc4568 SRTP https www ietf org rfc rfc3711 txt Crypto Life ...

Page 38: ...parameter under the FXS port configuration page If voice volume is too low at the other end user may increase the far end volume using the Tx gain level parameter under the FXS port configuration PAGE Disable Line Echo Canceller Disables the LEC will per call base Recommended for FAX Data calls Default is No Disable Network Echo Suppressor Disables the NEC will per call base Recommended for FAX Da...

Page 39: ...g voice codecs On FXS port page choose the order of your favorite codecs PCMU A or G711µ a G729 A B G723 1 G726 16 24 32 40 iLBC OPUS Configuring HT801 Through Voice Prompts As mentioned previously The HT801 has a built in voice prompt menu for simple device configuration Please refer to Understanding HT801 Interactive Voice Prompt Response Menu for more information about IVR and how to access its...

Page 40: ... Failover SIP Server with your Failover SIP Server IP address or FQDN Leave empty if not available d Prefer Primary SIP Server to No or Yes depending on your configuration Set to No if no Failover SIP Server is defined If Yes account will register to Primary SIP Server when failover registration expires e Outbound Proxy Set your Outbound Proxy IP Address or FQDN Leave empty if not available f SIP ...

Page 41: ...ou can verify if it has been correctly registered with your SIP server from your HT801 web interface under Status Port Status Registration If it displays Registered it means that your account is fully registered otherwise it will display Not Registered so in this case you must double check the settings or contact your provider Figure 9 Account Status ...

Page 42: ... ID per call Dial 67 number No dial tone is played in the middle 82 Send Caller ID per call Dial 67 number No dial tone is played in the middle 69 Call Return Service Dial 69 and the phone will dial the last incoming phone number received 70 Disable Call Waiting per call Dial 70 number No dial tone is played in the middle 71 Enable Call Waiting per call Dial 71 number No dial tone is played in the...

Page 43: ...g up 93 Cancel Delayed Call Forward To cancel Delayed Call Forward dial 93 wait for dial tone then hang up Flash Hook Toggles between active call and incoming call call waiting tone If not in conversation flash hook will switch to a new channel for a new call Pressing pound sign will serve as Re Dial key Rebooting HT801 from Remote Press the Reboot button at the bottom of the configuration menu to...

Page 44: ...er to upgrade the firmware version of your HT801 1 Access your HT801 UI by entering its IP address in your favorite browser 2 Enter your admin password default admin 3 Press Login to access your settings 4 Go to Advanced Settings Firmware Upgrade and Provisioning page and enter the IP address or the FQDN for the upgrade server in Firmware Server Path field and choose to upgrade via TFTP or HTTP HT...

Page 45: ...irmware files and put all of them in the root directory of the TFTP server 2 Connect the PC running the TFTP server and the phone to the same LAN segment 3 Launch the TFTP server and go to the File menu Configure Security to change the TFTP server s default setting from Receive Only to Transmit Only for the firmware upgrade 4 Start the TFTP server and configure the TFTP server in the phone s web c...

Page 46: ...FTP or HTTP HTTPS server path for the configuration file It needs to be set to a valid URL either in FQDN or IP address format The Config Server Path can be the same or different from the Firmware Server Path A configuration parameter is associated with each particular field in the web configuration page A parameter consists of a Capital letter P and 2 to 3 Could be extended to 4 in the future dig...

Page 47: ...our HT801 3 Insert a pin in this hole and press for about 7 seconds 4 Take out the pin All unit settings are restored to factory settings Using the IVR Command Reset default factory settings using the IVR prompt 1 Dial for voice prompt 2 Enter 99 and wait for reset voice prompt 3 Enter the encoded MAC address Look below on how to encode MAC address 4 Wait 15 seconds and device will automatically r...

Page 48: ... reset type Full Reset This will make a full reset ISP Data This will reset only the basic settings like IP mode PPPoE and Web port VOIP Data This will reset only the data related with a service provider like SIP server sip user ID provisioning and others Note Factory Reset will be disabled if the Lock keypad update is set to Yes If the HT801 was previously locked by your local service provider pr...

Page 49: ...veloper Forum for answers to your general questions If you have purchased our products through a Grandstream Certified Partner or Reseller please contact them directly for immediate support Our technical support staff is trained and ready to answer all of your questions Contact a technical support member or submit a trouble ticket online to receive in depth support Thank you again for purchasing G...

Reviews: