background image

LX_574G-INS-LAB-RevE21 9

Reclining by User

• 

Recline:

 Place hands on armrests and push your body against recliner back to recline yourself 

to desired position. Legrest will automatically adjust to recline position.

• 

Return to upright position:

 Place hands on armrests and pull yourself up while leaning your 

body forward away from the recliner back and at the same time pushing your legs down evenly 
on the legrest.

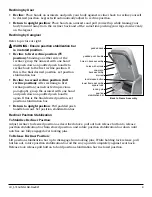
Reclining by Caregiver

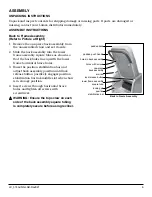
Refer to picture at right.

  WARNING: Ensure position stabilization bar 

is in stored position.

• 

Recline to first recline position (TV 
position):

 Standing on either side of the 

recliner, grasp the armrest with one hand 
and push down on padded push handle to 
recline back to the first recline position. If 
this is the final desired position, set position 
stabilization bar.

• 

Recline to second recline position (full 
recline position):

 After reclining to first 

recline position (as instructed in previous 
paragraph), grasp the armrest with one hand 
and push down on padded push handle 
again. If this is the final desired position, set 
position stabilization bar.

• 

Return to upright position:

 Pull padded push 

handle forward. Set position stabilization bar.

Recliner Position Stabilization

To Stabilize Recliner Position:


Adjust recliner to desired position as described above, pull out lock release button to release 
position stabilization bar from stored position, and rotate position stabilization bar down until 
notches are fully engaged over locking pins.

To Release Recliner Position:


Lift position stabilization bar up to disengage from locking pins. While holding lock release, pull  
button out, rotate position stabilization bar all the way up until completely against seat back. 
Release lock release pull button to hold position stabilization bar in stored position.
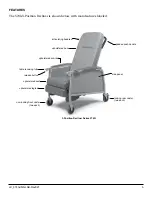
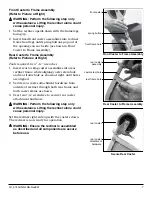
holes with screws

position

stabilization bar

locking pin

one-piece

back assembly

lock release button

armrest

lower frame assembly

square tube

padded push handle

padded back

holes in back assembly

Back to Frame Assembly

Summary of Contents for Lumex 574G Series

Page 1: ...perating Instructions IMPORTANT READ THIS MANUAL BEFORE OPERATING THE LUMEX 574G SERIES 3 POSITION RECLINER SAVE THIS MANUAL FOR FUTURE USE THE MOST CURRENT VERSION OF THIS MANUAL CAN BE FOUND ONLINE...

Page 2: ...8 CASTER OPERATION 8 TO OPERATE REAR SWIVEL LOCKING CASTERS 8 RECLINER OPERATION 8 RECLINING BY USER 9 RECLINING BY CAREGIVER 9 RECLINER POSITION STABILIZATION 9 ARTICULATING HEADREST 10 MOLDED TABLE...

Page 3: ...ult in death or serious personal injury CAUTION Indicates a potential hazard or unsafe practice that if not avoided could result in minor or moderate personal injury s NOTICE Indicates a potential haz...

Page 4: ...f California to cause cancer and birth defects or other reproductive harm For more information go to www p65warnings ca gov furniture WARNING GF Health Products Inc specifically disclaims responsibili...

Page 5: ...h main features labeled padded push handle side panel upholstered armrest upholstered back articulating headrest locking rear caster two each non locking front caster two each upholstered legrest upho...

Page 6: ...the lower frame horizontal brace holes 3 Raise the position stabilization bar and adjust back assembly position until lock release button positively engages position stabilization bar link middle slo...

Page 7: ...on each side as shown in Front Caster to Frame Assembly Rear Caster to Frame Assembly Refer to Pictures at Right Tools required two 7 16 wrenches 1 Insert rear locking caster assemblies into rear recl...

Page 8: ...os above To Lock the Rear Caster Depress the large locking tab located at the back of the caster This will lock both the caster and the swivel function To Unlock the Rear Caster Depress the small tab...

Page 9: ...instructed in previous paragraph grasp the armrest with one hand and push down on padded push handle again If this is the final desired position set position stabilization bar Return to upright positi...

Page 10: ...e pull buttons beneath both arms until the table engages then slide lock lockout keys forward on both sides 2 Pick table up by circular table arm and slide it into the table receiving tubes in the fro...

Page 11: ...bility when using this product in combination with painted or varnished surfaces Disinfectants In addition to cleaning healthcare facilities maintain disinfecting regimens to reduce the spread of infe...

Page 12: ...g purposes in patient care areas where Uncertainty exists as to the nature of the soil on the surfaces whether it is blood or body fluid or just normal dust or dirt Uncertainty exists regarding the pr...

Page 13: ...s are used on Lumex Recliner product labels MANUFACTURER FRAGILE HANDLE WITH CARE CE MARK CAUTION EC REP EUROPEAN AUTHORIZED REPRESENTATIVE UDI UNIQUE DEVICE IDENTIFIER GENERAL WARNING SIGN KEEP DRY E...

Page 14: ...including but not limited to filters fuses gaskets lubricants and charts 4 Accessories or parts not provided by GF 5 Charges by anyone for adjustments repairs replacement parts installation or other...

Page 15: ...3 Intended use 3 Introduction 3 K Key to symbols 13 L Limited warranty 14 N NOTICE statement significance 3 O Operation 8 R Rear caster to frame assembly 7 Recliner operation 8 Recliner position stab...

Page 16: ...on can be found on our website www grahamfield com 2014 GF Health Products Inc All Rights Reserved Lumex is a trademark of GF Health Products Inc GF Health Products Inc is an ISO 13485 2016 MDSAP Cert...

Reviews: