background image

16

308854

Displacement Pump Repair

Removing pump

1.

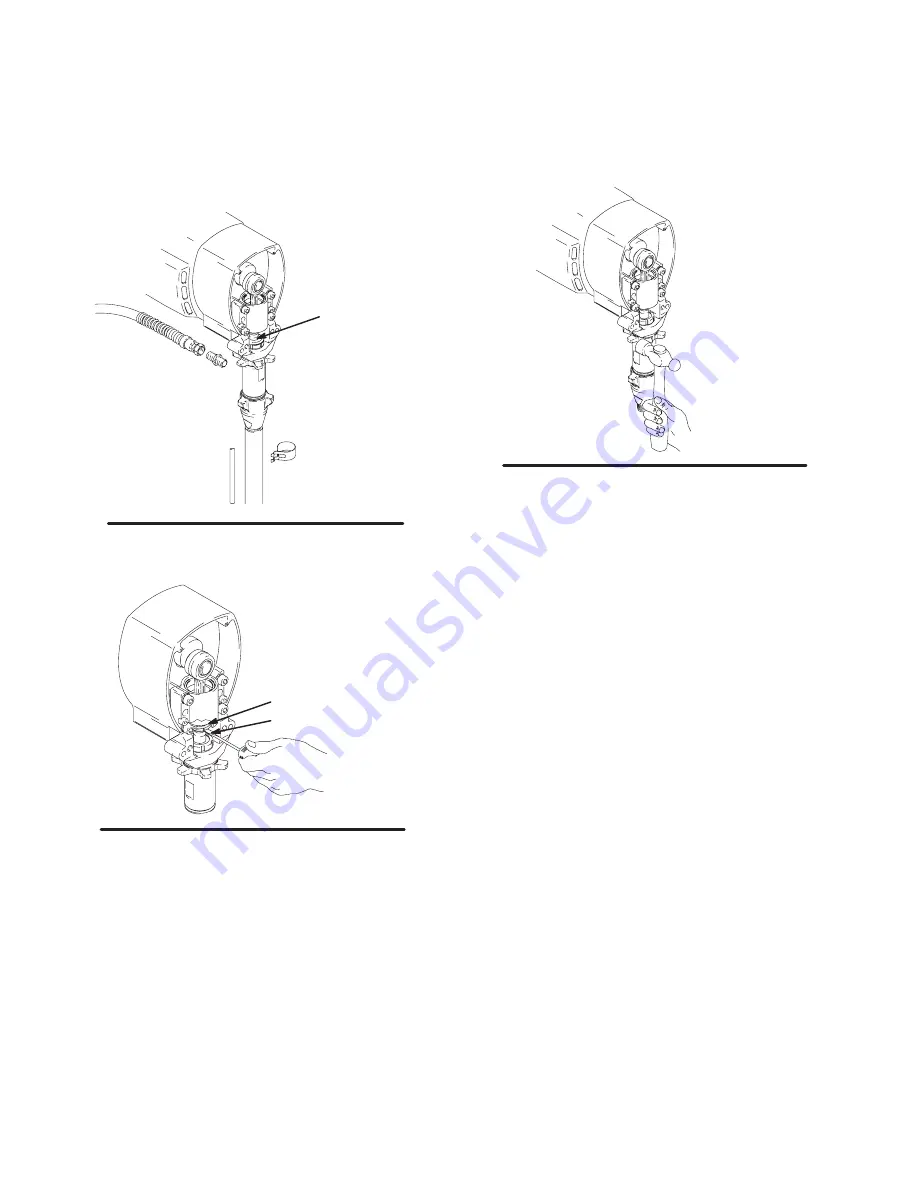
Flush pump. Relieve pressure. Fig. 13. Cycle
pump with piston rod (A) in its lowest position.

2.

Fig. 13. Unscrew suction tube and hose from
pump.

Fig.  13

7672A

A

3.

Fig. 14. Use screwdriver to push retaining spring
(35) up and pin (20) out.

Fig. 14

7674A

35
20

4.

Fig. 15. Loosen locknut by hitting firmly with a 
20 oz (maximum) hammer. Unscrew pump.

Fig. 15

7673A

Repairing Pump

See manual 308798 for pump repair instructions.

Summary of Contents for Ultra Max 1595

Page 1: ...Hi boy with RAC IV tip gun and hose 120 VAC Model Series Description 232171 A Hi Boy with RAC IV tip gun and hose All models are not available in all countries Table of Contents Component Function and Identification 3 Troubleshooting 5 General Repair Information 4 Motor Brush Replacement 7 Pressure Control 9 Pressure Control Repair 10 Pressure Control Wiring 12 Motor Replacement 13 Bearing Housing...

Page 2: ...prayer or stop spraying Do not use components rated less than system Maximum Working Pressure Never allow children to use this unit If you are injured using this equipment get immediate medical treatment Fire and explosion can occur when spraying or flushing flammable fluid in an area where air circulation is poor and flammable vapors can be ignited by an open flame or sparks To help prevent a fir...

Page 3: ...ment pump outlet Works with pressure adjusting knob L ON OFF Switch Power switch that controls VAC main power to sprayer M 3 ft 0 9 m Hose 3 16 in ID grounded nylon hose used between 50 ft hose and spray gun to allow more flexibility when spraying N 50 ft 15 m Main Hose 1 4 in ID 3 8 in ID MARK V grounded nylon hose spring guards both ends P Spray Gun High pressure spray gun with gun safety latch ...

Page 4: ...ble solutions WARNING EXPLOSION HAZARD Motor and drive housing are very hot during operation and could burn skin if touched Flammable materials spilled on hot bare motor could cause fire or explosion Have motor shield in place during operation to reduce risk of burns fire or explosion CAUTION Do not run sprayer dry for more than 30 seconds to avoid damaging pump packings 4 Install motor shield bef...

Page 5: ...for shorts Use an armature tester growler Replace motor See page 13 If pump continues to stroke when gun trigger is released With pump on and primed trigger gun momentarily then release and engage safety latch Relieve pressure turn off and unplug sprayer Service pump See manual 308798 If intake valve ball and piston ball are seating properly Remove intake valve and clean Check balls and seats for ...

Page 6: ... Motor is hot and runs intermittently Determine if sprayer was operated at high pressure with small tips which causes low motor RPM and excessive heat build up Decrease pressure setting or increase tip size Be sure ambient temperature where sprayer is located is no more than 90 F and sprayer is not located in direct sun Move sprayer to shaded cooler area if possible Determine if sprayer was turned...

Page 7: ...s wear differently on each side of mo tor check both sides Brush Repair Kit 222157 is available for Models 232164 232173 and Brush Repair Kit 220853 is available for Mod els 232160 through 232163 232166 232171 Spring clip 110816 may be purchased sepa rately Motor Brush Removal 1 Read General Repair Information page 4 2 Relieve pressure page 4 3 Fig 3 Remove motor shield 14 Remove in spection cover...

Page 8: ...ush down to hook short slots K in brush holder C Fig 5 G K J C NOTE SPRING COIL DIRECTION A 01227 E H 11 Repeat for other side 12 Test brushes a Remove pump connecting rod pin b With sprayer OFF turn pressure control knob fully counterclockwise to minimum pressure Plug in sprayer c Turn sprayer ON Slowly increase pressure until motor is at full speed CAUTION Do not run sprayer dry for more than 30...

Page 9: ...reely in both directions If not replace motor 5 Connect black motor leads together 6 Use motor fan to turn motor It should be much harder to turn than in step 4 If there is uneven or no resistance to turning check brushes and re place if necessary 7 If there is still uneven or no resistance to turning replace motor 8 Install pump pin and fan cover Pressure Control Replacement 1 Relieve pressure pa...

Page 10: ...ponents and wires necessary for repair Make a diagram show ing wire hook ups for items removed to insure correct wiring when reinstalling See Fig 9 for wiring information 5 Install control housing 202 to motor control board 201 using screws 213 and lockwashers 214 Pressure Control Transducer and O Ring Replacement WARNING FIRE AND EXPLOSION HAZARD Proper o ring replacement is essential to reduce t...

Page 11: ...rews 213 and washers 214 4 Seat transducer into o ring by drawing down screws and washers until bracket is flush with motor control surface 5 Carefully remove transducer and verify that o ring is seated correctly and not pushed out of groove If not seated correctly use new o ring and repeat steps 2 through 5 6 When o ring is correctly installed reinstall trans ducer and tighten screws to 150 in lb...

Page 12: ...nnector from potentiometer to J3 Wires J4 J5 to 10 12 switch Connector from pressure transducer to J6 I1 I2 J3 J5 J4 J6 J7 GND L1 L2 Twisted pair GRN YEL wire E to housing ground Housing ground L E N 1 2 5 3 6 4 BLACK wire L to on off sw 1 WHITE wire N to on off sw 4 ON OFF sw Twisted pair Red wires to I1 and I2 on board To J3 Twisted pair WHITE wire ON OFF SW 5 to L2 on board BLACK wire ON OFF SW...

Page 13: ...r cluster 9 when removing drive housing 18 The gear cluster may stay engaged in the motor front end bell or the drive housing DO NOT lose thrust balls 10 located at each end of gear cluster 9 or drop them between gears The balls which are heavily covered with grease usually stay in the shaft recesses but could be dislodged If caught between gears and not removed the balls will seriously damage the...

Page 14: ...F and install with locknuts 13 on new bearing housing 8 Inspect crank E for excessive wear and replace parts as needed Evenly lubricate inside of bronze bearing B with high quality motor oil Liberally pack roller bearing C with bearing grease 9 Assemble connecting rod 29 and bearing housing 27 10 Clean mating surfaces of bearing 27 and drive 18 housings 11 Align connecting rod 29 with crank E and ...

Page 15: ...4 before doing this procedure See Fig 12 1 Relieve pressure page 4 2 Remove front cover 31 and motor shield 14 Unclip drain hose 79 from pump 3 Remove four bearing housing screws 33 and lockwashers 49 4 Lightly tap lower rear of bearing housing 27 with a plastic mallet to loosen it from drive housing 18 Pull assembled bearing housing and connecting rod straight off drive housing 5 Remove two drive...

Page 16: ...west position 2 Fig 13 Unscrew suction tube and hose from pump Fig 13 7672A A 3 Fig 14 Use screwdriver to push retaining spring 35 up and pin 20 out Fig 14 7674A 35 20 4 Fig 15 Loosen locknut by hitting firmly with a 20 oz maximum hammer Unscrew pump Fig 15 7673A Repairing Pump See manual 308798 for pump repair instructions ...

Page 17: ...d out 1 5 in Screw in pump until holes in bearing cross link and piston rod align Fig 16 7676A 2 Fig 17 Push pin 20 into holes Fig 17 20 7675A 3 Fig 18 Push retaining spring 35 into groove all the way around connecting rod Fig 18 7674A 35 Fig 19 Screw jam nut down onto pump until stops Screw pump up into bearing housing until it is stopped by jam nut Back off pump and jam nut to align pump outlet ...

Page 18: ... 14 64 21 1 32 31 13 9 49 86 29 20 5 19 58 11 62 17 80 52 REF 6 79 REF 43 47 15 36 10 10 64 82 81 74 44 63 51 33 73 38 39 42 25 28 69 83 89 26 72 59 56 48 71 94 75 92 93 95 41 102 57 24 8 15 16 22 54 28 Detail B 37 Models 232160 through 232164 232166 Series A 55 77 104 99 98 97 96 103 105 106 107 57 237 REF 88 110 ...

Page 19: ...2 Models 232160 thru 232164 2 3 8 npt x 1 4 npsm 162485 Model 232166 3 8 npt x 3 8 npsm 2 58 101242 RING retaining ext 2 59 167025 STRAINER 60 mesh 1 60 179811 WHEEL semi pneumatic 2 61 240136 HANDLE cart 1 62 192027 SLEEVE cart 2 63 105510 WASHER lock spring 6 64 108865 SCREW machine pan hd 10 69 111482 RIVET snap 1 71 171941 SPRING compression 1 72 186075 SUPPORT filter 1 73 192719 HANGER pail 1...

Page 20: ... 18 27 90 60 6 19 63 30 61 14 64 21 1 32 31 13 9 49 29 5 19 62 17 80 52 REF 6 47 15 10 64 82 81 74 44 63 51 33 73 38 25 69 83 89 72 59 56 48 71 94 95 41 57 24 8 16 22 54 85 28 REF Detail B 37 55 77 104 103 105 106 107 88 110 79 REF 86 42 101 28 50 26 11 58 93 92 36 75 97 63 237 REF 39 15 20 119 115 9001C 102 96 99 43 120 101 121 ...

Page 21: ...2 59 167025 STRAINER 60 mesh 1 60 179811 WHEEL semi pneumatic 2 61 240136 HANDLE cart 1 62 192027 SLEEVE cart 2 63 105510 WASHER lock spring 6 64 108865 SCREW machine pan hd 10 69 111482 RIVET snap 1 71 171941 SPRING compression 1 72 186075 SUPPORT filter 1 73 192719 HANGER pail 1 74 100020 WASHER lock 2 75 193709 VALVE seat 1 77 LABEL DANGER 1 187791 English 1 189702 Japanese 1 79 194178 HOSE dra...

Page 22: ...13 214 212 203 204 205 211 206 207 209 210 202 228 90 REF 230 229 89 REF 1 Torque to 150 in lb 17 N m 1 2 2 To housing ground Fig 9 231 234 3 3 Located this point inside housing 226 227 235 224 225 4 WARNING See Pressure Control Transducer and O Ring Replacement on page 10 for correct replacement procedure 4 238 237 ...

Page 23: ...ble at no cost These parts are included on all sprayers as shipped but not on replacement pressure control 239576 These parts are included with replacement pressure control 239576 but are not on all sprayers as shipped Technical Data Power Requirements Models 232164 and 232173 230 VAC 50 Hz 1 phase 12A min or 5000W generator Models 232160 thru 163 232171 120 VAC 60 Hz 1 phase 15A min or 5000W gene...

Page 24: ... no other remedy including but not limited to incidental or consequential damages for lost profits lost sales injury to person or property or any other incidental or consequential loss shall be available Any action for breach of warranty must be brought within two 2 years of the date of sale GRACO MAKES NO WARRANTY AND DISCLAIMS ALL IMPLIED WARRANTIES OF MERCHANTABILITY AND FITNESS FOR A PARTICULA...

Reviews: