background image

bly

Parts Needed: 4 each - PL55-5NM F, PL22-0NM G 

(no assembly required)

, PL19-5NM E, PL48-5NM D

35 mm Cap Bolts
4 - Pole Caps (remove from cog wheels)
4 - Quick Release Springs

8 - Guide Dowels

4 - Quick Release Hooks

8 - Grabber Screws

“F”, “G”, and “E” Pole Assembly

<

First, you will assemble the “F” (55 ½") and “E”     (19
½") poles.  Gather these poles together along with the
grabber screws and Guide Dowels.

<

Insert a Guide Dowel into the ends of each “F”, and
“E” poles WITH THE SMALLER HOLE OF THE
GUIDE DOWEL INWARD.    

<

Insert a grabber screw into a Guide Dowel.   Using a
Phillips Screwdriver, screw the grabber completely into the rail.

“D” Pole Assembly

<

 First attach the Quick Release Springs to the ends of the Quick Release Hooks.  This is done by slipping
the springs over the knob as pictured.

<

 Place the Quick Release Hook assembly into the slots
that are cut into the end of each “D” Pole.  

<

Next place a plastic Pole Cap onto the end of each
“D”Pole.  The slotted side of the Pole Cap goes in the
inside. 

Connecting Pole to Pole

<

Look at the rails needed to make the size
you have selected.  Align the slanted ends of the pole parts together and insert each bolt into the outside
hole.  Continue inserting the bolt through to the metal T-nut insert.

<

Begin all the bolts by hand, then tightly holding the wood pole together align it squarely on all sides. 
Line up this joint completely and then use the allen wrench  to tighten all bolts.

Continue bolting

togther all slanted ends of poles until you have four Quilting Poles

.

Nylon Washer 

(see next step

)

Summary of Contents for Z44 New Millennium

Page 1: ...Section Assembly 4 Step 6 Brace Assembly 5 Step 7 Brace to Stand Assembly 7 Step 8 Quilting Pole Assembly 8 Step 9 Quilting Pole to End Assembly 10 Step 10 Final Frame Adjustments 10 Use of Accessories 11 Tilting your Z44TM New Millennium 12 Folding and Storing your Z44TM New Millennium 13 Quilting Instructions and Tips Preparing the Fabric Layers For Installation 14 Fabric Installation 14 Making ...

Page 2: ......

Page 3: ......

Page 4: ...ce Z44TM New Millennium Quilting Frame which may be shown to be defective This Lifetime Warranty does not cover parts damaged through misuse improper storage improper assembly loss natural events and willful or accidental destruction Defective parts may be returned only with a valid RMA which may be obtained by calling GraceWood Inc at 801 485 6688 Warranty registration card must be returned withi...

Page 5: ...e to Diagonal Stands Parts Needed Right and Left Diagonal Stands 6 5 16 x2 Carriage Bolts longer 6 Jamb Nuts 6 1 4 Smaller Flat Washers 8 Plastic Rollers Note direction carriage bolt goes through the part Tighten jamb nuts on carriage bolts to pull the square part of the bolts into the wood until they are seated into the wood parts Slide two plastic rollers onto both top Carriage Bolts and one Pla...

Page 6: ... 2 5 16 x 1 3 4 Carriage Bolts shorter 2 1 4 Smaller Flat Washers 2 Jamb Nuts 2 Plastic Rollers Note direction carriage bolt goes through the part Tighten nuts on carriage bolt to pull the square part of the bolt into the wood until the bolt is seated into the wood part Slide the plastic rollers onto the bolts as pictured These will rest on the bolt loose and be held in place by the Diagonal Stand...

Page 7: ... are already installed on the Pivot S e c t i o n s a n d the Diagonal Stands through the holes as shown on the pictures The carriage bolt at the top of the Diagonal Stand goes into the long slot of the Pivot Section and receives a 5 16 flat washer and nylon lock nut The carriage bolt at the bottom of the Pivot Section goes into the slot in the Diagonal Stand and receives a large fender washer and...

Page 8: ...s 2 Nylon Lock Nuts Before beginning be sure the Plastic Rollers are in place on the carriage bolts as directed in Steps 2 and 3 The carriage bolt in the Pivot Section goes into the Rachet Slot of the Pole Mounting End The Pole Mounting End s carriage bolt fits into the horizontal slot next to the L or R in the Pivot Section With the End pieces fastened place a large fender washer onto both carria...

Page 9: ... When tightening the nylon lock nuts leave them loose enough to spin the washer and slide the joint Step 6 Brace Assembly ...

Page 10: ...evious page Follow the line up of holes as indicated in the pictures according to the size of the frame that you are assembling Notice the position of the inserted metal T Nuts Be sure they are facing outside Put the 5 16 washer on the 5 16 x 1 bolt and start it through the slot first continuing through the round hole into the inserted metal T nut By hand begin to tighten all the bolts onto the th...

Page 11: ...cated on the inside of the Diagonal Stand Place a Connector Bolt through the hole of the Diagonal Stand from the outside and into the keyed end of the brace Place a rectangle nut in the brace slot so that the threaded hole lines up with the bolt Thread the bolt through the rectangle nut and completely tighten using the alan wrench Continue this procedure until all four bolts are holding the Lower ...

Page 12: ...to the ends of the Quick Release Hooks This is done by slipping the springs over the knob as pictured Place the Quick Release Hook assembly into the slots that are cut into the end of each D Pole Next place a plastic Pole Cap onto the end of each D Pole The slotted side of the Pole Cap goes in the inside Connecting Pole to Pole Look at the rails needed to make the size you have selected Align the ...

Page 13: ......

Page 14: ...ase Hook back then release it into the hole Test the cog stop to make sure it fits snug into the teeth of the wheel If it does not slip the wheel off and flip it around so the teeth go the other direction TIP With the first pole in place it may be necessary to adjust the width of the frame with the slots in the braces so that the pole will roll freely but will not will not move more than 1 16 from...

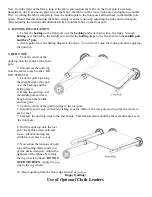
Page 15: ...uts on the outside Diagonal Stands one on each side STEP 2 Lift the pole assembly up and allow it to slide down STEP 3 The pole assembly will drop down until it rest diagonal against the stand see right STEP 4 Re tighten the two wing nuts loosened in Step 1 STEP 5 Loosen the wing nuts on the Base Legs one on each side STEP 6 Lift the frame by the brace until the Base Legs drop in the slot STEP 7 G...

Page 16: ... For Queen and King size we recommend adjusting tilt one side at a time STEP 3 Slide Pole Assembly forward again until the bolts on both ends rest completely seated between teeth in tilt arch STEP 4 Re tighten the wing nuts on the Pivot Section NOTE IF THE FRAME PARTS DO NOT MOVE AT THE JOINTS SMOOTHLY CHECK THE NYLON LOCK NUTS AND MAKE SURE THEY ARE NOT OVER TIGHTENED ALSO CHECK TO MAKE SURE THE ...

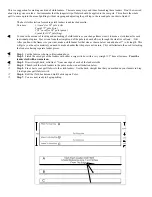
Page 17: ...round the back side of the front and middle poles The bar with the cloth sleeve should rest on top of the two poles with the sleeve facing toward the work area There are four tightness settings available The best one will depend on the angle of your poles as they rotate around Example If you are clamping down on the corner of the front pole you will need to clamp down in a less tight setting To te...

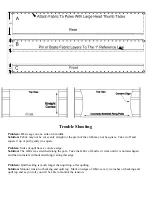
Page 18: ...ece of fabric and are pieced together using two fabric pieces with a seam down the middle or three fabric pieces with two seams having been sewn You can also sew your back fabrics together using crosswise piecing Front Pole Backing fabric 1 Mark the center of Backing fabric with a pin or a pencil mark 2 Tack the center mark to the center of the front pole The Backing fabric is put on with the wron...

Page 19: ...ilt top 3 QUILT TOP 1 Tack the center of the quilt top onto the center of the front pole 2 Smooth out the quilt top from the center to each corner DO NOT STRETCH 3 Tack the quilt top along the straight edge of the pole over the backing and the batting layers 4 Drape the quilt top over the middle pole and let it hang between the middle and rear poles 5 Tack the center of the quilt top edge to the r...

Page 20: ...out half way through the slant or cut end OR After you know the frame size you want make a cloth leader for that size as shown below and add about 7 to its length This will give you the extra material you need to make a header that the pole can slide into This will eliminate the need for tacking the leader or having separate leader pieces Step 1 Cut the fabric as shown in illustration above Step 2...

Page 21: ... have a concave edge Solution The fabric was stretched along the pole Take the fabric off and let it relax until it is not misshapen and then re install without stretching it along this edge Problem Quilt backing is much longer than quilt top after quilting Solution Monitor tension of backing and quilt top Mark on edges of fabrics every six inches on backing and quilt top and as you roll you will ...

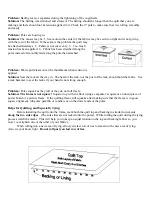
Page 22: ...he tack should hold the fabric Use a tack hammer to seat the tacks if your hand is not strong enough Problem Poles squeak as they roll or they do not roll freely Solution The frame is not square Square it up with the floor using a carpenter s square or an uncut piece of poster board or a picture frame If the quilting frame still squeaks after making sure that the frame is in good square alignment ...

Reviews: