background image

10

Settings

Auto Scanning for Channels

The Auto Channel Scan must be run before any channels can be viewed on the television.

1.  Press the Source button to switch to TV mode.
2.  Press the Setup button to access the setup menu.
3.  Press the Arrow (



) buttons to highlight the CHANNEL icon. Press the Enter button.

4.  Press the Arrow (



) buttons to highlight Air/Cable. Press the Arrow (



) buttons to select AIR.

5.  Press the Arrow (



) buttons to highlight Auto Scan. Press the Enter button to begin scanning  

for available channels. 


Note: Initial channel scanning process may take up to 15 min.

Parental Controls (V-Chip)

1.  Press the Source button to switch to TV mode.
2.  Press the Setup button.
3.  Press the Arrow (



) buttons, highlight LOCK, and press the Enter button.

4.  Enter the default passcode to access the 

LOCK preferences. The default passcode is 0 0 0 0.

5.  From this menu, you can lock specific ratings from the United States rating system or the Canadian rating 

system by accessing the V-CHIP settings. You can also lock the buttons on the television or lock specific 

sources from access.

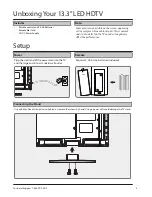
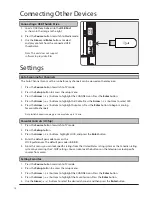
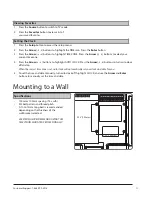
1.  Load a USB thumb drive into the USB Port 

as shown in the image to the right.

2.  Press the Source button to switch to Media mode.
3.  Use the Arrow and Enter buttons to select  

and play content from the connected USB  

thumb drive. 


Note: This unit does not support 

software to play video files.

Connecting Other Devices

Connecting a USB Thumb Drive

DC IN 12V

Setting Favorites

1.  Press the Source button to switch to TV mode.
2.  Press the Setup button to access the setup menu.
3.  Press the Arrow (



) buttons to highlight the CHANNEL icon. Press the Enter button.

4.  Press the Arrow (



) buttons to highlight the Favorites icon. Press the Enter button.

5.  Use the Arrow (



 buttons to select the desired channels and then press the Enter button.

Summary of Contents for TE1384B

Page 1: ...USER S GUIDE V 973 01 For the most up to date version of this User s Guide go to www gpx com TE1384B 13 3 LED HDTV...

Page 2: ...ARNING Do not place this unit directly onto furniture surfaces with any type of soft porous or sensitive finish As with any rubber compound made with oils the feet could cause marks or staining where...

Page 3: ...finish protect your furniture with a cloth or other protective material WARNING Changes or modifications to this unit not expressly approved by the party responsible for compliance could void the user...

Page 4: ...nnecting Devices to Your TV 8 Connecting a TV Antenna Connecting Cable Connecting HDMI Connecting Composite Audio Video Connecting a Computer Connecting Optical Audio Connecting USB Drives Settings 10...

Page 5: ...luded Power Remote Connecting the Stand Use a phillips head screwdriver to tighten or remove the screws by hand Using a power drill could damage the TV stand Some pixels may be visible on the screen a...

Page 6: ...ntation TV TOP CONTROLS TV REAR INPUTS Optical Input Stereo Headphone Jack TV Antenna Composite Audio Input Composite Video Input VGA PC Input HDMI Input USB Plug AC Power Plug to DC Input Volume Chan...

Page 7: ...ause in Media Mode Stop Press to stop in Media Mode Skip Forward Press to skip forward in Media Mode Source Press and use the Arrow Enter buttons to adjust the source Display Press to view the on scre...

Page 8: ...e input on the television 2 Press the Source button to switch to TV mode 3 Press the Setup button to access the setup menu 4 Press the Arrow buttons to highlight the CHANNEL icon Press the Enter butto...

Page 9: ...button to switch to the PC Mode 3 Audio from the connected PC can be input to the television through the TV s PC Audio Input by using a 3 5mm audio cable not included You will need a receiver with a...

Page 10: ...ences The default passcode is 0 0 0 0 5 From this menu you can lock specific ratings from the United States rating system or the Canadian rating system by accessing the V CHIP settings You can also lo...

Page 11: ...o highlight AUTO CLOCK Press the Arrow buttons to turn auto clock off and on When the correct time zone is set auto clock will automatically set your clock and date for you 5 To set the time and date...

Page 12: ...Initiative Environmental Commitment to Protect for Today and Sustain for Tomorrow On a continual basis DPI Inc is making efforts to sustain the environment and improve the recyclability of its product...

Reviews: