background image

8

Connecting Devices to Your TV

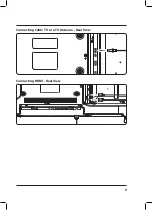
Connecting Cable TV or a TV Antenna

Requires a cable TV or "over-the-air" TV antenna wire (not included).

1.  Connect the 

Cable/Antenna

 wire to the input on the television. 

2.  Press the 

Source

 button to switch to 

TV mode

.

3.  Press the 

Setup

 button to access the setup menu.

4.  Press the 

Arrow

 (



) buttons to highlight the 

Channel

 icon, and press the 

Enter

 button.

5.  Press the 

Arrow

 (



) buttons to highlight 

Air/Cable

. Press the 

Arrow

 (



) buttons  

to select 

AIR or Cable

.

6.  Press the Arrow (



) buttons to highlight 

Auto Scan

. Press the Enter button to begin scanning  

for available channels.

NOTE: In any Source mode, you can press the 

c/ − button 

on the remote to switch back to TV mode.

Connecting HDMI 

HDMI offers superior sound and picture quality when compared to other AV connection types, and is the easiest 
way to connect your media devices to the television. 
Use HDMI with Audio Return Channel (ARC) to connect to a compatible audio receiver with a standard HDMI cable, 
no stereo or optical audio cables will be needed. 

Note: ARC may not support surround sound (5.1) or other audio with 

more than two channels (2.0).

Requires a device that supports HDMI and a HDMI cable (not included).

1.  Connect the device’s 

HDMI output

 to an 

HDMI input

 on the television. 

2.  Press the 

Source

 button to switch to the connected input 

HDMI

.

Summary of Contents for TDE3274 v2534-01

Page 1: ...32 LED HDTV DVD User s Guide for Model TDE3274 v2534 01 For the most up to date version of this User s Guide go to www gpx com...

Page 2: ...the televisions set is not overhanging the edge of the supporting furniture Not placing the televisions set on cloth or other materials that may be located between the televisions set and supporting f...

Page 3: ...batteries might have been swallowed or placed inside any part of the body seek immediate medical attention CAUTION Danger of explosion if battery is incorrectly replaced Replace only with the same or...

Page 4: ...udio Video Connecting a Computer Connecting Optical Audio Connecting the Stereo Audio Output DVD CD 14 Playing a DVD or CD Programming a DVD or CD DVD Setup Menu USB SD MMC MS Memory Card 15 Using a U...

Page 5: ...vely affect the performance or picture quality Connecting the Stand Take care not to place the TV on a surface that will scratch or damage the TV housing or screen Using a phillips head screwdriver ti...

Page 6: ...utput Headphone Jack Optical Audio Output Stereo Audio Input Composite Video Input Y Component Video Input Y Pb Pr HDMI TV Antenna Cable Input PC Audio Input 3 5mm VGA PC Video Input HDMI MHL Mobile H...

Page 7: ...on guide Freeze Press to freeze or unfreeze the current frame in TV mode Channel Press to change the TV channel DVD Menu Open the DVD menu Prog Press to program a loaded disc to play titles chapters o...

Page 8: ...scanning for available channels NOTE In any Source mode you can press the channel button on the remote to switch back to TV mode Connecting HDMI HDMI offers superior sound and picture quality when com...

Page 9: ...9 HDMI HDMI HDMI Connecting Cable TV or a TV Antenna Rear View Connecting HDMI Rear View...

Page 10: ...orresponding color coded video inputs on the television with a Composite Video cable 2 Connect the audio output on your media device to the corresponding color coded audio input on the television with...

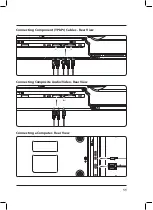
Page 11: ...11 Connecting a Computer Rear View Connecting Composite Audio Video Rear View Connecting Component YPbPr Cables Rear View...

Page 12: ...AVE NO EFFECT Connecting Optical Audio Requires a Digital Optical Audio Cable not included and an audio receiver with a Digital Optical Input 1 Connect the Digital Optical Audio Cable from the Optical...

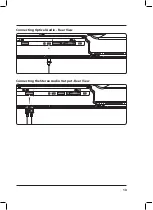
Page 13: ...13 Connecting the Stereo Audio Output Rear View Connecting Optical Audio Rear View...

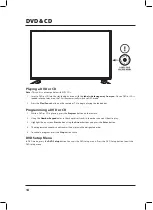
Page 14: ...press the DVD Setup button to access the DVD setup menu Press the DVD Setup button to exit the DVD setup menu Programming a DVD or CD 1 While a DVD or CD is playing press the Program button on the re...

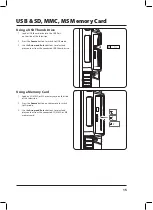
Page 15: ...he Arrow and Enter buttons to select and play content from the connected USB thumb drive USB SD MMC MS Memory Card Using a Memory Card 1 Load an SD MMC or MS memory card on the side of the television...

Page 16: ...ed favorites Setting the Clock 1 Press the Setup button to access the setup menu 2 Press the Arrow buttons to highlight the Time icon and press the Enter button 3 Press the Arrow buttons to highlight...

Page 17: ...200mm x 100mm spacing wth x ht M6 bolt pattern and thread pitch A 15 25mm long bolt is recommended depending on the thickness of the wall bracket selected We strongly recommend having this television...

Page 18: ...de l utilisateur en anglais espagnol ou fran ais ou pour obtenir des r ponses des questions fr quemment pos es consultez la rubrique d assistance sur www gpx com Contact Information Website www gpx co...

Reviews: