GPO US 40H User Manual Download Page 14

www.gpous.com 

User manual  

 Commercial 

   LCD Series 

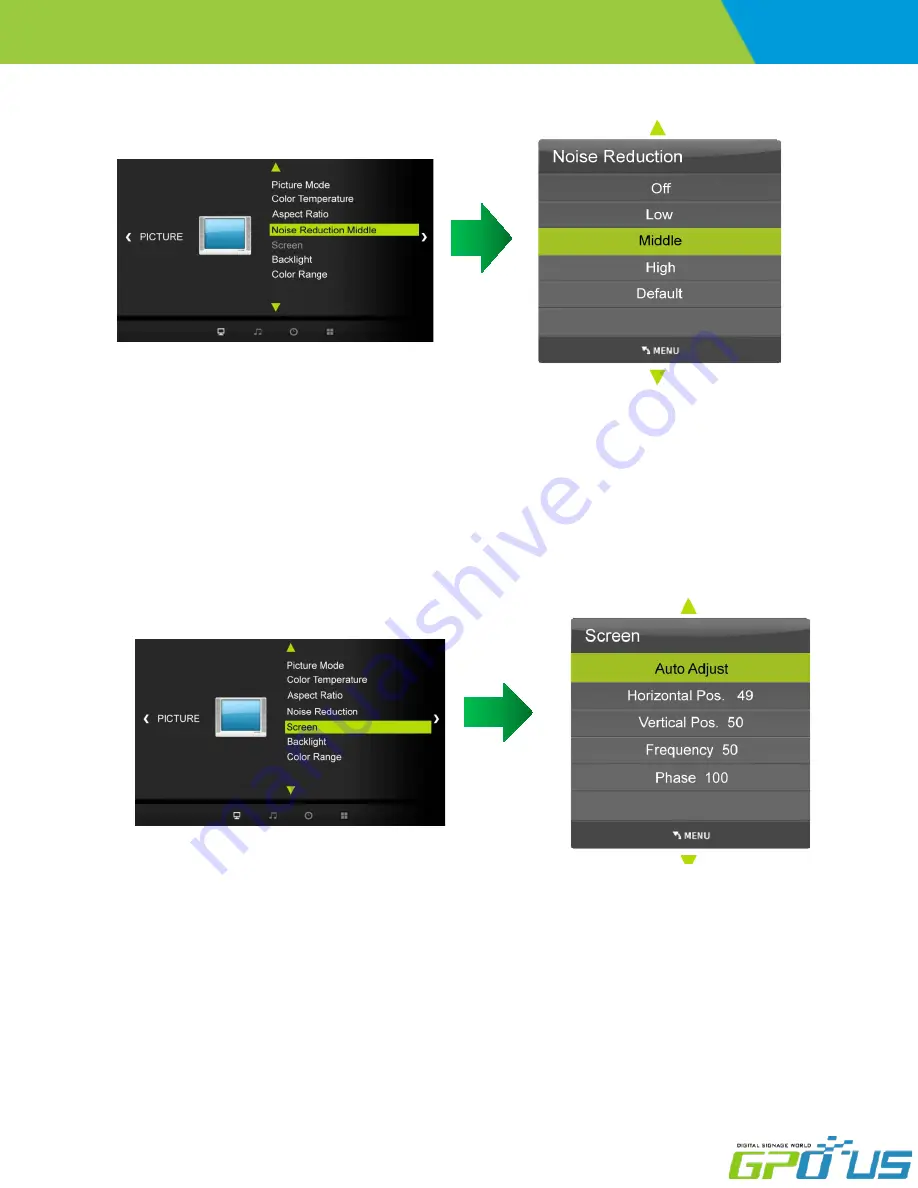
Select the picture appearance to suit your preference and viewing situations.  

a. Press the 

MENU 

button and then 

/

 buttons to select the 

PICTURE 

icon. 

b. Press the 

/

 buttons and then use 

ENTER 

button to select 

Noise Reduction 

menu  

c. Press the 

ENTER 

button and then use 

/

 buttons to select the desired picture option;  

Off, Low, Middle, High, Default. 


d. Press 

EXIT 

button to return to monitor viewing or press 

MENU 

button to return to the previous menu.  

 4) Noise Reduction 

 5) PC Menu 

a. Press the 

MENU 

button and then use 

/


buttons to select the 

PICTURE 

icon.  

b. Press the 

/


buttons and then use 

ENTER 

button to select 

Screen Menu

.  

c. Press 

/


buttons and then use 

/


buttons to make desired adjustments.  

d. Press 

EXIT 

button to return to monitor viewing or press 

MENU 

button to return to the previous menu.  

Summary of Contents for 40H

Page 1: ...us com User manual Commercial LCD Series User Manual Commercial LCD 40M H 42M H 46M H 46UH 47M H 55M H 65M Before operating the unit please read this manual thoroughly and retain it for future reference Models ...

Page 2: ...uctions are for use by qualified service personnel only To reduce the risk of electric shock do not perform any service other than that contained in the operating instructions unless you are qualified to do so CAUTION RISK OF ELECTRIC SHOCK DO NOT OPEN CAUTION TO REDUCE THE RISK OF ELECTRIC SHOCK DO NOT REMOVE COVER OR BACK NO USER SERVICEABLE PARTS INSIDE REFER SERVICING TO QUALIFIED SERVICE PERS...

Page 3: ...isplay combination to avoid injury from tip over 13 Unplug this display during lightning storms or when unused for long periods of time 14 Refer all servicing to qualified service personnel Servicing is required when the display has been damaged in any way such as power supply cord or plug is damaged liquid has been spilled or objects have fallen into the display the display has been exposed to ra...

Page 4: ...t Source 2 POWER Turns the LCD Display On and Off 3 UP Controls the UP cursor in the menu 4 LEFT Controls the LEFT cursor in the menu 5 RIGHT Controls the RIGHT cursor in the menu 6 DOWN Controls the DOWN cursor in the menu 7 ENTER Controls the ENTER cursor in the menu 8 MENU Displays the main On Screen menu 9 EXIT Exits the On Screen menu ...

Page 5: ...d or unevenness surface wall and build into wall Ensure that electrical outlet s are capable of supporting this product s power consumption Clearance for Ventilation When installing the product make sure there is at least 20cm clearance on all sides for effective ventilation and do not seal the product in an enclosed space If the product is installed in a location with poor ventilation the interna...

Page 6: ... cover the fan ventilation holes If the holes are covered the internal temperature can rise rapidly causing malfunction Cleaning and Maintenance Regularly clean the vent holes in the back of product sets If the vent holes and the fan ventilation holes are clogged with dust air flow inside of the product will be inhibited This can cause rapid increase of the internal temperature and may cause malfu...

Page 7: ...r manual Commercial LCD Series 1 HDMI1 Input 2 HDMI2 Input 3 PC RGB Input 4 PC RGB Audio Input 5 RS232 Input 6 Component Input 7 Component Audio Input 8 AV Input 9 AV Audio Input 10 AC Power In 100 240V 11 AC Power S W ...

Page 8: ... On toggle 3 OSD KEY Input Power Menu Source Right Left Up Down a Power Turns the LCD Display On Off b Menu Displays the main On Screen menu c Source Selects Input Source d Left Right Moves from one menu item to another horizontally or adjusts selected menu values Adjusts the audio volume e Up Down Moves from one menu item to another vertically or adjusts selected menu values ...

Page 9: ...el 1 To show and remove the Menu Press the MENU button on the Remote Control to display the menu A second press of the MENU button or a press of the EXIT button will take you back to monitor viewing 2 To go to the next level Press ENTER on the Remote Control 3 To go back to the previous level Press MENU or EXIT on the Remote Control 4 Typical Menu Operation a Press MENU button The main menu will a...

Page 10: ...adjust the volume b If you wish to switch the sound off press the MUTE button on the remote control c You can cancel this function by pressing the MUTE or VOL button 3 On Screen Menus Language Selection There are several languages in which the menus can be displayed Select your desired language by following these steps a Press the MENU button and then use button to select the OPTION icon b Press t...

Page 11: ...on and Adjustment 1 How to adjust the OSD screen a Press the MENU button and then button to select each menu b Press the ENTER button and then use button to display the available menus Your monitor s OSD On Screen Display may differ slightly from what is shown in this manual ...

Page 12: ...the picture appearance to suit your preference and viewing situations a Press the MENU buttons and then button to select the PICTURE mode b Press the buttons and then use ENTER button to select Picture Mode menu Standard Dynamic Mild User c Press the button to select Picture Mode User menu Contrast Brightness Color Sharpness Tint d Press ENTER button and then use buttons to make appropriate adjust...

Page 13: ...ption User Cool Medium Warm d Press the buttons to select Picture Mode User menu Red Green Blue e Press EXIT button to return to monitor viewing or press MENU button to return to the previous menu 2 Color Temperature Control 3 Aspect Ratio Selects the screen format a Press the MENU button and then use buttons to select the PICTURE icon b Press the buttons and then use ENTER button to select Aspect...

Page 14: ... buttons to select the desired picture option Off Low Middle High Default d Press EXIT button to return to monitor viewing or press MENU button to return to the previous menu 4 Noise Reduction 5 PC Menu a Press the MENU button and then use buttons to select the PICTURE icon b Press the buttons and then use ENTER button to select Screen Menu c Press buttons and then use buttons to make desired adju...

Page 15: ...revious menu 6 Backlight 7 Color Range a Press the ENTER button Range scaling changes from 16 234 to 0 255 6 Sound Menu Options 1 Sound standard Mode Adjust the sound to suit your taste and room situations a Press the MENU button and then use button to select the SOUND icon b Press the button and then use ENTER button to select Sound Mode menu Standard Music Movie Sports User c Press the button an...

Page 16: ...EXIT button to return to monitor viewing or press MENU button to return to the previous menu 2 Sound Balance 3 Auto Volume Automatic Volume Level Control Adjust the sound to suit your taste and room situations a Press the MENU button and then use buttons to select the SOUND icon b Press the buttons and then use ENTER button to select the Auto Volume menu c Press ENTER button to make desired adjust...

Page 17: ...urn to monitor viewing or press MENU button to return to the previous menu 4 Surround Sound 5 User Control for 5 Band Equalizer f the Equalizer settings are changed sound mode setting is switched to User automatically a Press the MENU button and then use buttons to select the SOUND icon b Press the buttons to select the EQ Equalizer menu c Press the ENTER button and then use buttons to make desire...

Page 18: ...English French Español Deutsch Italiano Portugues Chinese etc d Press EXIT button to return to monitor viewing or press MENU button to return to the previous menu 7 Setup Menu Options 1 Language 2 Set ID a Press the MENU button and then use buttons to select the OPTION icon b Press the buttons to select the SET ID Menu c Press the ENTER button and then use buttons to select SET ID options d Press ...

Page 19: ... the buttons to set Show Time options e Press EXIT button to return to monitor viewing or press MENU button to return to the previous menu 3 2 Slide Show Option Menu Show Time Show Effect a Press the MENU button and then use buttons to select the OPTION icon b Press the buttons to select the Slide Show Option Menu c Press the ENTER button and then use buttons to select the Show Effect Menu d Press...

Page 20: ...tton to return to the previous menu Enables disables auto dimming control by light ambient sensor a Press the MENU button and then use buttons to select the OPTION icon b Press the buttons to select the Dimm Control Menu c Press the ENTER button and then use buttons to select the Dimming Menu d Press the buttons to select the Auto Dimming functions e Press the buttons to set Auto Dimming options f...

Page 21: ...OPTION icon b Press the buttons to select the Dimm Control Menu c Press the ENTER button and then use buttons to select the Dimming Menu d Press the buttons to select the Max Ambient functions e Use buttons to set detected light ambient value by LUX unit f Press EXIT button to return to monitor viewing or press MENU button to return to the previous menu 4 1 4 Dimming Menu MIN Ambient Light Ambient...

Page 22: ... Control Menu c Press the ENTER button and then use buttons to select the Fan Control functions d Press the buttons to set Off On Auto options e Press EXIT button to return to monitor viewing or press MENU button to return to the previous menu 5 Heat Control 5 1 Fan Control Menu 5 2 Fan Control Menu Active Temperature Adjusts fan driving temperature by degrees Celsius It works only when the Fan Co...

Page 23: ... the monitor enters shutdown mode a Press the MENU button and then use buttons to select the OPTION icon b Press the button to select the Heat Control Menu c Press the ENTER button and then use buttons to select the Shutdown Temperature Menu d Use buttons to set fan driving hysteresis temperature by degrees Celsius e Press EXIT button to return to monitor viewing or press MENU button to return to ...

Page 24: ...TER button to select the Details Menu Off Low Middle High 8 OSD Duration When downloading software via USB memory a Press the MENU button and then use Must be new version software merge bin in USB memory 9 Software Update USB Adjusting the keep the time OSD a Press the MENU button and then use button to select the OPTION icon b Press the button to select OsdDuration menu c Press the ENTER button t...

Page 25: ...setting is wrong reset the clock manually a Press the MENU button and then use buttons to select the TIME icon b Press the ENTER button and then use buttons to select Clock c Press the buttons to select the Hour Minute d Use buttons to adjust clock e Press EXIT button to return to monitor viewing or press MENU button to return to the previous menu ...

Page 26: ... activation e Press EXIT button to return to monitor viewing or press MENU button to return to the previous menu 3 Off Timer Timer function operates only if current time has been set a Press the MENU button and then use buttons to select the TIME icon b Press the ENTER button and then use buttons to select Off Timer c Press the button and then use buttons to select the On OFF d Use buttons buttons...

Page 27: ...electing the menu press the ENTER button c Using button in the remote control to select the content to play d To go back to the previous menu press button then select Return item and then press ENTER button e To exit from the Menu press SOUTCE button in the remote control and change the input source Press the ENTER button to see the Play menu The menu will be showed during playing the contents To ...

Page 28: ...to Production In the case of JPG the designer should use baseline JPG form The photo taken by digital camera can not play due to CMIK compression The media board has no ability of extrusion directly from the board The photo can not play if the size of any side over 4096 in resolution When creating an image check the supported Codecs If the Codec is not supported the image cannot play or interrupti...

Reviews: