background image

1

Safety Instructions 

• To ensure the best safety of the exerciser, regularly check 

for damage

 and worn parts.

• If you pass on this exerciser to another person or if you allow another person to use it, make sure

that that person is familiar with the content and instructions.

• Only one person should use the exerciser at a time.

• Before the first use and regularly make sure that all screws, bolts and other joints are properly

tightened and firmly fixed.

• Before you start your work-out, remove all sharp-edged objects around the exerciser.

• Only use the exerciser for your work-out if it works without problem.

• Any broken, worn or defective part must immediately be replaced and/or the exerciser must no

longer be used until it has been properly maintained and repaired.

• Children should use the exerciser only under adult supervision and be instructed on the correct

and proper use of the exerciser. The exerciser is not a toy.

• Make sure there is sufficient free space around the exerciser when you set it up.

• Please note that an improper and excessive work-out may be harmful to your health.

• Please note that levers and other adjustment mechanisms are not projecting into the area of

movement during the work-out.

• Always wear appropriate clothing and shoes which are suitable for your work-out on the

exerciser.The clothes must be designed in a way so that they will not get caught in any part of the
exerciser during the work-out due to their form (for example, length). Be sure to wear appropriate
shoes which are suitable for the work-out, firmly support the feet and which are provided with a
non-slip sole.

• Be sure to consult a physician before you start any exercise program.

• Be sure to set up the exerciser in a dry and even place and


always protect it from humidity. If

you


wish


to protect the place particularly against pressure points,


contamination,


etc.,

it

 is re

commended to put a suitable, non-slip mat under the exercise

.

• Stop your work-out immediately in case of dizziness, nausea, chest pain or any other physical

symptoms. In case of doubt, consult your physician immediately.

• Children, disabled and handicapped persons should use the exercise only under supervision and

in presence of another person who may give support and useful instructions.

• Be sure that your body parts and those of other persons are never close to any moving parts of

the exerciser during its use.

• When adjusting the adjustable parts, make sure they are adjusted properly and note the marked,

maximum adjusting position, for example of the saddle support, respectively.

• Do not work out immediately after meals!

Summary of Contents for Bodyworx ARX700

Page 1: ...Model No ARX700 RECUMBENT BIKE Retain this owner s manual for future reference Read and follow all instructions in this owner s manual Version A...

Page 2: ...tep 3 Call Our Toll Free Number If a warranty service request is required on your product please call the toll free number 1800 005 770 Congratulations on purchasing your product we at GPI believe tha...

Page 3: ...ng the work out Always wear appropriate clothing and shoes which are suitable for your work out on the exerciser The clothes must be designed in a way so that they will not get caught in any part of t...

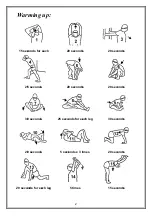
Page 4: ...ds for 5 seconds 0 seconds 0 seconds onds for ea up each s s s ach leg 20 20 25 seco 5 seco 2 0 seconds 0 seconds onds for ea onds x 3 t 5 times s s ach leg times 20 20 30 20 15 0 seconds 0 seconds 0...

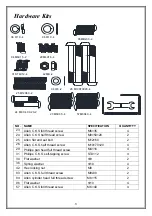
Page 5: ...2 4 34 Flat washer 8 2 36 Spring washer 10 4 42 Hex locking nut M8 2 93 Allen C K S full thread screw M8x30 2 94 Allen cylinder head full thread screw M6 15 2 96 Flat washer 10 4 57 Allen C K S full t...

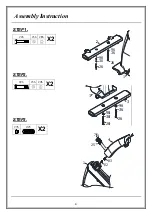
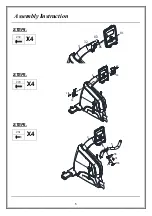
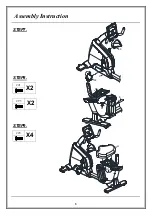
Page 6: ...S S S Assem STEP 1 26 STEP2 26 STEP3 76 mbly I 36 9 36 9 25 X Instru 96 X2 96 X2 X2 uction 4 2 1 25 76 1 26 36 2 96 26 36 96 4 6 83 82 26 36 96 6 6 26 36 6 96 4 3 1 3...

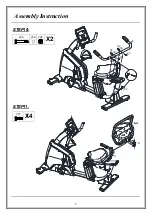
Page 7: ...S S S Assem STEP4 32 X STEP5 29 X STEP6 31 X mbly I X4 X4 X4 Instru uction 29 5 4 9 54 32 83 4 4 3 86 31 81 29 55 56 65 31 1 5...

Page 8: ...6 Assembly Instruction STEP7 STEP8 21 X2 93 X2 STEP9 23 X4 64 63 1 8 93 21 60 23...

Page 9: ...S S Assem STEP10 24 STEP11 57 X mbly I 0 34 4 1 X4 Instru 42 X2 uction 7 24 42 34 42 34 88 11 24 87 6 61 57 1...

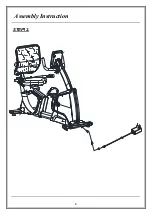
Page 10: ...8 Assembly Instruction STEP12...

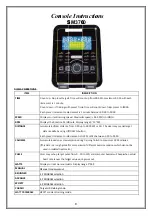
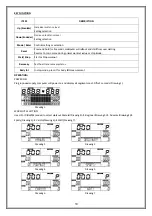
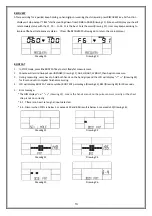
Page 11: ...guide f dical treatmen up target puls s over the targ nt workout wa workout election election election ning mode t training mod 9 Inst SM376 D t Time will co th preset Time ecrement is 1 eed Maximum M...

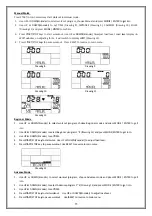
Page 12: ...io Drawing 6 ng 2 ng 4 ng 6 se resistance l g selection ase resistance g selection m setting or se and hold for 2 e to main me or Stop workou eart rate recov p mode press wer on and di orkout Manua W...

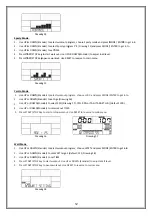
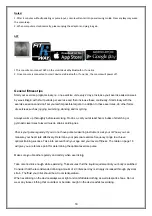
Page 13: ...r to selec coder to set T y to start work y to pause wo orkout in man ct workout pr et TIME Dra NTER to confir oorkout Use it will switch ect workout p ct Beginner pr TIME to start work Use UP or DOWN...

Page 14: ...UP or DOWN Encoder to adjust Watt level 5 Press START STOP key to pause workout Use RESET to reverse to main menu Drawin ng 14 coder to selec coder to selec coder to set T y y ng 15 Use UP or DOWN Enc...

Page 15: ...sensors correctly or the chest strap is not on correctly AT is below 5 or exceeds 50 and BMI result is below 5 or exceeds 50 Drawing 26 ng 21 ng 23 ng 25 ing on hand g s counting dow to F6 F1 is us P...

Page 16: ...the oose clothing t pedaling or p t APP on the s s gram slowly i ort periods pe ghly before e avoid muscle regularly and gh while exe mmended drin nk should be device alwa that could te pulse input c...

Page 17: ...careful not get excessive moisture on the computer display panel as this might cause an electrical hazard or electronics to fail Please keep the recumbent bike specially the computer console out of d...

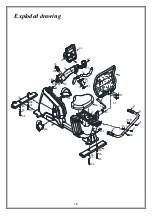
Page 18: ...16 Exploded drawing 4 5 25 29 29 32 54 55 56 65 76 81 83 23 60 57 64 63 1 90 26 26 36 36 26 26 36 36 8 94 59 2 3 61 82 89 87 31 31 96 96 96 96 6 90 90 24 24 42 42 34 34 88...

Page 19: ...3 0 2 9 2 9 3 2 3 4 3 5 3 6 3 6 3 6 3 6 3 7 3 7 3 8 3 9 3 9 4 0 4 0 4 2 4 2 4 2 4 2 4 3 4 4 4 4 4 5 4 5 4 6 4 7 4 8 4 9 5 0 5 1 5 2 5 3 5 4 5 5 5 6 5 8 5 9 6 0 6 1 6 2 6 2 6 2 6 2 6 3 6 4 6 5 6 6 6 6...

Page 20: ...llow screw 8 33 M6 15 2 21 Allen C K S full thread screw M6 15 6 22 Allen C K S full thread screw M8 20 5 23 Allen C K S full thread screw M6 35 4 24 Allen C K S half thread screw M8 40 20 2 25 Allen...

Page 21: ...rack cover right 1 51 Rear stabilizer cover left 1 52 Rear stabilizer cover right 1 53 Aluminum track end cover 1 54 Handlebar cover left 1 55 Handlebar cover right 1 56 Handlebar front cover 1 57 All...

Page 22: ...netic inductor L 200mm 1 85 Power communication wire L 750mm 1 86 Power adapter 240V 1 87 Spring wire L 2000mm 1 88 Handle pulse connection wire 1 L 2 100mm 1 89 Handle pulse connection wire 2 L 650mm...

Page 23: ...Model No KR6000PRO To register your warranty please go to www gpisports com au PROGRAMMABLE ROWER RECUMBENT BIKE Model No ARX700...

Reviews: