JSV3H
OM−05229
MAINTENANCE AND REPAIR
PAGE E − 9
2.
Inspect all mating surfaces and the rotor/shaft
assembly for nicks or burrs, and restore to
original contours with emery cloth or a fine file.
If the surface cannot be restored, replace the
part.
Cleaning Seal Assembly
Seal faces are precision-finished and sub-
ject to wear patterns which cannot be re-
aligned during assembly. The seal assem-
bly should be replaced completely at each
overhaul to ensure trouble-free operation.
If necessary to use an old seal in an emer-
gency,
never
mix old and new seal parts;
seal performance will be severely affected.
1.
Inspect the seal assembly for wear, scoring,
grooves, and other damage that might cause
leakage.
2.
Wash all seal parts in fresh cleaning solvent
and allow to dry thoroughly. Re-inspect the
parts after cleaning.
3.
If needed, clean the seal faces with a clean,
lint-free tissue. Wipe lightly in a concentric pat-
tern to avoid scratching the faces.
PUMP AND MOTOR REASSEMBLY
MOTOR REASSEMBLY
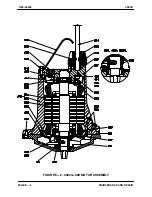
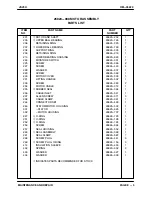
References are to FIGURE E−2.
Installing Bearings
NOTE
The bearings in this pump are permanently lubri-
cated.
When installing the upper bearing (203) on
the shaft,
never
press or hit against the
outer race, balls, or ball cage. Press
only
on the inner race. A sleeve with the same
diameter as the inner race is useful for in-
stalling the bearing.
When installing the lower bearing (207) in
the bearing housing,
never
press or hit
against the inner race, balls, or ball cage.
Press
only
on the outer race. A sleeve with
the same diameter as the outer race is use-
ful for installing the bearing.
1.
Lightly oil the upper and lower ends of the ro-
tor/shaft assembly (201).
NOTE
Heating the bearings will ease installation.
Never
heat bearings by direct flame
.
An induction
heater, hot oil bath or electric oven may be used.
If a hot oil bath is used to heat the bearings, both the
oil and the container must be absolutely clean, and
if the oil has been previously used, it must be thor-
oughly filtered.
Use tongs, insulated gloves, or other
protective devices when handling
heated bearings.
NOTE
Do not heat the bearings until ready to install. Heat it
to a uniform temperature no higher than 250
_
F
(120
_
C), and slide the bearings onto the shaft in
one continuous motion to prevent cooling and
sticking.
2.
Slide the upper bearing (203) onto the shaft
until it seats squarely against the shaft shoul-
der.


