background image

1.

2.

- Select the sleep time.

5.

6.

7.
8.

9.
10.
11.

- Press to access TELETEXT function.

12.

- Press to exit TELETEXT function.

13.

- Press this button once, the screen will

display the hidden text; press this button twice, the screen
will hide the hidden text.

14.

- Adjust the size of text under TELETEXT

interface (Press the button once, the enlarged screen will
display the top half text of the TELETEXT interface; press
the button twice, the enlarged screen will display the bottom
half text of the TELETEXT interface; press the button three
times, the screen will display the normal size of text under
TELETEXT interface).

15.

16.

17.

18.
19.

- Press to enter operation interface.

20.
21.

22.

23.

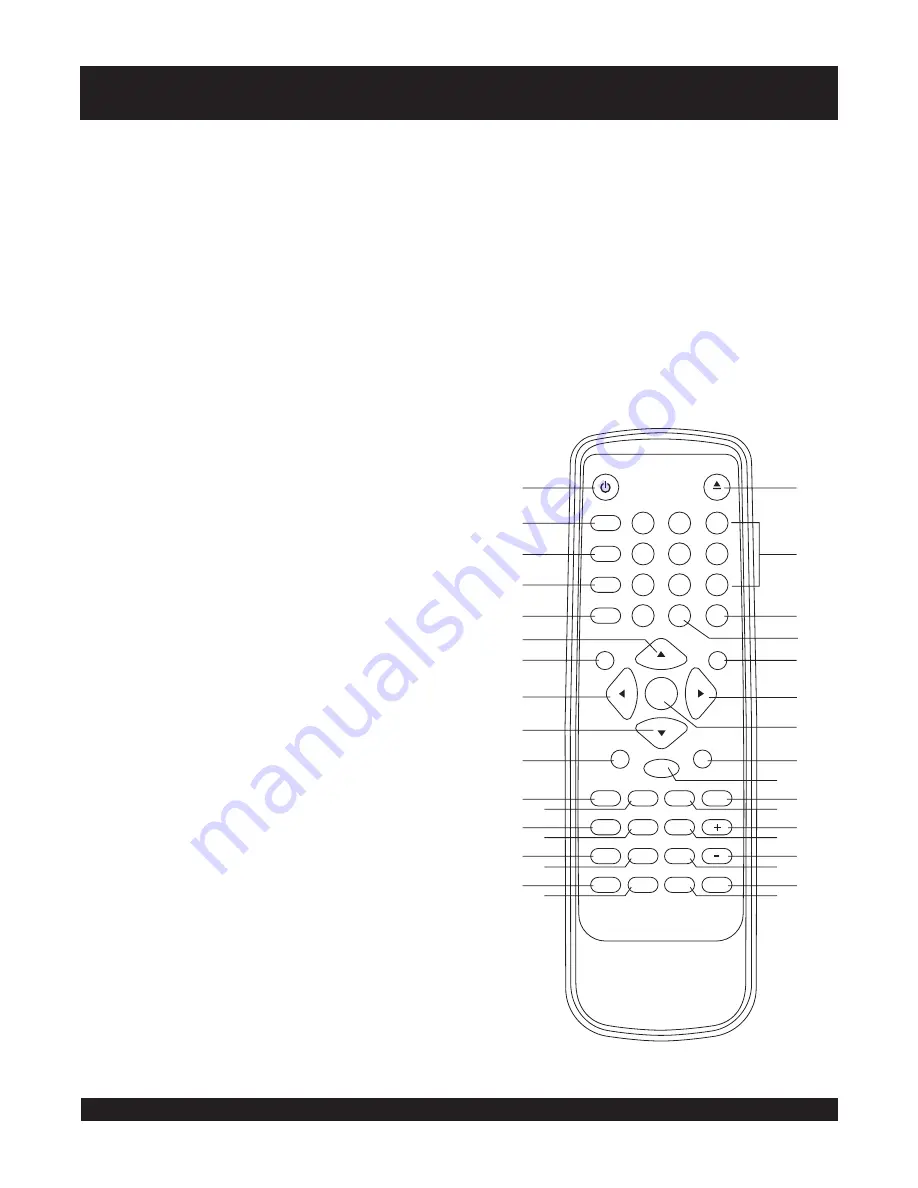
TIMER button

LEFT/RIGHT navigation buttons

RED

GREEN

TELETEXT button

CANCEL button

REVEAL button

SIZE button

SYS MENU button

3.

- Select the desired signal input mode.

4.

- Select Nicam function.

TV/AV button
NICAM/A2 button

POWER button

DISPLAY button

REPEAT A-B button

REPEAT 1/ALL button

PLAY button

PAUSE/STEP button

F.BWD (

) button

F.FWD (

) button

SUBTITLE button

ANGLE button

PROGRAM button

MENU/PBC button

SEARCH button

EJECT button

NUMERIC buttons

STOP button
SELECT button

SLOW button

NEXT button

- Press this button to set the player to

standby on or off state (if the main power of the set is on).

- Press Display button continuously during

the playback, the screen will display the elapsed time and
remaining time (DVD function key).

- Press this button, the player will

repeat sections between two specific points (A-B)(DVD
function key).

- Press this button, the player will

repeat play one chapter or one title (for DVD), or repeat play
the current track or the whole tracks (for VCD/CD) (DVD
function key).

- Press this button, the player will start to play

the disc (DVD function key).

- Press this button will halt or show the

movie one picture each time (DVD function key).

-This button will display the different

language on the screen (DVD function key).

- Press this button will display the angle

number and change to different angles (DVD function key).

- Press this button can setup the

memory order of chapter or title (for DVD) or tracks (for CD)
(DVD function key).

- Select Playback Control for VCD if

PBC is on, when you press return button, the player will stat
at the VCD root (DVD function key).

- Press this button during play then press

NUMERIC button to choose number corresponding to the
desired point (DVD function key).

(DVD function key)

- The tray in and tray out switch button (DVD

function key).

- Use these buttons to select the track.

- Press this button, the player will stop playing.

- Press this button to confirm what you

select.

- Press this button during playback the play

speed will be reduced (DVD function key).

- Press this button, the scene will skip to the

next chapter or the next track (DVD function key) .

ZOOM button

- Press ZOOM button to enlarge picture size

.

5

1

2

3

4

5

6

7

8

9

10

11

12

13

14

15

16

MUTE

1

2

3

4

5

6

7

8

9

0

POWER

DISPLAY

TV/AV

REPEAT

NICAM/A2

1/ALL

-/--

SYS MENU

PLAY

STOP

SELECT

PAUSE/STEP

SLOW

F.FWD

F.BWD

PREV

NEXT

SUBTITLE

ANGLE

AUDIO

MENU/PBC

TITLE/RET.

VOLUME

SEARCH

ZOOM

SETUP

EJECT

TIMER

A-B

TELETEXT

CANCEL

INDEX

REVEAL

SIZE

HOLD

23

24

25

26

27

28

29

30

17

18

19

20

21

22

CLEAR

7

31

32

33

33

24.

25.

26.

- Display the index of TELETEXT.

27.

28.

- To hold the TELETEXT playback.

29.
30.

31.
32.

33.

- Select the options under

OSD setting interface.

YELLOW

INDEX button

HOLD button

-/-- button

UP/DOWN navigation buttons

PREV (

)button

 button

AUDIO button

VOLUME - button

TITLE/RET. button

MUTE button
SETUP button

CLEAR button

- Press this button, the scene will

skip to the PREVIOUS chapter or the track (DVD function
key).

- Press this button, the volume will

increase.

- Select the sound track (DVD function key)

- Press this button, the volume will

reduce.

- Play the title (DVD) or return menu (

VCD) (DVD function key).

- shut off by pressing this button.

- Press this button will enter initial settings

menu (DVD function key).

- Clear the input information (DVD function

key).

PROGRAM

TV/

ENTER

CONTROL REFERENCE GUIDE - REMOTE CONTROL

Goodmans Helpline 0870 8730080

Summary of Contents for GTVL15N5DVD

Page 1: ...AUDIO MENU PBC TITLE RET VOLUME SEARCH ZOOM SETUP EJECT TIMER A B TELETEXT CANCEL INDEX REVEAL SIZE HOLD CLEAR PROGRAM INSTRUCTION MANUAL Read these instructions thoroughly before attempting to connect operate or adjust this player Retain the book for future reference TFT LCD TV DVD PLAYER MODEL GTVL15N5DVD TV ENTER Goodmans Helpline 0870 8730080 ...

Page 2: ...nd where children might see it WARNING To prevent fire or shock hazerd do not expose this unit to rain or moisture CAUTION DANGEROUS VOLTAGES EXIST INSIDE THIS UNIT DO NOT REMOVE COVER OR BACK NO USER SERVICEABLE PARTS INSEDE REFER SERVICING TO QUALIFIED SERVICE PERSONNEL DISCONNECT FROM MAINS SUPPLY WHEN NOT IN USE This wires in this mains lead are coloured in accordance with the following wiring...

Page 3: ... away from magnetic objects motors TV sets and transformers Do not place heavy objects on top of the unit Avoid exposing your unit directly to sunlight or other heat sources Put your unit in a well ventilated area away from high humidity The apparatus and AC DC adaptor shall not be exposed to dripping or splashing and that no objects filled with liquids such as vases shall be placed on apparatus I...

Page 4: ...LIDE SHOW EFFECTS ENJOYING VIDEO CDS WITH PLAYBACK CONTROL 19 ON SCREEN DISPLAY INFORMATION 20 PROGRAM PLAY 20 REPEAT PLAY 20 CHANGING SUBTITLE LANGUAGE DVD ONLY 21 ZOOM PLAY 21 CHANGING AUDIO SOUNDTRACK LANGUAGE DVD VCD DISC 21 VIEWING FROM ANOTHER ANGLE DVD ONLY 21 SEARCH FOR PREFERRED SCENE 21 CLEANSING OTHERS TROUBLE SHOOTING 23 CONTROL REFERENCE GUIDE MAIN UNIT 4 CONTROL REFERENCE GUIDE REMOT...

Page 5: ...NU BUTTON 12 BACKWARD SKIP SEARCH BUTTON 13 FORWARD SKIP SEARCH BUTTON 14 STOP BUTTON 15 PLAY PAUSE BUTTON 16 EJECT BUTTON BACK VIEW 17 IN SOCKET 18 AV IN RIGHT 19 AV IN LEFT 20 AV VIDEO IN 21 S VIDEO 22 SCART IN 23 VGA IN 24 DC 12V IN SOCKET SOCKET SOCKET SOCKET SOCKET SOCKET SOCKET 1 2 3 4 1 5 6 7 8 9 10 11 12 13 14 15 16 17 18 19 20 21 22 23 24 CONTROL REFERENCE GUIDE MAIN UNIT Goodmans Helplin...

Page 6: ...ction key Press this button will display the angle number and change to different angles DVD function key Press this button can setup the memory order of chapter or title for DVD or tracks for CD DVD function key Select Playback Control for VCD if PBC is on when you press return button the player will stat at the VCD root DVD function key Press this button during play then press NUMERIC button to ...

Page 7: ...remote control unit This may irremediable damage If the remote control unit is not going to be used for a long time remove the batteries Otherwise electrolyte may leak which may lead not only to malfunction but to burns if contact is made with the electrolyte Wipe away any electrolyte leaking inside the remote control and install new batteries If any electrolyte should come into contact with parts...

Page 8: ...ecting to the AC outlet Connecting to DVD VCD S Video Terminals Connecting to the TV Connecting to DVD VCD AV Terminals Connecting to PC Scart Cable Connecting to DVD with SCART video output connectors VGA in cable not included BASIC CONNECTION Goodmans Helpline 0870 8730080 AC adaptor ...

Page 9: ...en 4 The channel 34 is selected Once the input is done it will start broadcasting the selected channel immediately adjust the volume use the VOLUME UP DOWN buttons on the top unit or on the remote control TO 8 Press once the MENU button on top of the unit or on the remote control the screen will pop up a setting menu Use the MENU button on the remote control to confirm the item to be set use the A...

Page 10: ...the Sharpness Adjust the Colour by using the Arrow buttons until the desired effect is reached 3 Set the Contrast Adjust the Contrast by using the Arrow left right buttons until the desired effect is reached Adjust the Sharpness by using the Arrow left right buttons until the desired effect is reached 6 Set the Hue Adjust the Hue by using the Arrow buttons until the desired effect is reached Note ...

Page 11: ...uage Use the Arrow buttons to select the desired language Scroll to Reset When Reset is done the settings are cleared and return to default settings 1 Auto Tune 2 Manual Tune Scroll to Auto Tune and press Arrow right button to begin searching for and store channels automatically that are found press MENU button to exit the Auto Tune mode 4 TV CHANNEL SETTING Scroll to Manual Search and press Arrow...

Page 12: ...lifier Make sure this unit is connected to PC correctly Power the unit on press the POWER button on top of the monitor or on the remote control to turn on the TV use the TV AV button to switch to PC mode the icon PC is shown at the right top corner of the screen Turn on your PC and now you can use this player as a monitor NOTE 1 The default resolution of your PC should not exceed 1024X768 2 The fr...

Page 13: ... screen will move vertically 1 Adjust the volume 2 VGA SOUND SETTING Adjust the Volume until the desired effect is reached 3 Adjust the bass Adjust the Bass until the desired effect is reached 2 Adjust the treble Adjust the Treble until the desired effect is reached 4 Adjust the Balance Adjust the Balance until the desired effect is reached 1 Port select setting 3 VGA CONFIG SETTING Select the Por...

Page 14: ...V AV button Power on the external video device This unit features an S video input terminal allowing you to connect it to external video devices Make sure the connection is done correctly refer to the basic connection section Power this unit on and set the working mode to S VIDEO by means of the TV AV button Power on the external video device This unit provides auto protection against situations o...

Page 15: ...until the desired effect is reached 3 Set the Contrast Adjust the Contrast until the desired effect is reached 5 Set the Sharpness Adjust the Sharpness until the desired effect is reached 6 Set the Hue Adjust the Hue until the desired effect is reached Not for DVD 1 Set the mode 2 Set the Volume Adjust the mode by using the Volume up down buttons to scroll among the options Standard Movie Custom S...

Page 16: ...enu in any mode 4 Use left navigation button to switch to another main setup items Common procedure for initial settings it is used to select the TV output mode Options NORMAL PS Pan scan mode NORMAL L B Letter box mode WIDE 16 9 wide screen mode it is used to select whether or not the multi angle icon is display on the screen when a multi angle DVD disc is playing Options On Icon will be displaye...

Page 17: ...le language DVD only need disc software support select preferred disc menu language DVD only need disc software support select rating levels You must set PASSWORD MODE OFF to enable this selection DVD only need disc software support Reset to factory settings 4 4 DISC MENU 4 5 PARENTAL 4 6 DEFAULT Subtitle Power on this set by pressing power button without placing any disc press setup button then y...

Page 18: ...has been selected as the menu language Preparations Switch the TV ON and select Video as the TV input Switch on the stereo system s power if the player has been connected to a stereo system 1 Press POWER to switch on the power 2 Insert a disc into the disc slot the player will start to read the disc immediately Basic play OPEN LOADING DVD VIDEO Rapid advance Rapid reverse During playback press F F...

Page 19: ... buttons and press SELECT button to confirm 3 The files in this folder are displayed and select your favourable song by using the up down navigation buttons and press SELECT button to start playback Note The time to load and display picture depends on the file size of the pictures During playback press MENU button to return to folder selection or STOP button to enter preview mode Press NEXT button...

Page 20: ...TOM 8 DIAGONAL WIPE RIGHT BOTTOM 9 EXTEND FROM CENTRE H 10 EXTEND FROM CENTRE V 11 COMPRESS TO CENTRE H 12 COMPRESS TO CENTRE V 13 WINDOW H 14 WINDOW V 15 WIPE FROM EDGE TO CENTRE 16 MOVE IN FROM TOP 17 NONE When playing VCD 2 0 3 0 with PBC the player will show the VCD on the screen After a few seconds a menu will appear on the screen Press numeric buttons to select corresponding track if the tra...

Page 21: ...umber is more than 10 press the 10 key first and then the unit digit Example Track 3 press 3 Track 12 press 10 and then 2 Track 21 press 10 twice and then 1 3 To start program play select START on the menu or select EXIT on the menu to exit without program play 4 To clear programmed items scroll the navigation button to the item to be cleared and press CLEAR button on the remote control the select...

Page 22: ...udio soundtrack and stereo VCD disc only When no soundtrack languages are recorded press this button will not work When the power is turned on or the disc is removed the language heard is the one selected at the initial settings NOTE NOTE 3x 2x 4x 1 3 1 4 1 2 CHANGING SUBTITLE LANGUAGE 0 0 1 Press SEARCH button during play then press up or down navigation button to selectTitle Chapter Title time o...

Page 23: ...is may cause unwanted harm electric shock or fire Unplug the unit immediately it does not function correctly for example abnormal sound or This could save you from the occurrence of a fire blank screen or smoke Do not open the housing through back cabinet no serviceable parts are included you could risk exposing yourself to live components It may cause electric shock or fire Avoid exposing the mon...

Page 24: ...efore requesting service for this unit please check the chart below for a possible cause of the problem you are experiencing Some simple check or adjustment on your own may eliminate the problem and restore proper operation No subtitles Subtitles appear only with discs which contain them Subtitles are cleared from the TV monitor Perform the steps to display the subtitles Angle cannot be changed Th...

Reviews: