background image

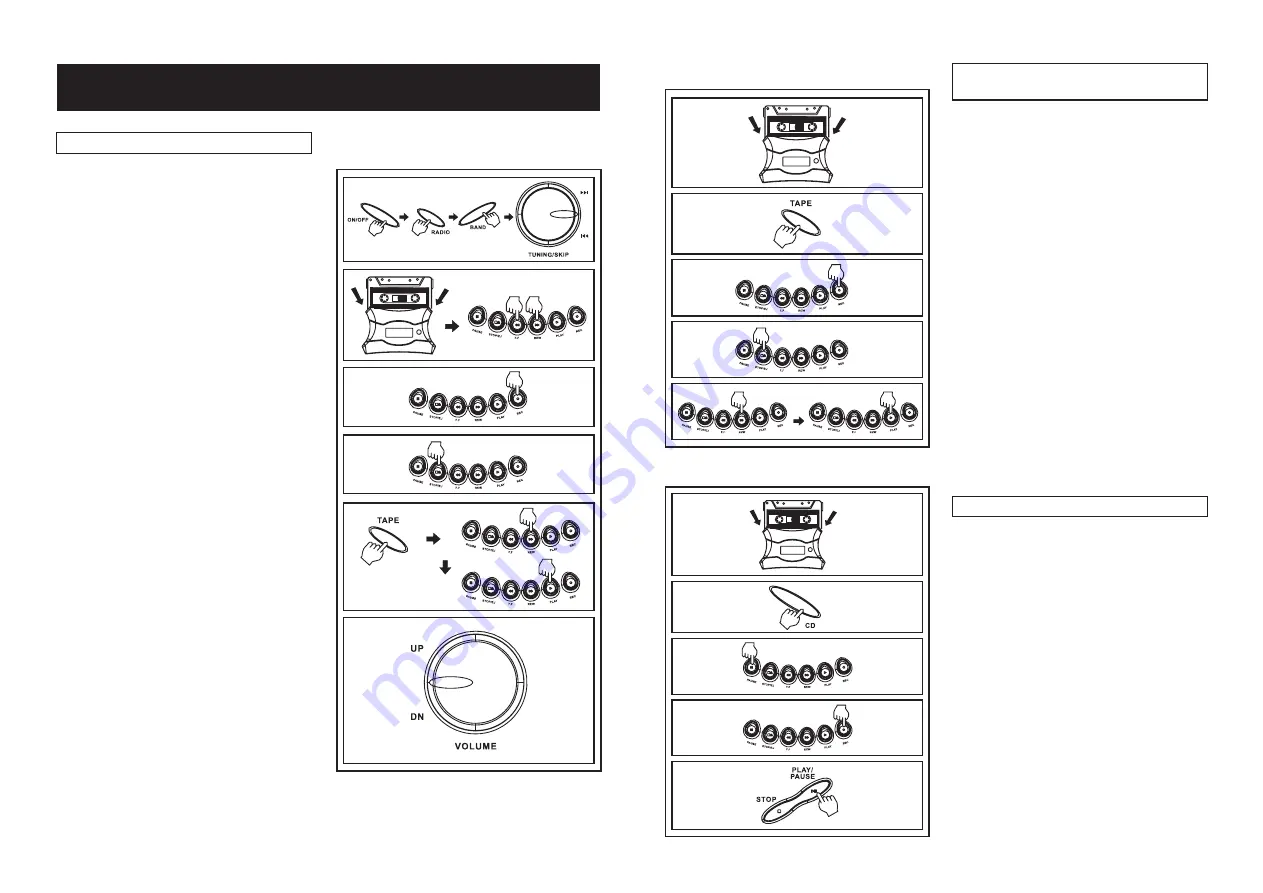
11. RECORDING FROM RADIO/MICROPHONE/CD

RECORDING FROM RADIO

RECORDING FROM THE BUILT-IN

MICROPHONE

1. Load the cassette tape into the

Cassette Door (full reel on the right ).

2. Load the compact disc and close the CD

Door.

3. Press CD button.
4. Press the Cassette Pause button.
5. Press the Cassette Record button for

record stand by.

When pressing the Cassette
Record Button, the Cassette
Play Button will automatically
go down (If the buttons do not
go down, reverse the tape or
check record prevention tab).

6. Start the CD playing by pressing the CD

Play/Pause button.

NOTE:

RECORDING FROM A CD

1. Load a blank cassette tape into the

Cassette door (full reel or spool on right
side).

2. Press TAPE button.
3. Press the Cassette Record button and

Cassette Play button at the same time.
Both buttons should remain in their
down positions when released.

4. When you talk in front of the set your

voice will be recorded. You are now
recording using the Built-in Condenser
Microphone and the recording process
will automatically stop at the end of the
tape and shut itself off.

5. To stop the recording manually, press

the Cassette Stop/Eject button.

6. To hear what you recorded, press the

Cassette Rewind button and then the
Cassette Play button.

1. Follow the instructions to

.

2. Load a blank cassette tape with full spool

the door.

3. Locate the portion of the tape where the

recording is to begin by using the Rewind
or Fast Forward buttons or start at the
beginning of the tape.

4. Press the Cassette Record Button and

Cassette Play button simultaneously.
Both buttons should remain in their
depressed positions when released.

5. The recording process will automatically

stop at the end of the tape.

6. To stop the recording manually, press the

Cassette Stop/Eject Button.

When you want to play the cassette

tape after recording, press the TAPE button,
press Cassette Rewind Button, and then
press Cassette Play Button. Adjust the
Volume Control to your taste.

NOTE:

select the

required station

on the right into the guides on the inside
of

Summary of Contents for GPS219PLLR

Page 1: ...CAUTION DANGEROUS VOLTAGES EXIST INSIDE THIS UNIT DO NOT REMOVE COVER OR BACK NO USER SERVICEABLE PARTS INSIDE REFER SERVICING TO QUALIFIED SERVICE PERSONNEL DISCONNECT FROM MAINS SUPPLY WHEN NOTIN USE PLUG WIRING DETAILS The wires in this mains lead are coloured in accordance with the following wiring codes Blue Neutral Brown Live The wires in this mains lead must be connected to the terminals in...

Page 2: ...t care must be taken if you are to obtain the best results and safety is to be assured Do read the operating instructions before you attempt to use the equipment Do ensure that all electrical connections Including the mains plug extension leads and interconnections between pieces of equipment are properly made in accordance with the manufacturer s instructions Switch off and withdraw the mains plu...

Page 3: ... to qualified personnel only Player Operation 1 POWER SOURCES 2 PLAYER MAINTENANCE CLEANING THE LENS If the lens in the CD pick up is dirty dusty etc it could degrade the sound or prevent disc play Open the disc holder and clean the lens as shown Use a blower available from camera stores to blow dust off the lens If there are fingerprints etc on the lens gently wipe clean with a cotton swab h h CA...

Page 4: ... cabinet Maintenance and care 4 LOCATION OF CONTROLS LOCATION OF CONTROLS 1 PHONES SOCKET 2 VOLUME CONTROL 3 TAPE BUTTON 4 STANDBY INDICATOR 5 FOLDING HANDLE 6 CD DOOR 7 CD STOP BUTTON 8 CD PLAY PAUSE BUTTON 9 CD REPEAT RADIO PRESET BUTTON 10 TUNING 11 ON OFF BUTTON 12 RADIO BUTTON 13 CD BUTTON SKIP SEARCH CONTROL PROGRAM RADIO PRESET STORE AERIAL COMPARTMENT ON REAR 14 BASS BOOST SWITCH 15 CASSET...

Page 5: ...THE PRESET MEMORIES THEY WILL REMAIN IN MEMORY AS LONG AS THE BATTERIES ARE INSTALLED OR AC POWER CORD IS CONNECTED 1 Press the Radio button after the ON OFF button has been pressed 2 Press the Radio Band Button to select the desired wave band 3 Tune to desired station by 5 When listening to an FM station in stereo and there is a large amount of hiss slide the FM Stereo Mono selector switch to the...

Page 6: ...to select the desired wave band 3 Press the Radio Preset Button repeatedly to select the required station Example Press this button 3 times to select the Number 3 Preset station and so on 4 To turn off the radio press the Power button to turn the unit to Standby PLAYING A COMPACT DISC 5 To start playback press the CD Play Pause Button The first track number will appear in the Display and the disc ...

Page 7: ...the track number being played and the indicator will show but not flashing in the display during programmed play 9 When all the songs have finished playing the set will stop disappears from the display Programming can only be done when the CD is in the stop mode The programmed memory will be cleared if the CD power is turned off 6 NOTE NOTE Press the CD Play Pause button to commence playback after...

Page 8: ...o adjust the Volume Control when recording This circuit automatically records at the correct level and prevents over loading NOTE While recording you may adjust the Volume Control as desired without affecting the recording operation Press the CD Random button in CD stop mode or during CD playback Press this button once again during Random playback to exit and resume Normal CD playback 9 RANDOM PLA...

Page 9: ... are now recording using the Built in Condenser Microphone and the recording process will automatically stop at the end of the tape and shut itself off 5 To stop the recording manually press the Cassette Stop Eject button 6 To hear what you recorded press the Cassette Rewind button and then the Cassette Play button 1 Follow the instructions to 2 Load a blank cassette tape with full spool the door ...

Page 10: ...battery Compartment matching the polarity as shown in the battery compartment 3 Close the battery compartment lid Always remove batteries if the remote controller is not going to be used for a month or more Batteries left in the unit may leak and cause damage NOTE INSERTING BATTERIES REMOTE OPERATION 13 PRODUCT SPECIFICATIONS Net Weight Dimension Power consumption Power requirements Output level S...

Reviews: