background image

10

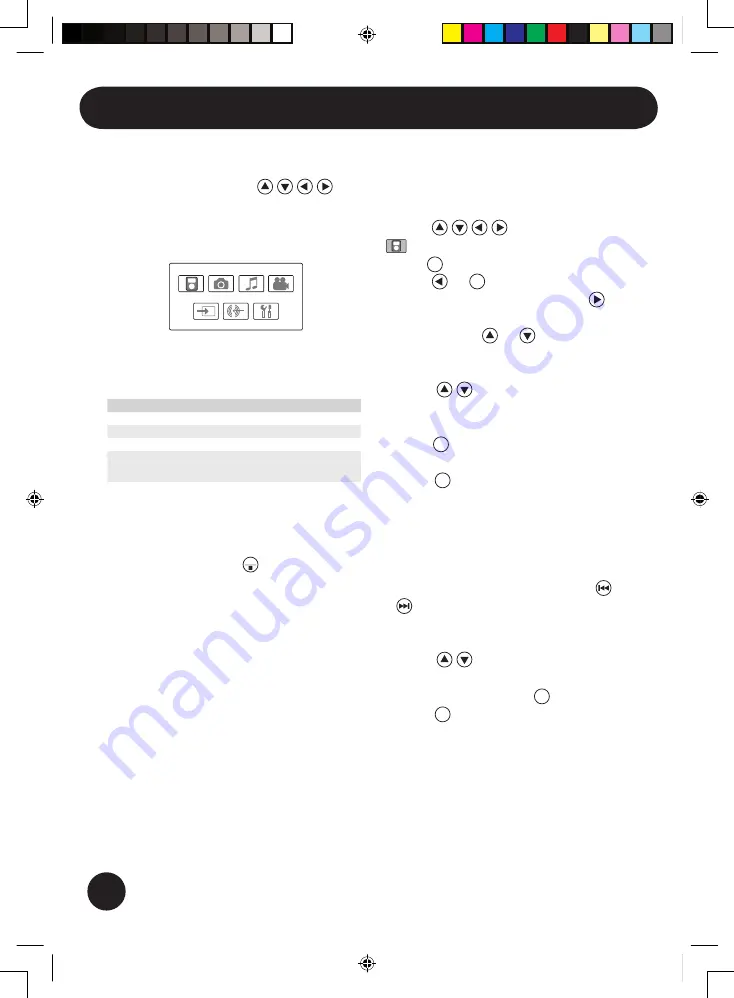
• After turning on the power, the main 

operation page will be appeared 

on the screen. Press  / / /  

buttons to select iPod, Photo, Music, 

Movie, AV IN, Line IN, or Setup 

functions.   


• Please refer to the following table to 

select the proper mode to play the 

files.  

Mode

Display format

Photo:

JPEG

Music:

MP3

Movie:

MPEG 4*.avi

Please note that not all images, audio and MPEG4 

formats are compatible with the device

• This device can only display one 

storage media’s contents at a time. 

If more than one input source is 

connected, press <

MODE

> to select 

which source you want to play. If 

you insert SD/MMC card and USB 

pen drive at same time, the device 

will only play the files from SD/MMC 

card. To play the files from USB pen 

drive, please remove the SD/MMC 

card.  

• When you input the external signals 

via AV composite jack or audio 

cable, only the volumes can be 

adjusted (AV In and Line In mode). 

Basic Operation

iPod Mode

1. Plug iPod into iPod dock (for 

connection details, refer to page 8). 

2. Press the Power switch ON. 

3. Press  / / /  buttons to select  


iPod 

from the main menu, then 

press 

OK

.

4. Press   or 

MENU

 button can go back 

to the previous menu or press    

button to go to the next level of 

menus. Press   or   buttons to 

select the item you wish to perform.  

5. To view photos:

• Press  /  buttons to select the 

photo you wish to playback when 

you are in thumbnail mode, then 

press 

OK

 to display the selected 

photo by full screen on the iPod. 

Press 

OK

 again to display on the 

device screen.  

• In slide show mode, photos are 

accompanied with background 

music. You can not select the 

previous or next song while you are 

in the slide show mode. Press 

/  to go to next or previous photo.  

6. To play music/video (using remote 

control):

• Press  /  buttons to select 

a music/video file you wish to 

playback, then press 

OK

 to play. 

Press 

OK

 again to display the video 

file on the device screen. 

• It is suggested to use the audio 

format preference in following 

order: Apple lossless, ACC then 

MP3. 

Summary of Contents for GIPDV701

Page 1: ...GIPDV701 IPOD DOCK WITH 7 LCD DISPLAY User guide ...

Page 2: ...onnections 7 Connecting the power 7 Inputting external media source 7 Inserting a memory card 7 Inserting a USB device 7 Inserting iPod 8 AV In 8 Line In 8 Outputting signals 9 Connecting with AV equipment 9 Connecting with audio quipment 9 Basic Operation 10 iPod mode 10 Viewing photos and slide show 11 Thumbnail mode 11 Rotation 12 Playing MP3 music 12 Playing a movie 12 AV In mode 13 Line In mo...

Page 3: ...ds the iPod mini 1st 2nd and iPod nano 1st 2nd This device doesn t support the latest iPod series including the iPod classic iPod Touch and iPod nano 3rd This device supports the following file formats JPEG MP3 and MPEG4 avi Please note that not all images audio and MPEG4 formats are compatible with this device If playing other formats please convert the files to a supported format on your compute...

Page 4: ...is turned off 7 Power LED indicator 8 3D Surround button Press this button to simulate a virtual three dimensional surround sound 9 PLAY Pause confirm button 10 LCD screen 11 Remote sensor 12 Speakers 13 Earphone jack 14 LINE IN jack 15 Volume 16 Volume 17 DC IN jack 18 Battery connector 19 Composite AV in jack 20 Composite AV out jack Top 1 2 3 4 5 6 7 8 9 Rear Front 10 11 12 16 15 14 13 17 18 19...

Page 5: ...6 PREVIOUS button 7 MUTE button 8 SETUP button 9 OK button 10 MODE STOP button 11 F FWD button 12 Next button 13 PLAY PAUSE button 14 1 ALL REPEAT button During playback press 1 ALL but ton repeatedly to select the follow ing options Track Repeat within a track Folder Repeat within a folder All Repeat all files OFF Repeat off 15 VOLUME button Note The remote control can operate the iPod even if th...

Page 6: ...emote control Insert the battery and match the and on battery to the marks inside the battery compartment Remember to remove the plastic insulating strip from the battery before first use CR2025 Note The battery in the Remote Control normally lasts for about one year although this depends on how often and for what operations the Remote Control is used If the remote control unit fails to work even ...

Page 7: ...source you want to play This device can only play JPEG MP3 and MPEG 4 avi formats Not all images audio and MPEG4 format files are compatible with this device If the files cannot be played in this device please convert these files to readable formats using your computer Inserting a memory card Insert your memory card into the appropriate slot according to the orientation marked on the machine MMC S...

Page 8: ...Pod mini 1 2 Generation 2 iPod video 30GB 3 iPod photo 30GB 4 iPod video 60GB 80G Colour 20G 5 iPod photo 40GB 60GB 6 Note The iPod will be automatically charged when connected to the power socket whether the power is ON or OFF Connection continued AV In Input AV source from other AV device e g Camcorder with connection to Audio Video input jack Be sure to match up the correct colour with the cabl...

Page 9: ...ure to match up the correct colour with the cable connectors TV Example 3 5mm AV cable White Red Yellow White Red Yellow Earphone Example Connecting with audio equipment Connect the earphone jack to earphones with 3 5mm audio cable CAUTION To avoid possible damage to your hearing do not play earphones at a high volume for long periods of time ...

Page 10: ...ne In mode Basic Operation iPod Mode 1 Plug iPod into iPod dock for connection details refer to page 8 2 Press the Power switch ON 3 Press buttons to select iPod from the main menu then press OK 4 Press or MENU button can go back to the previous menu or press button to go to the next level of menus Press or buttons to select the item you wish to perform 5 To view photos Press buttons to select the...

Page 11: ...uttons to select Photo from the main menu then press OK 3 The slide show starts to play 4 To pause the slide shows press button Displaying pictures bigger than 480 x 234 will take longer to load When the device is not operative in few second the screen saver will be activated automatically To stop the screen saver press any button on the device or remote control Thumbnail Mode 1 Press MODE or MENU...

Page 12: ...o play automatically 4 Press button to increase or decrease the volumes 5 To stop playing press MODE button If selecting a folder the folder list will display on the left screen and the file list on the right Press buttons to enter the left or right screen and then buttons to select the file you wish to play Playing a movie 1 Turn the POWER switch to ON 2 Press buttons to select Movie from the mai...

Page 13: ...l device Note When you input external signals via AV composite jacks or audio cable only the and buttons can be adjusted in AV In and Line In mode Besides the screen will remain black screen after connecting with external signal Setup Interval Time 5 Sec 15 Sec 30 Sec 1 Min 5 Min 30 Min 1 Hour 4 Hours 12 Hours 1Day Transition No Effect Random Cover Up Cover Down Uncover Left Push Right Wipe Up Wip...

Page 14: ...o M2 or MS PRO HG card into this device use only with Memory Stick Duo Replacement Adapter or Memory Stick Micro Adapter not supplied This device does not support SDHC card iPod does not respond to the device Check the connection if the iPod is not installed properly Remove the iPod and reinsert the iPod into the iPod dock connector Check any obstruction on the iPod or device s dock connectors iPo...

Page 15: ......

Page 16: ... 2007 Issue 1 October 2007 Customer Helpline 0871 230 1777 82 245 00020 ...

Reviews: