background image

4

Advanced functions

06

5

Advanced functions

06

Recorded programme icons

Icons may be displayed to the right of the 

programmes in the ‘Recorded library’.

This is what they mean

 The recording is currently playing.
 This recording has been marked for 

deletion.

 This recording has been marked for copy.
 This programme is being recorded.

The horizontal bar at the bottom of the 

‘Recorded library’ shows how much recording 

time has been used on the device, and how 

many hours or minutes are still available.

Copy

You can copy programmes from one inserted 

device to another by using the copy feature.

In the ‘Recorded library’

Press 

[•]

[••]

 or 

[•••]

 or use 

[

t

]

 and 

[

u

]

 to select a device.

Use 

[

p

]

 or 

[

q

]

 to select the programme 

you want to copy and press 

[RED]

.

Use 

[

p

]

 or 

[

q

]

 to select other 

1.

2.

3.

programmes you want to copy and press 

[RED]

 to highlight them.

Press 

[•]

[••]

 or 

[•••]

 or use 

[

t

]

 and 

[

u

]

 to select the device you want to copy 

onto. Press 

[OK]

.

The confirm copy screen will appear.

Press 

[RED]

 to cancel copying.

Press 

[BLUE]

 to start copying.

The copy progress screen will appear.

Press 

[RED]

 to return to the ‘Recorded 

library’ (copying will continue).
Press 

[GREEN]

 to cancel copying.

Press 

[EXIT]

 to watch TV. Copying will 

continue.

To return to the ‘Copy progress’ screen at any 

time.

Press 

[PLAY]

 to enter the ‘recorded 

library’.
Press 

[RED]

 to view progress screen.

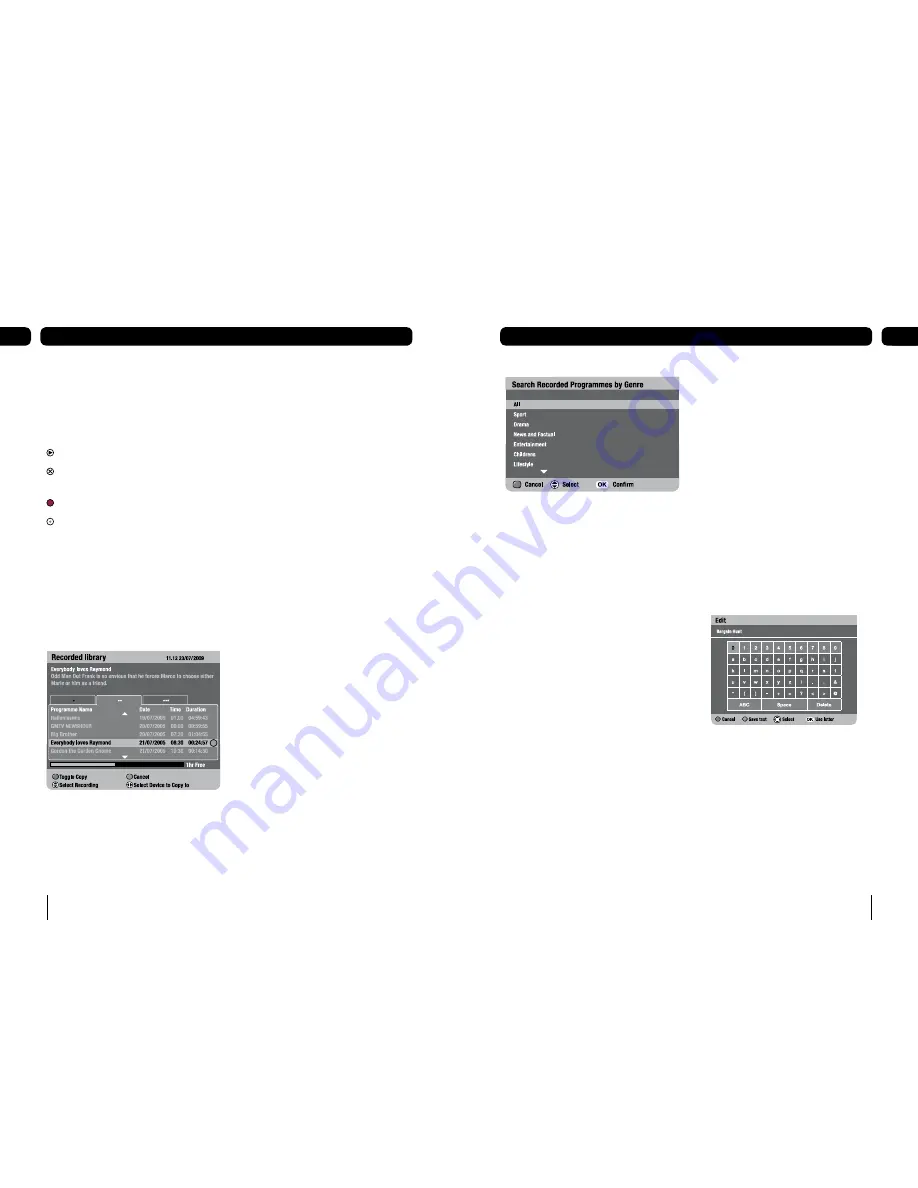
Search recorded programmes

The search facility lets you sift through your 

recorded programmes by genre, making it 

easy to find the recording you want to watch.

To search your recorded programmes

From the ‘Recorded library’, press 

[YELLOW]

.

Use 

[

p

]

 and 

[

q

]

 to skip through the 

different genres.
Highlight the genre you want to search 
and press 

[OK]

.

4.

1.

2.

1.

2.

3.

1.

2.

1.

2.

3.

The ‘Recorded library’ will re-open displaying a 

list of genre specific recordings.

Highlight the recording you want to watch 
and press 

[OK]

.

Or press 

[YELLOW]

 to search another 

genre.

Sort by name or by date

You can arrange your recordings by name/

date.

From the ‘Recorded library’, use 

[swap]


to toggle between sort by name and sort 

by date.

1.

2.

1.

Rename a recording

Press 

[MENU]

, highlight ‘System set-up’ 

and press 

[OK]

.

Highlight ‘Recorded programme options’ 
and press 

[OK]

.

Highlight ‘Rename recorded programme’ 
and press 

[OK]

The ‘Edit’ screen will open.

To select a device press 

[•]

[••]

 or 

[•••]

 or use 

[

t

]

 and 

[

u

]

.

Use 

[

p

]

 or 

[

q

]

 to select the programme 

you want to rename and press 

[OK]

.

Use the on-screen keyboard to rename 
the recording and press 

[GREEN]

 to save. 

1.

2.

3.

1.

2.

3.

Summary of Contents for GDB20USB3

Page 1: ...IMPORTANT Please read all instructions carefully before use and keep for future reference GDB20USB3 Digital Box Instruction Manual...

Page 2: ...g television A FREEVIEW Digital Box gives you up to 48 digital TV channels and up to 24 digital radio stations without a subscription or contract For more information on FREEVIEW and to check receptio...

Page 3: ...ough a recorded programme u PLAY Opens the recorded programmes list PAUSE Pauses live TV and starts recording Pauses a recording or playback EXIT Exits the menu system and goes back to the last progra...

Page 4: ...SCART cable SCART cable Aerial lead 1 2 Plug in and switch on Insert the Digital Box mains plug into a mains socket The standby light on the front will come on Switch your TV on 3 Using your digital b...

Page 5: ...ositioned over a stable and even surface Insert the flash device into one of the USB ports labelled and Look at the image below for guidance After a few seconds the green light next to the port should...

Page 6: ...are available for the next eight days Using the programme guide Press the guide button Press p or q to move through the list of channels To move through the programmes press t and u To move forwards o...

Page 7: ...the recording unless another recording follows immediately after in case the programme being recorded over runs slightly Record using the programme guide The easiest way to schedule a recording is by...

Page 8: ...cording you can skip forward through adverts for example in 30 second 1 2 3 5 and 10 minute blocks To set the Skip duration Press MENU highlight System set up and press OK Highlight Recorded programme...

Page 9: ...digital text Your digital box gives you access to digital text and teletext Digital text and teletext services vary depending on the country and channel Check with your retailer or TV guide for more...

Page 10: ...e a channel from your favourites list Highlight the favourites list and then press the yellow button Use u to select the stored favourite channels and p and q to highlight the channel you want to dele...

Page 11: ...cument Accessibility set up Accessibility set up lets you select and change the settings of subtitles and the audio language or the current programme To change audio language Press menu Press 4 or use...

Page 12: ...the Programme guide If you schedule daily weekly etc the recording will be highlighted in orange in the Programme guide To return to the previous menu press RED To exit to TV press EXIT Press and hold...

Page 13: ...e Press GREEN to cancel copying Press EXIT to watch TV Copying will continue To return to the Copy progress screen at any time Press PLAY to enter the recorded library Press RED to view progress scree...

Page 14: ...will be marked DEL and you should delete them To delete a channel see the channel set up and channel organiser sections TV set up Television type Television type lets you tell the digital box whether...

Page 15: ...ted the message Please insert a device will appear Formatting Formatting erases all the contents from a UBS device and leaves it in ready status To format a device on the Device management menu Use p...

Page 16: ...ll flash Retune Channels If you are missing channels channel information or would like to search for new channels available you should scan at any time To retune channels Press menu Press 5 or use q t...

Page 17: ...ue with the copy due to the device being removed The device was removed during the copy process Re insert the device and start copy again Unable to copy any more due to the device running out of space...

Page 18: ...performance or damaged aerial or the cable between your aerial and TV may be damaged Check for any obvious damage to the aerial and cables and make sure that the connectors are properly fitted If this...

Page 19: ...view scheduled recordings in periods of 24 hrs 1 week 2 weeks or 4 weeks Make sure you have USB devices with enough free space inserted when a recording is scheduled The green light is not turned when...

Page 20: ...Put your Digital Box in a well ventilated area away from high humidity Do not expose this Digital Box to rain or moisture dripping or splashing For stubborn stains use a damp not dripping cloth Do no...

Page 21: ...x in order to continue receiving your existing TV channels and also to pick up new ones Digital UK the body leading the digital TV switchover will advise you when you need to re tune during the switch...

Reviews: