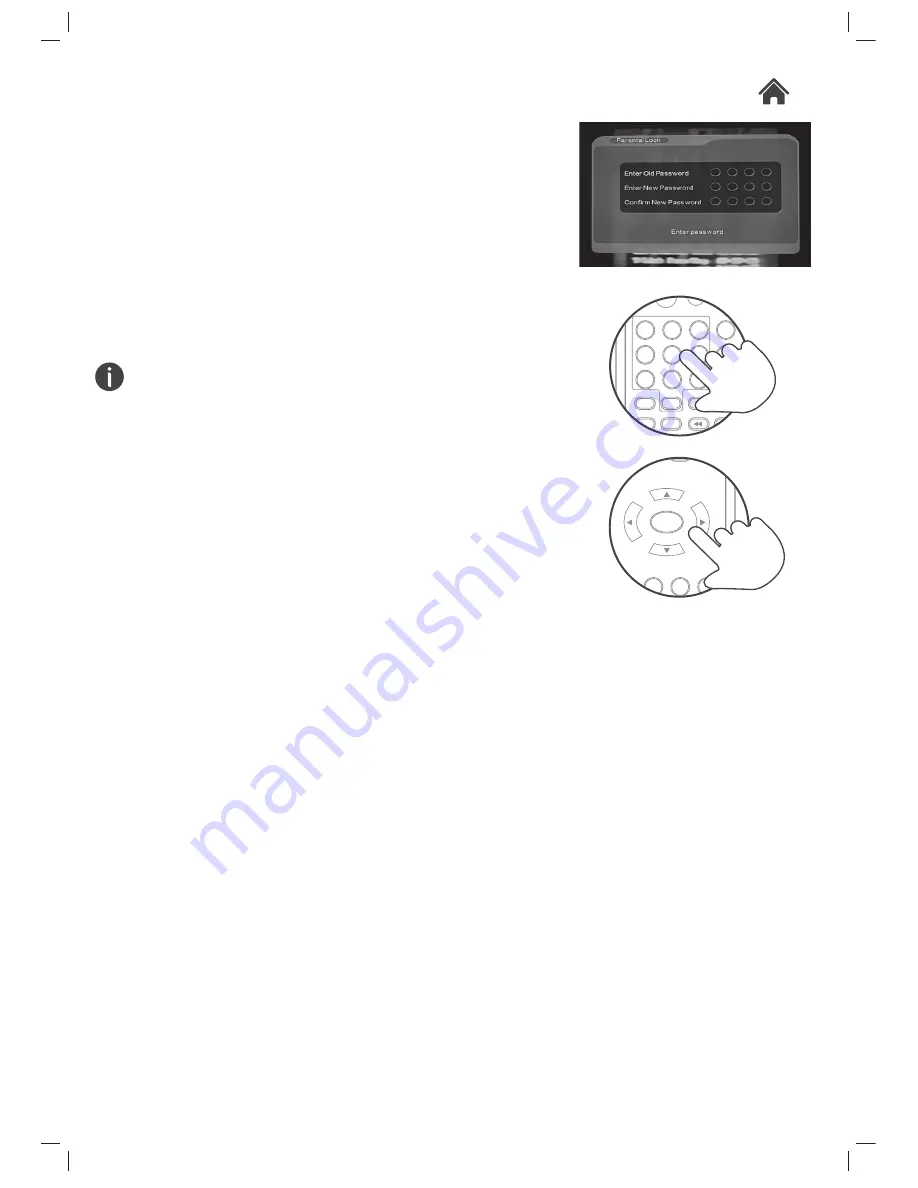
background image

GDB01SFV1

Parental Lock

Use this screen to change the default Parental lock code of 
‘0000’ to whatever code you wish.

1.  When selected, the initial option is to enter the existing pass 

code. if you have not changed it, enter the following ‘0000’

2.  Next enter your new pass code.

3. Enter the new pass code again to ensure you entered the 

correct code in the second option.

4.  The new pass code has been set.

If you cannot remember your newly set pass code then the 
default override pass code is ‘8888’.

Factory default settings

Should you wish to restore the unit back to the factory default 
settings.

1.  Select Factory Default from the Digital TV menu.

2.  Enter the pass code. The default is ‘0000’.

3. Select YES from the pop up options screen asking do you 

want to perform the operation. Press the ENTER (05) button 
to initiate.

4.  The display will show “factory Default” and return to the 

Initial install screen outlined in section 4.1 (Getting Started) 
of this manual.

5.  Perform the steps in section 4.1 (Getting Started) to begin 

the initial setup again.

Software Version

If for any reason you wish to check the software version of 
your unit activate this function for details.

5.6

5.7

5.8

LANG

1

4

7

2

5

8

0

3

6

9

ASPECT

TV/RADIO

INFO

RECALL

FAV

EPG

SUBTITLE

MENU

ZOOM

TEXT

EXIT

Group

CH-

CH+

VOL-

ENTER

VOL+

Summary of Contents for GDB01SFV1

Page 1: ...USER MANUAL MODEL GDB01SFV1 SET TOP BOX ...

Page 2: ...elect Menu 4 8 Channel Buttons 4 9 Last Programme Recall 4 10 Audio Language Selection 4 11 Electronic Programme Guide 4 12 Programme Reminder 5 1 OSD Settings 5 2 TV Settings 5 3 System Settings 5 4 Time Settings 2 4 Remote Control 3 5 Standby Auto Standby 3 6 Fitting The Remote Batteries 4 13 Digital TV 4 14 Channel Manager 4 15 Channel Organiser 4 16 Setting Favourite Channels 4 17 Delete a Cha...

Page 3: ...te Control Quick Start Guide Guarantee Booklet If any of these items are missing contact customer support Visit www goodmans co uk support 2 1 Mains Power Your Set Top Box requires a mains supply of 230 240V AC 50Hz Please ensure that your mains supply is compatible before use Disconnect the Power Cord from the mains when not in use Position of Set Top Box Place on a flat stable surface that is not...

Page 4: ...P button O SCROLL LEFT button P SCROLL DOWN button Q CHANNEL button R CHANNEL button S FAV DAILY button RED T DELETE button GREEN U MUTE button V LANGUAGE select button W ASPECT RATIO Button Press to cycle between 4 3LB 4 3 PS 16 9 aspect ratios TAKE CARE WITH LIVE ELEMENTS Rear View 2 3 Your Set Top Box 2 A B C D E F SCART TV ANT IN LOOP OUT Remote Control 2 4 MUTE LANG 1 4 7 2 5 8 0 3 6 9 ASPECT...

Page 5: ...ENTER button 06 SCROLL RIGHT button 07 VOLUME button 08 VOLUME button 09 LOCK TIMER button BLUE 10 MOVE PROGRAMME INFO button YELLOW MUTE LANG 1 4 7 2 5 8 0 3 6 9 ASPECT TV RADIO INFO RECALL FAV EPG SUBTITLE MENU ZOOM TEXT Group EXIT CH CH VOL ENTER VOL FAV DEL MOVE LOCK DAILY P INFO TIMER POWER G U V W X Y Z H I J L N Q K M O P R S T 02 05 01 03 04 06 07 08 09 10 Remote Control 2 4 ...

Page 6: ...V E socket on the back panel of the set top box and the Scart socket on your TV If there is more than one Scart connector on the TV look in your TV instruction manual to check which one you should use 5 Plug the mains cable F into the mains socket 6 Plug the TV back into the mains socket if required The set top box will not work if you do not have the scart to scart cable connected Recording from ...

Page 7: ...he POWER button G to wake from Standby mode 2 Press the POWER button G again to enter Standby mode The auto standby function shuts the unit down into the standby mode when left unused for 3 hours Use the O 06 buttons to select on or off When set to on you will see a pop up appear after 3 hours asking if you d like to stop the auto standby process Simply select no and press the ENTER 05 button to r...

Page 8: ...control 1 VOL 05 will increase the volume and VOL 07 will decrease the volume 2 To turn the volume off press the MUTE U button on the remote control To turn it back on press the MUTE U button again Subtitles 1 To use subtitles press the SUBTITLE K button on the remote control When activated the screen below will be shown 2 Use the button 06 to enable subtitles and select from the available languag...

Page 9: ...the quick select menu further using channel grouping to assign descriptions to channels also add a favourite mark to filter channels based on your favourites These are explained later in the manual 4 Once set up you can filter the favourite channels by pressing the FAV S button 5 Once set up you can view channels based on their descriptions using the O 06 buttons Each press will scroll to a new cate...

Page 10: ...ress the EXIT 03 button to close the electronic programme guide 6 Pressing the P INFO 10 button yellow will display detailed information about the currently selected programme Press EXIT 05 to return to the EPG Programme Reminder 1 The programme reminder function can be activated from the EPG menu Highlight the programme you wish to use as the wake up programme and press the TIMER 09 blue button t...

Page 11: ...avourite Channels 1 Use the N P buttons to scroll through the list of available channels 2 When selected press the RED S button to assign that channel as a FAVOURITE Press again to remove the function Delete a Channel 1 Use the N P buttons to scroll through the list of available channels 2 When selected press the GREEN T button to earmark that channel for deletion from the channel list 3 Continue ...

Page 12: ...lt code is 0000 4 When entered the channel will display a padlock icon to indicate it is locked You can proceed to press the BLUE 09 button to add locks to other channels 5 Press the EXIT 05 button when finished 6 Any locked stations selected for viewing will require the 4 digit pass code Rename a Channel 1 Press either O 06 button to rename the selected channel 2 Use the numeric keypad H to assign...

Page 13: ...available channels 3 When selected choose which description on the right of the display matches the station and press the corresponding numeric key EG ESPN I would like assigned to SPORT so press the 4 button 4 Once all descriptions are assigned press the EXIT 03 button to store and exit the menu Delete All You may need to delete the TV or radio channel database for example you have moved or remov...

Page 14: ...earch The manual search function requires some knowledge of digital TV or a specific channels settings 1 Set the CHANNEL NAME value to the Channel number you wish to search 2 Press the ENTER 05 button and wait for the search to commence If the display returns back to the Installation screen immediately then no stations were found on that Channel number 3 If stations are found on the Channel number ...

Page 15: ...deo Output Press the O 06 buttons to cycle through the two options of RGB or CVBS depending on what signal your TV requires Brightness Use the O 06 buttons to enter the Brightness level options Then use the N P buttons to select from 0 to 100 Press ENTER 05 to apply the brightness level setting Contrast Use the O 06 buttons to enter the Contrast level options Then use the N P buttons to select fro...

Page 16: ...it pass code is required to proceed with the function The default code is 0000 You can then use the N P buttons to select the age Press ENTER 05 to store the setting Auto Standby The auto standby function shuts the unit down into the standby mode when left unused for 3 hours Use the O 06 buttons to select on or off When set to on you will see a pop up appear after 3 hours asking if you d like to s...

Page 17: ...T is only available when the TIMER MODE is set to AUTO Use the O 06 N P buttons to set your GMT offset zone Leaving on AUTO sets the zone depending on the transmission 4 The SUMMER TIME setting is only available when the GMT OFFSET option is set to anything but AUTO Use the O 06 buttons to cycle between on off Wake Up Timer Settings The wake up timer allows you to set a reminder when a programme i...

Page 18: ... duration comes to an end the set top box will revert back to the channel you were watching prior to the wake up operation Example 2 You wish to make a recording of a programme to a PVR or VCR via the scart socket while you re out The selected programme is on BBC2 at 3 30pm and lasts for 2 hours 1 The settings would be as follows Timer No 1 TImer Mode Once Wakeup Mode Channel Wakeup Channel BBC2 W...

Page 19: ...re the unit back to the factory default settings 1 Select Factory Default from the Digital TV menu 2 Enter the pass code The default is 0000 3 Select YES from the pop up options screen asking do you want to perform the operation Press the ENTER 05 button to initiate 4 The display will show factory Default and return to the Initial install screen outlined in section 4 1 Getting Started of this manu...

Page 20: ... again later Check the settings in the installation menu The unit plays a strange sound Multiple audio tracks can sometimes cause this interference Change the audio track using the LANG V button on the remote control The remote does not respond The batteries may be inserted incorrectly The batteries may be dead Check the polarities match the batteries are correctly inserted Replace the batteries F...

Page 21: ...FDM QPSK 16QAM 64QAM 1 2 2 3 3 4 5 6 7 8 2K 8K 1 4 1 8 1 16 1 32 Demultiplexer Standard Input Max Bit Stream Rate ISO IEC 13818 1 60Mbps Serial 7 5MBps Parallel Video Decoding Standard Aspect Ratio Video Resolution ISO IEC 13818 2 MPEG 2 MP ML 4 3 16 9 720 576 PAL 720 480 NTSC Audio Decoding Standard Output Mode Sampling Frequency ISO IEC 13818 3 Left channel Right channel Stereo 32 44 1 48KHz Out...

Reviews: