background image

329944

Power On and Play a DVD

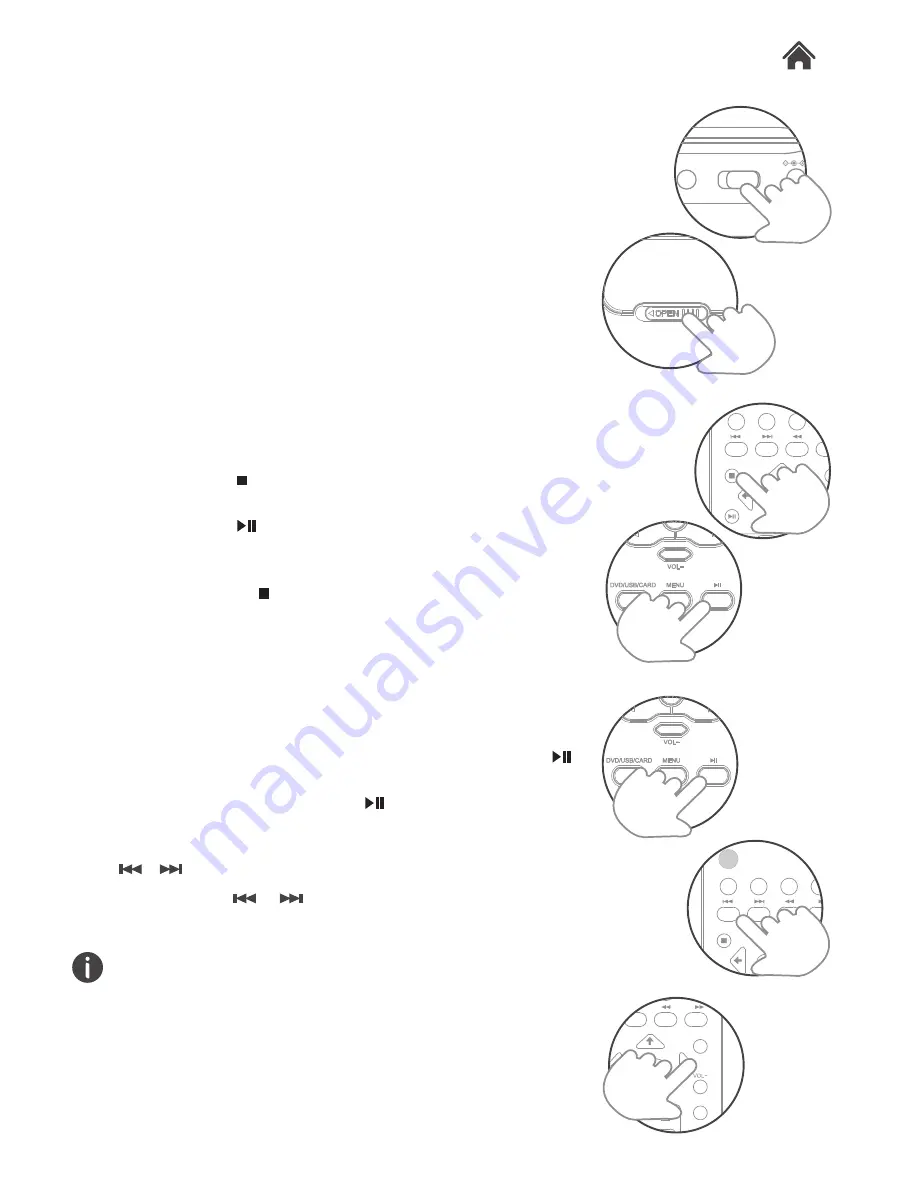
1.  Slide the POWER switch (Q) to the ON position (the green 

power LED will illuminate).

2.  Press the disc compartment OPEN/CLOSE button (K) to 

open the disc tray.

3.  Place a DVD disc onto the disc tray (label facing upwards).
4.  Close the disc tray and the playback starts automatically.
5.  When a menu screen appears on the screen, use the 

navigation buttons (E or remote) to select the menu option 
you require, then press the OK button (F or remote) to start 
playback. 

Stopping Playback (DVD/CD)

1.  Pressing the   STOP button on the remote once during 

playback will stop play at the current position.

2.  Pressing the   PLAY/PAUSE button (H or remote) at this 

point will resume playback from the position you stopped 
playback from. 

3.  If you press the   STOP button on the remote twice, 

playback will cease and the resume option will not be 
available.

Play/Pause (DVD/CD)

1.  If you need to pause the playback at any time, press the   

PLAY/PAUSE button (H or remote). 

2.  To resume playback press the   PLAY/PAUSE button (H 

or remote) again.

 /   Skip chapter (DVD) or track (CD)

1.  Press either 

 or 

 buttons (04) during playback to skip 

a chapter (DVD) or a track (CD) ahead or backwards. 

This function may not work during the “Warning” section of a 
DVD.

Volume controls

1.  Use the /- buttons (D, G, 20 & 18) on the 

portable DVD player or remote to increase or decrease the 
listening level.

4.1

4.2

Getting Started

Basic Operation

Operation

4

AV IN

OFF/ON

DC IN 9-12V

MENU

SETUP

VOL+

GOTO

SUBTITLE

TITLE

ENTER

MENU

SETUP

VOL+

SUBTITLE

TITLE

TFT

ST-BY

ENTER

VOL+

AUDIO

GOTO

ENTER

Summary of Contents for 329944

Page 1: ...USER MANUAL MODEL 329944 10 PORTABLE DVD PLAYER ...

Page 2: ...Operation 4 3 Repeat DVD CD 4 4 Multi angle DVD 4 5 Audio Tracks DVD 4 6 Subtitles DVD 5 1 System Setup 5 2 General Setup 5 3 Audio Setup 6 1 Disc Handling 6 2 Disc Information 6 3 Copyright Information 2 4 Remote Control 3 6 Fitting The Remote Batteries 3 7 Connection to a TV 3 8 Connecting an External Source 3 9 In Car Headrest Mount 4 7 Zoom DVD Picture disc 4 8 Programme Playback DVD CD 4 9 GO...

Page 3: ...Player Remote Control Power Adaptor In Car Charger Earphones In car headrest harness AV Cable Quick Start Guide Guarantee Booklet 2 1 Mains Power Your DVD player requires charging from a mains supply of 230 240V AC 50Hz Please ensure that your mains supply is compatible before use Disconnect the Power Cord from the mains when not in use Position of DVD Player Place on a flat stable surface that is...

Page 4: ...ess to decrease volume level H PLAY PAUSE Press to begin playback or pause playback I MENU button Press to display the DVD menu if available J DVD USB SD mode button Switch between input modes K OPEN CLOSE button Press to open or close the disc drawer L USB input socket Connect a USB flash drive for photo viewing M SD MMC input socket Insert an SD card for photo viewing N EARPHONE Earphone output ...

Page 5: ... the current disc 13 ANGLE Press repeatedly to cycle through any available DVD angles 14 REPEAT Enables the repeat mode 15 MUTE Press to temporarily silence audio output Press again to resume 16 AUDIO Press repeatedly to cycle through available audio tracks 17 GOTO Specify an exact point on a DVD or CD to jump to MENU SETUP VOL AUDIO GOTO MUTE REPEAT DISPLAY ANGLE ZOOM PROG SUBTITLE TITLE TFT ST B...

Page 6: ...h Q is set to the OFF position 2 Insert the small jack end of the car power adapter into the DC input socket R on the side of the DVD player 3 Insert the other end into a 12V car power adapter socket It is VERY important not to connect to a 24V car power adapter Please check your vehicle manual before attempting 4 Set the POWER ON OFF switch Q to the ON position to use the portable DVD player or f...

Page 7: ...uilt in battery every three months Standby 1 Press the ST BY button on the remote control or main unit to wake the unit from STANDBY mode 2 Press the ST BY button on the remote control or main unit to enter STANDBY mode Adjusting the swivel display The display can be rotated a total of 270 degrees The display can be rotated 90 degrees Anti clockwise from the facing front position The display can b...

Page 8: ... attempting to connect this unit to a TV ensure that the portable DVD player and TV are both switched off 1 Insert the 3 5mm end of the supplied AV adapter cable into the AV OUTPUT socket O on the side of the unit 2 Connect the other ends of the adapter cable to an RCA AV cable not supplied as shown in the diagram Take note to match the colours when connecting 3 Red white sockets carry audio and c...

Page 9: ...tch to the AV IN mode 5 Should you need to switch back to the internal DVD player press the MODE button on the main unit C again If your video source only has a SCART output you can purchase a SCART adaptor and connect the three coloured jacks to the same coloured sockets on the adaptor Then connect the adaptor to your video source In Car Headrest Mount Follow the below insructions to mount the po...

Page 10: ...t will resume playback from the position you stopped playback from 3 If you press the STOP button on the remote twice playback will cease and the resume option will not be available Play Pause DVD CD 1 If you need to pause the playback at any time press the PLAY PAUSE button H or remote 2 To resume playback press the PLAY PAUSE button H or remote again Skip chapter DVD or track CD 1 Press either o...

Page 11: ...tions Menu DVD 1 Pressing the MENU button I or 01 remote during playback displays the disc main menu Title DVD 1 Pressing the TITLE button 03 during playback displays the discs title menu if available The TITLE menu is the beginning track of a disc not all discs contain these and as such the TITLE button may not respond Mute DVD CD This function will instantly silence the audio 1 Press the MUTE bu...

Page 12: ...angles Audio tracks DVD It is common for a DVD disc to contains more than one audio track for example 5 1 audio stereo audio and other languages 1 Press the AUDIO button 16 to cycle through the tracks This Portable DVD Player does NOT support DTS audio If you select a DTS audio track or one is selected automatically no sound will be output Should this occur select a compatible audio track Subtitle...

Page 13: ...ks required Should you require more Title Chapters or Tracks than 10 navigate to the NEXT icon and press the OK button F 06 Tracks 11 20 will now be programmable 5 Once the programming is complete navigate to the START icon and press the OK button F 06 to begin playback of your programmed sequence GOTO function DVD CD The GOTO function allows you to enter a specific chapter title audio track subti...

Page 14: ...to return to the file browser screen 5 Press the STOP button 05 during a slideshow to display a thumbnail view of the selected folder 6 To display an image indefinitely press the PLAY PAUSE button H 07 To resume the slide show press the PLAY PAUSE button once again 7 During the slide show the navigation buttons will rotate the displayed image 8 Press the buttons 04 to skip to the previous or next ...

Page 15: ...he 2 button If the second digit is 0 press the 0 button Earphone Usage 1 Connect earphones supplied to the 3 5mm N output on the side of the main unit 2 Adjust the volume in the normal manner see Setting the volume level Section 4 2 Listen at moderate volumes to avoid hearing damage If you hear no sound during playing do not turn up volume as the music may suddenly begin at a high volume Excessive...

Page 16: ...les are available for selection OSD language This option sets the On Screen Display language Choose between English German French Spanish Screen saver When the unit is not in use the DVD logo will appear as a screen saver to prevent screen burn in Choose ON or OFF Last memory When set to ON the unit will remember the last position on a disc before the unit was shut down STANDBY General Setup Page ...

Page 17: ... channels will be output only from the Right speaker MIX MONO The audio frequency on the Left Right channels will be merged together and output from both Left Right speakers Dynamic When watching a disc with high dynamic audio at low volumes you can increase the dynamic range to reduce the loss of sound details Video Quality Sharpness Set the video sharpness level Select from Low Medium High Brigh...

Page 18: ...you are watching PAL MULTI to set automatically or NTSC Audio Choose the default audio setting This means the Portable DVD Player will automatically select this language as the audio track if available Subtitle Select the default subtitle language Disc menu This option sets the default DVD menu language Once set if the DVD you are watching contains a menu with your specified language that is used ...

Page 19: ...e 2 Once you have entered a correct existing password you can then enter your new password and confirm Press the OK button to save the new password The master override password can be used if you change the default but forget the new password The master password is 1369 Default Activating this option resets every setting to the factory default ...

Page 20: ... placing object on discs outside or their case may cause warping Normally DVD discs are divided into titles and the titles are sub divided into chapters Audio CD discs are divided into tracks Each title chapter or track is assigned a number which is called title number chapter number or track number respectively There may be discs that do not have these numbers This product incorporates copyright ...

Page 21: ... Player is DVD Video DVD R DVD RW CD DA CD R CD RW compatible This DVD Player is designed and manufactured to respond to the Region Management Information that is recorded on a DVD disc If the Region number described on the DVD disc does not correspond to the Region number of this DVD Player this DVD player can not play that disc The Region number of this DVD player is REGION 2 Disc Types Region M...

Page 22: ...ernal source or TV Press the TFT button on the remote to resume playback on the internal display Re check the connections see Section 3 7 3 8 for details The remote does not respond The batteries may be inserted incorrectly The batteries may be low Obsticle between the remote the unit Remote is too far away Remote not aimed at the IR sensor on the unit Check the polarities match the batteries are ...

Page 23: ...e 10 25 4cm Supported Discs CD CD R DVD DVD R DVD R PICTURE CD JPG Supported memory formats USB SD SD up to 16Gb SDHC Remote battery 2 x AAA Technical Specifications 8 Customer Support 9 For all product support please email goodmans bmstores co uk This Product is intended for use within the UK Declaration of Conformance The full text of the EU declaration of conformity is available at the followin...

Page 24: ......

Reviews: