background image

4

PRODUCT DESIGN

Vent pipe must be either 2” or 3” in diameter, depending
upon furnace input, number of elbows, length of run and
installation (1 or 2 pipes). The optional Combustion Air
Pipe is dependent on installation/code requirements and
must be 2” or 3” diameter PVC.

2. Line voltage wiring can enter through the right or left side

of the furnace. Low voltage wiring can enter through the
right or left side of furnace.

3. Conversion kits for propane gas and high altitude natural

and propane gas operation are available. See High Alti-
tude Derate chart for details.

4. Installer must supply the following gas line fittings, de-

pending on which entrance is used:

Left

 -- Two 90° Elbows, one close nipple, straight pipe

Right

 -- Straight pipe to reach gas valve.

Accessibility  Clearances (Minimum)

POSITION*

FRONT

SIDES

REAR

TOP FLUE

FLOOR

Upflow

3

0

0

1

0

C

Horizontal

Alcove

6

0

4

0

C

*=    All positioning is determined as installed unit is viewed from the front.

C=   If placed on combustible floor, floor MUST be wood only.

POSITION*

FRONT

SIDES

REAR

TOP FLUE

FLOOR

Upflow

1

0

0

1

0

NC

Horizontal

Alcove

6

0

4

0

C

*=    All positioning is determined as installed unit is viewed from the front.

C=   If placed on combustible floor, floor MUST be wood only.

*MVC95* MINIMUM CLEARANCES TO COMBUSTIBLE MATERIALS

(INCHES)

NC= For instalaltion on non-combustible floors only. A combustible
       subbase must be used for installations on combustible flooring.

*CVC9 MINIMUM CLEARANCES TO COMBUSTIBLE MATERIALS

(INCHES)

NC= For instalaltion on non-combustible floors only. A combustible
       subbase must be used for installations on combustible flooring.

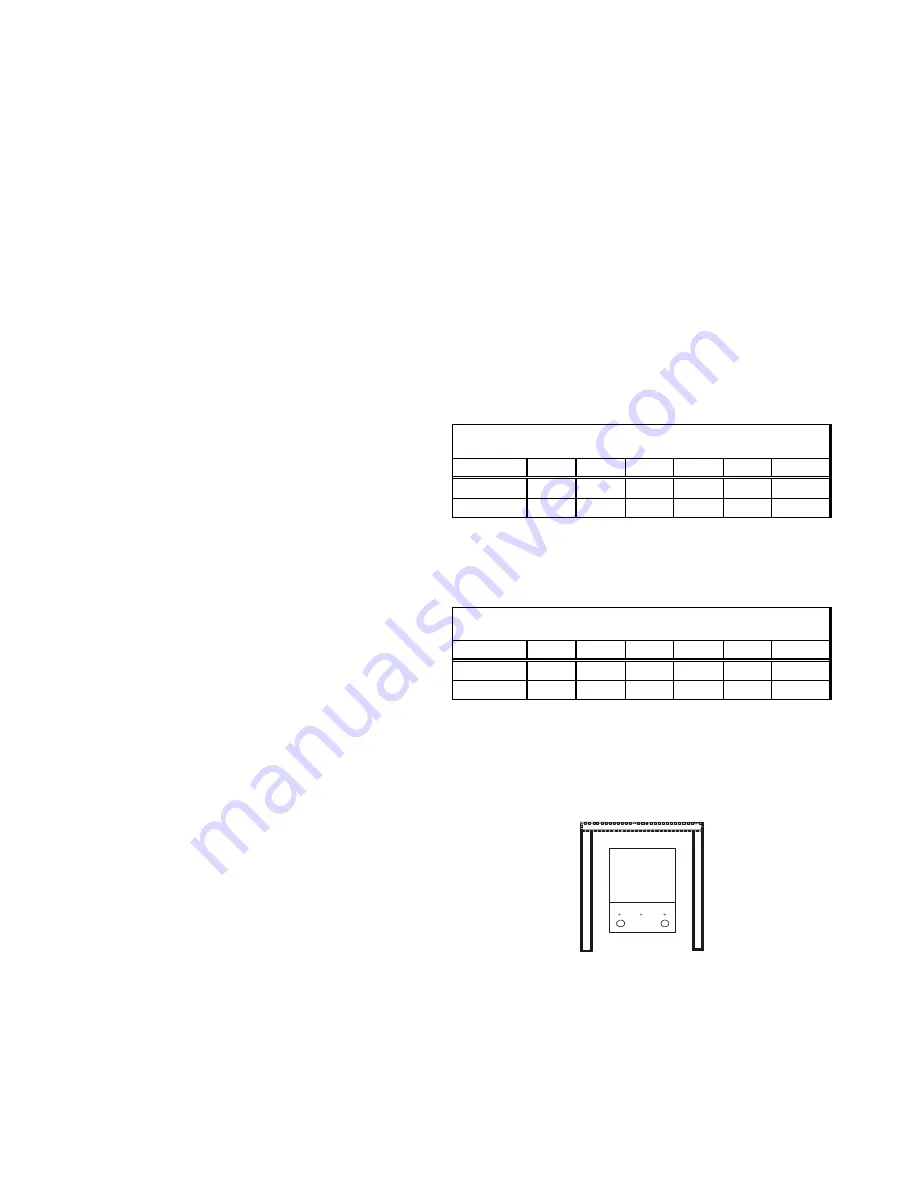
Alcove Illustration

REAR

S

ID

E

S

ID

E

ALCOVE

24" at front is required for servicing or cleaning.

Note: In all cases accessibility clearance shall take
precedence over clearances from the enclosure where
accessibility clearances are greater.  All dimensions are
given in inches.

General Operation

Models covered by this manual come with a new 4-wire com-
municating PCB.  When paired with a compatible communi-
cating indoor unit and a CTK01AA communicating thermo-
stat, these models can support 4-wire communication pro-
tocol and provide more troubleshooting information. These
models are also backward compatible with the legacy ther-
mostat wiring.

The GCVC9, GMVC95, AMVC95 and ACVC9 furnaces are
equipped with an electronic ignition device to light the burn-
ers and an induced draft blower to exhaust combustion prod-
ucts.

An interlock switch prevents furnace operation if the blower
door is not in place. Keep the blower access doors in place
except for inspection and maintenance.

These furnaces are also equipped with a self-diagnosing elec-
tronic control module. In the event a furnace component is
not operating properly, the control module's dual 7-segment
LED's will display an alpha-numeric code, depending upon
the problem encountered. These LED's may be viewed
through the observation window in the blower access door.
Refer to the 

Troubleshooting Chart

 for further explanation of

the LED codes and

 Abnormal Operation - Integrated Igni-

tion Control

 section in the Service Instructions for an expla-

nation of the possible problem.

The rated heating capacity of the furnace should be greater
than or equal to the total heat loss of the area to be heated.
The total heat loss should be calculated by an approved
method or in accordance with “ASHRAE Guide” or “Manual
J-Load Calculations” published by the Air Conditioning Con-
tractors of America.

*Obtain from: American National Standards Institute 1430
Broadway New York, NY 10018

Location Considerations

The furnace should be as centralized as is practical
with respect to the air distribution system.

Do not install the furnace directly on carpeting, tile, or
combustible material other than wood flooring.

When suspending the furnace from rafters or joists,
use 3/8" threaded rod and 2” x 2” x 1/8” angle as
shown in the Installation and Service Instructions. The
length of the rod will depend on the application and
clearance necessary.

When installed in a residential garage, the furnace
must be positioned so the burners and ignition source
are located not less than 18 inches (457 mm) above
the floor and protected from physical damage by ve-
hicles.

Notes:

1. Installer must supply one or two PVC pipes: one for com-

bustion air (optional) and one for the flue outlet (required).

Summary of Contents for ComfortNet ACVC90704CXAA

Page 1: ...r service procedures performed by an unqualified person ACVC9 AMVC95 GCVC9 GMVC95 90 95 Gas Furnace Units Refer to Service Manual RS6200004 for installation operation and troubleshooting information A...

Page 2: ...ge personal injury or death Goodman will not be responsible for any injury or property damage arising from improper service or service procedures If you install or perform service on this unit you ass...

Page 3: ...and can lead to the imposition of substantial fines These regulations may vary by jurisdiction Should questions arise contact your local EPA office WARNING WARNING Do not connect or use any device tha...

Page 4: ...these models can support 4 wire communication pro tocol and provide more troubleshooting information These models are also backward compatible with the legacy ther mostat wiring The GCVC9 GMVC95 AMVC...

Page 5: ...fice HAPS28 HANG14 45 Orifice HALP11 56 Orifice HAPS28 GMVC950905DX GMVC951155DX AMVC950905DX AMVC951155DX No Change LPM 05 55 Orifice No Change HANG13 44 Orifice HALP11 56 Orifice HAPS29 HANG14 45 Or...

Page 6: ...r Pressure Tap 19 Coil Front Cover Drain Port 20 Drain Line Penetrations 21 Drain Trap 22 Blower Door Interlock Switch 23 Inductor Not All Models 24 Two Stage Integrated Control Module with fuse and d...

Page 7: ...L HOLE RIGHT SIDE DRAIN LINE HOLES STANDARD GAS SUPPLY HOLE DRAIN TRAP 20 3 16 AIR INTAKE PIPE 2 PVC LEFT SIDE DRAIN LINE HOLES 1 3 4 DRAIN TRAP 1 1 2 1 5 8 30 1 4 11 3 4 19 3 16 BOTTOM KNOCK OUT 23 9...

Page 8: ...CTRICAL HOLE 20 5 32 2 UNFOLDED FLANGES DISCHARGE AIR E CONDENSATE DRAIN TRAP w 3 4 PVC DISCHARGE RIGHT OR LEFT SIDE FOLDED FLANGES RETURN AIR A HIGH VOLTAGE ELECTRICAL HOLE LOW VOLTAGE ELECTRICAL HOL...

Page 9: ...2 MODEL 1 Data given is least negative pressure required for pressure sw itch to close LOW FIRE HIGH FIRE LOW FIRE HIGH FIRE LOW FIRE HIGH FIRE LOW FIRE HIGH FIRE GMVC950453BX GMVC950704CX AMVC950453B...

Page 10: ...1 0 1 2 3 5 1 7 1 0 1 2 3 5 1 8 1 0 1 2 3 5 3 3 1 0 1 2 3 5 3 4 1 0 1 2 3 5 3 7 O pe n S e tting F 3 2 5 2 1 0 1 7 0 2 0 0 2 2 0 1 9 0 GM V C9 5 0 4 5 3 BX AM V C9 5 0 4 5 3 BX 1 GM V C9 5 0 7 0 4 CX...

Page 11: ...naces All CAPF coils have a CAUF equivalent All CHPF coils in B C D heights have an insulated Z bracket for use with one size smaller furnace All proper coil combinations are subject to being ARI rate...

Page 12: ...be installed elsewhere in the duct system such as a central return Disposable Minimum Filter Area in2 Based on a 300 ft min filter face velocity Minimum filter area dictated by heating airflow require...

Page 13: ...ngcounterflowtopreturnfiltersizes depending on cabinet size Refer to Minimum Filter Area tables to determine filter area requirement NOTE Filters can also be installed elsewhere in the duct system suc...

Page 14: ...gh Stage Pressure Switch Trip Point w c 0 75 0 75 1 10 1 10 Low Stage Pressure Switch Trip Point w c 0 30 0 30 0 50 0 50 Front Cover Pressure Switch Trip Point w c 0 10 0 10 0 10 0 10 Blower W heel D...

Page 15: ...gh Stage Pressure Switch Trip Point w c 0 75 0 75 1 10 1 10 Low Stage Pressure Switch Trip Point w c 0 30 0 30 0 50 0 50 Front Cover Pressure Switch Trip Point w c 0 10 0 10 0 10 0 10 Blower W heel D...

Page 16: ...Temperature Rise F 30 60 30 60 40 70 High Stage Pressure Switch Trip Point w c 0 55 0 55 0 55 Low Stage Pressure Switch Trip Point w c 0 20 0 20 0 20 Front Cover Pressure Switch Trip Point w c 0 37 0...

Page 17: ...gh S tage P res s ure S witc h Trip P oint w c 0 55 0 55 Low S tage P res s ure S witc h Trip P oint w c 0 20 0 20 F ront Cover P res s ure S witc h Trip P oint w c 0 37 0 37 B lower W heel D x W 10 x...

Page 18: ...51 Normal 600 864 47 Normal 920 1 325 46 Plus 660 950 43 Plus 1 012 1 457 42 Minus 585 842 48 Minus 900 1 296 47 Normal 650 936 43 Normal 1 000 1 440 42 Plus 715 1 030 39 Plus 1 100 1 584 38 Minus 63...

Page 19: ...Norm al 800 Norm al 1100 Norm al 1100 Plus 880 Plus 880 Plus 1210 Plus 1210 Minus 900 Minus 990 Minus 1260 Minus 1260 Norm al 1000 Norm al 1100 Norm al 1400 Norm al 1400 Plus 1100 Plus 1210 Plus 1540...

Page 20: ...d 0 8 w c is tabulated for cooling purposes only 6 Motor CFM minimum GMVC95 AMVC95 Continuous Fan Speed Chart Model Furnace Maximum CFM Continuous Fan Speed1 2 GMVC950453BX AMVC950453BX 1400 420 GMVC9...

Page 21: ...5 w c ESP High Stage CFM at 1 5 w c ESP Rise F Minus 747 1 076 56 Minus 999 1 439 56 Normal 830 1 195 50 Normal 1 110 1 598 50 Plus 913 1 315 46 Plus 1 221 1 758 46 Minus 824 1 186 51 Minus 1 067 1 5...

Page 22: ...ximum CFM capaibility is 1760 CFM the continuous fan speed will be 0 30 X 1760 CFM 530 CFM Example If the furnace maximum CFM capaibility is 1760 CFM the continuous fan speed will be 0 30 X 1760 CFM 5...

Page 23: ...esponding taps Refer to the bullet points below for a description of each ramping profile Verify CFM by noting the number displayed on the dual 7 segment LED display 5 6 A OFF OFF B ON OFF C OFF ON D...

Page 24: ...al 800 Plus 660 Plus 880 Minus 720 Minus 990 Normal 800 Normal 1100 Plus 880 Plus 1210 Minus 990 Minus 1260 Normal 1100 Normal 1400 Plus 1210 Plus 1540 Minus 1286 Minus 1620 Normal 1429 Normal 1800 Pl...

Page 25: ...30 140 150 100 90 80 70 60 50 40 30 20 10 OUTPUT BTU HR x 1000 BTU OUTPUT vs TEMPERATURE RISE CHART TEMPERATURE RISE 600 CFM 700 900 1000 1100 1200 1400 1600 1800 2000 2200 2400 CFM FORMULAS BTU OUTPU...

Page 26: ...WIRE AS SUPPLIED WITH THE FURNACE MUST BE REPLACED IT MUST BE REPLACED WITH WIRING MATER IAL HAVING A TEMPERATURE RATING OF AT LEAST 105 C USE COPPER CONDUCTORS ONLY PU DISCONNECT EAC PLUG CONNECTION...

Page 27: ...r to the appropriate wiring diagram for the unit being serviced BK WH BK BK INTEGRATED CONTROL MODULE GROUND TO SCROLL HOUSING BK BK ECM BLOWER MOTOR INDUCTOR COIL PI N 4 WH WH TO ECM TRANSFORMER BLWR...

Page 28: ...reference only Not all wiring is as shown above Refer to the appropriate wiring diagram for the unit being serviced Wiring is subject to change Always refer to the wiring diagram on the unit for the...

Reviews: