background image

SERVICING

42

If either winding does not test continuous, replace the
compressor.

NOTE: 

 If an open compressor is indicated, allow ample

time for the internal overload to reset before replacing
compressor.

S-17B GROUND TEST

If fuse, circuit breaker, ground fault protective device,
etc., has tripped, this is a strong indication that an
electrical problem exists and must be found and cor-
rected. The circuit protective device rating must be
checked, and its maximum rating should coincide with
that marked on the equipment nameplate.

With the terminal protective cover in place, it is accept-
able to replace the fuse or reset the circuit breaker ONE
TIME ONLY to see if it was just a nuisance opening.  If
it opens again, DO NOT continue to reset.

WARNING

Disconnect ALL power before servicing.

Disconnect all power to unit

, making sure that 

all

power legs are open.

1. DO NOT remove protective  terminal cover. Discon-

nect the three leads going to the compressor termi-
nals at the nearest point to the compressor.

2. Identify the leads and using a Megger, Hi-Potential

Ground Tester, or other suitable instrument which
puts out a voltage between 300 and 1500 volts, check
for a ground separately between each of the three
leads and ground (such as an unpainted tube on the
compressor).  Do not use a low voltage output
instrument such as a volt-ohmmeter.

HI-POT

COMPRESSOR GROUND TEST

3. If a ground is indicated, then carefully remove the

compressor terminal protective cover and inspect for
loose leads or insulation breaks in the lead wires.

4. If no visual problems indicated, carefully remove the

leads at the compressor terminals.

WARNING

Damage can occur to the glass embedded terminals if
the leads are not properly removed. This can result in
terminal and hot oil discharging.

Carefully retest for ground, directly between compressor
terminals and ground.

5. If ground is indicated, replace the compressor.

S-17C UNLOADER TEST PROCEDURE

(2 STAGE COMPRESSORS ONLY)

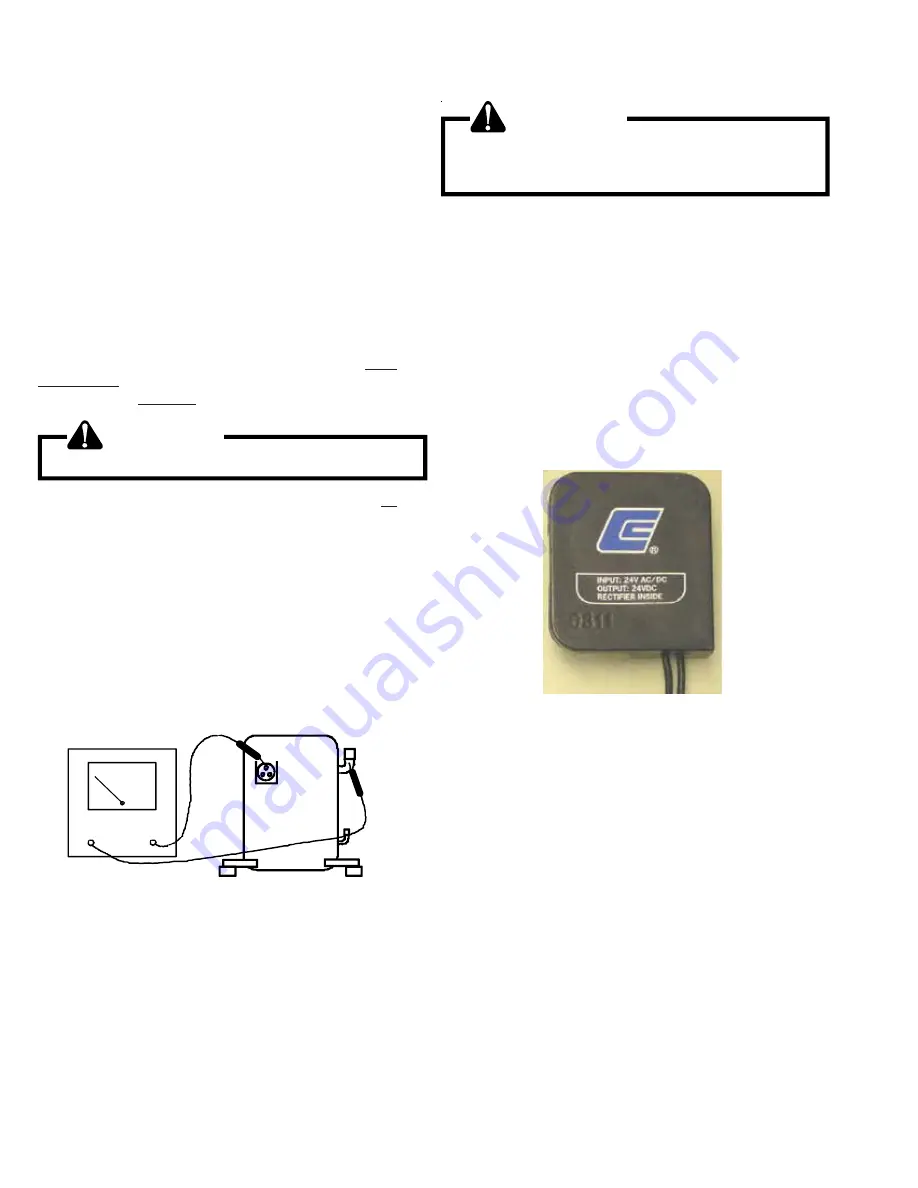
A nominal 24-volt direct current coil activates the internal
unloader solenoid. The input control circuit voltage must be
18 to 28 volt ac. The coil power requirement is 20 VA. The
external electrical connection is made with a molded plug
assembly. This plug contains a full wave rectifier to supply
direct current to the unloader coil.

U NL OADER SO LEN OID

(M olded Plug)


Unloader Test Procedure

If it is suspected that the unloader is not working, the following
methods may be used to verify operation.

1. Operate the system and measure compressor current.

Cycle the unloader ON and OFF at 10 second intervals.
The compressor amperage should go up or down at least
25 percent.

2. If step one does not give the expected results, shut unit

off. Apply 18 to 28 volt ac to the unloader molded plug
leads and listen for a click as the solenoid pulls in.
Remove power and listen for another click as the unloader
returns to its original position.

3. If clicks can’t be heard, shut off power and remove the

control circuit molded plug from the compressor and
measure the unloader coil resistance. The resistance
should be 32 to 60 ohms, depending on compressor
temperature.

Summary of Contents for A/GPG1324-60***M41AA series

Page 1: ...Canada Shown Below ANSI Z21 47 CSA 2 3 Central Furnaces Service Instructions APG GPG 13 and 15 Gas Electric Package Units with R 410A Refrigerant Accessories This manual is to be used by qualified pr...

Page 2: ...U S call 1 713 861 2500 Not a technical assistance line for dealers Your telephone company will bill you for the call WARNING Goodman will not be responsible for any injury or property damage arising...

Page 3: ...ating meets or exceeds 400 lbs When in doubt do not use cylinder WARNING The compressor POE oil for R 410A units is extremely susceptible to moisture absorption and could cause compressor failure Do n...

Page 4: ...115 115 000 BTUH 140 138 000 BTUH REFRIGERANT 4 R 410A MAJOR REVISION MINOR REVISION VOLTAGE 1 208 230V 1ph 60Hz 3 208 230v 3ph 60Hz 4 460v 3ph 60Hz CONFIGURATION M Multi position Model Description A...

Page 5: ...60 60 000 BTUH HEATING INPUT 070 69 000 BTUH 090 92 000 BTUH 115 115 000 BTUH 140 138 000 BTUH REFRIGERANT 4 R 410A MAJOR REVISION MINOR REVISION VOLTAGE 1 208 230V 1ph 60Hz 3 208 230v 3ph 60Hz 4 460...

Page 6: ...l and Medium Chassis PGMDMD103 Motorized 25 Fresh Air Downflow Application Large Chassis PGMDMH101 Motorized 25 Fresh Air Damper Horizontal Application Small Chassis PGMDMH102 Motorized 25 Fresh Air D...

Page 7: ...ombustion you to substances death or serious which can cause illness and which cause cancer birth defects or other reproductive harm are known to the This product contains fiberglass insulation State...

Page 8: ...gas supplier in fuel combustion you to substances death or serious which can cause illness and which cause cancer birth defects or other reproductive harm are known to the This product contains fiber...

Page 9: ...9 DU GAZ ARRIVEE INLET GAS IN ON POS LEVER SHOWN MANUAL GAS ON MARCHE MANUEL EN POS ROBINET A GAZ LIGHTING INSTRUCTIONS PG15...

Page 10: ...Measurement in inches 26 1 2 14 25 3 2 1 1 2 DOWNFLOW FILTER RACK PGFR101 102 103 MODEL A B C RETURN SUPPLY PGC101 102 103 46 1 4 39 3 8 14 1 2 12 1 2 x 23 15 x 22 1 2 NOTE PGFR cannot be used with d...

Page 11: ...4 16 1 8 16 x 25 x 1 PGEH103 35 1 4 18 1 8 18 18 1 4 16 1 8 16 x 25 x 1 ECONOMIZER HORIZONTAL APPLICATIONS Measurement in inches D E C A B 18 16 1 8 PGED103 DOWNFLOW ECONOMIZER 25 A B 16 X 20 x 2 FIL...

Page 12: ...0 12 1 8 6 1 A B 5 3 4 5 3 4 A B B A BOTTOM VIEW BOTTOM VIEW PGMDD103 PGMDD101 102 11 7 8 11 7 8 MODEL A B PGMDD101 102 16 16 PGMDD103 18 16 MODEL A B PGMDMD101 102 16 16 PGMDMD103 18 16 MANUAL MOTORI...

Page 13: ...4 14 3 4 12 1 4 14 3 4 22 3 4 22 1 4 MODEL A B C D RETURN SUPPLY SQRPG101 102 22 3 4 12 1 4 22 1 4 14 3 4 16 16 SQRPG103 22 3 4 12 1 4 22 1 4 14 3 4 18 18 A C B SQUARE TO ROUND CONVERTER HORIZONTAL AP...

Page 14: ...ACCESSORIES 14 GPGHFR101 103 EXTERNAL HORIZONTAL FILTER RACK 16 x 25 x 2 FILTER...

Page 15: ...TE CABLE SLIDE IMPORTANT NOTE If using bottom discharge with roof curb ductwork should be attached to the curb prior to installing the unit Refer to Roof curb Installation Instructions for proper curb...

Page 16: ...l restriction ductwork shall be applied Conditioned air is drawn through the filter s field installed across the coil and back into the conditioned space by the indoorblower Most A GPG series package...

Page 17: ...ust comply with all applicable codes The unit must be electri callygroundedinaccordancewiththelocalcodesor intheir absence with the latest edition of the National Electrical Code ANSI NFPA No 70 or in...

Page 18: ...A TRUNK LINE PER THE TABLES INCLUDE ALL APPLIANCES ON THAT LINE THAT COULD BE OPERATED SIMULTANEOUSLY Thegaspipesupplyingtheunitmustbeproperlysizedbased onthecubicfeetperhourofgasflowrequired specifi...

Page 19: ...LEVEL OF ODORANT IN PROPANE GAS A GAS DETECTING DEVICE IS THE ONLY RELIABLE METHOD TO DETECT A PROPANE GAS LEAK CONTACT YOUR LOCAL PROPANE SUPPLIER ABOUT INSTALLING A GAS DETECTING WARNING DEVICE TO A...

Page 20: ...2 412 767 1 297 1 996 1 084 2 267 90 171 386 719 1 217 1 873 1 017 2 127 100 161 365 679 1 149 1 769 961 2 009 150 130 293 546 923 1 421 772 1 613 200 111 251 467 790 1 216 660 1 381 250 90 222 414 70...

Page 21: ...d gas into the outdoor condenser coil In the condenser coil the hot refrigerant gas being warmer than the outdoor air first loses its superheat by heat trans ferredfromthegasthroughthetubesandfinsofth...

Page 22: ...xtthermostat request B HeatingOperation Highstageheat 1 Thermostat type is set to two stage 2 Thermostat W1 and W2 inputs initiate high stage heating 3 Induceddraftblowerisenergizedathighspeedforthe p...

Page 23: ...high stage cooling IDT ODT Pressure Loss of Charge Switch circuits are checkedforclosedcondition Coolingoperationcanproceed only if these circuits are closed 1 Low and high stage compressor outputs ar...

Page 24: ...5 fault codes To recall the fault codes depress the fault recall but ton for at least 2 seconds but not more than 4 seconds To clear the fault code memory depress the fault recall button for at least...

Page 25: ...sed 5 24VAC 24VAC Common 6 24VAC Pressure Switch Output 7 24VAC Main Valve High Output 8 24VAC Pressure Switch Input 9 Unused Main Valve Low Output Table 2 Circuit Definitions and Voltage Ratings for...

Page 26: ...OFF Delay 0 Seconds Ignition Attempts 3 Recycles Infinite Automatic Restart 60 Minutes Pressure Switch Lockout Delay 5 Minutes Factory Test Mode Active Time 2 Minutes Maximum Flame Failure Response Ti...

Page 27: ...cooling the call for heat shall proceed as normal except the fan remains energized on cool speed Heat Mode 1 CALL FOR HEAT The thermostat calls for heat by energizingthe W terminal Thecontrolcheckstos...

Page 28: ...RestrictorOrificeAssemblyinCoolingOperation In the cooling mode the orifice is pushed into its seat forcing refrigerant to flow through the metered hole in the center of the orifice Either a thermosta...

Page 29: ...or soot scale etc Inspect all burners for lint and proper positioning 9 Startthesystem usingtheproperinstrumentationcheck gas inlet and manifold pressures burner flame and microamp signal Adjust if ne...

Page 30: ...14 1286 40 22 45 90 180 450 15 60 120 240 480 1200 41 176 439 16 56 113 225 450 1125 42 21 43 86 172 429 17 53 106 212 424 1059 43 167 419 18 50 100 200 400 1000 44 41 82 164 409 19 47 95 189 379 947...

Page 31: ...OR MINUS 3 INCHES WATER COLUMN FROM 3 5 INCHES WATER COLUMN FOR NATURAL GAS OR 10 INCHES WATER COLUMN FOR PROPANE GAS Toadjustthepressureregulatoronthegasvalve turndown clockwise toincreasepressurean...

Page 32: ...t Ignition Control S 313 Open Control Circuit Test Control Circuit w ith Voltmeter S 4 Low Voltage Test Voltage S 1 Faulty Evap Fan Motor Repair or Replace S 16 Shorted or Grounded Fan Motor Test Moto...

Page 33: ...Test Flame Sensor S 314 Faulty Ignition Control Test Control S 313 Gas Valve or Gas Supply Shut Off Turn Valves to On Position S 304 Faulty Induced Draft Blow er Test Blow er S 303 Dirty Flame Sensor...

Page 34: ...42 S 17C UnloaderTest 42 S 17D OperationTest 43 S 18 Testing Crankcase Heater optional item 43 S 100 RefrigerationRepairPractice 43 S 101 LeakTesting 44 S 102 Evacuation 44 S 103 Charging 45 S 104 Che...

Page 35: ...within the voltage tabulation as shown If the voltage falls below the minimum voltage checkthelinewiresize Longrunsofundersizedwirecan causelowvoltage Ifwiresizeisadequate notifythelocal power company...

Page 36: ...nd G 3 No voltage indicates the trouble is in the thermostat or wiring 4 Checkthecontinuityofthethermostatandwiring Repair or replace as necessary S 3B COOLING ANTICIPATOR The cooling anticipator is a...

Page 37: ...y cause property damage personal injury or death The compressor contactor and other relay holding coils are wired into the low or line voltage circuits When the control circuit is energized the coil p...

Page 38: ...d start components are not required on Scroll compres sor equipped units due to a non replaceable check valve located in the discharge line of the compressor However hard start kits are available and...

Page 39: ...ensitive The normally closed contacts are wired in series with the start capacitor and the relay holding coil is wired parallel with the start winding As the motor starts and comes up to speed the inc...

Page 40: ...r head 2 Removethe2screwssecuringtheECMpowerheadand separate it from the motor 3 Disconnect the 3 pin motor connector from the power head and lay it aside 4 Using an ohmmeter check the motor windings...

Page 41: ...ant air and cannot occur externally fromtheventingterminalwithoutthepresenceofanexternal ignition source Therefore properevacuationofahermeticsystemisessen tial at the time of manufacture and during s...

Page 42: ...erminalprotectivecoverandinspectfor loose leads or insulation breaks in the lead wires 4 If no visual problems indicated carefully remove the leads at the compressor terminals WARNING Damage can occur...

Page 43: ...itch WARNING Line Voltage now present A If the compressor starts and continues to run the cause for failure is somewhere else in the system B If the compressor fails to start replace S 18 TESTING CRAN...

Page 44: ...lent to 25 microns absolute and a thermocouple vacuum gauge to give a true reading of the vacuum in the system NOTE Neverusethesystemcompressorasavacuumpump orrunwhenunderahighvacuum Motordamagecould...

Page 45: ...essor section of a Scroll compressor is more tolerant of liquid refrigerant continued floodback or flooded start conditions may wash oil from the bearing surfaces causing premature bearing failure S 1...

Page 46: ...60 8 6 162 0 57 0 264 0 87 4 366 0 110 4 468 0 129 0 600 0 149 0 62 10 0 164 0 57 7 266 0 87 9 368 0 110 8 470 0 129 3 604 0 149 5 64 11 3 166 0 58 4 268 0 88 4 370 0 111 2 472 0 129 7 608 0 150 1 66...

Page 47: ...Recover during system repair or final unit disposal 1 Run system at least 10 minutes to allow pressure to stabilize 2 Temporarily install thermometer on suction large line nearcompressor withadequatec...

Page 48: ...88 86 84 82 80 78 308 90 88 86 84 82 80 317 92 90 88 86 84 82 326 94 92 90 88 86 84 335 96 94 92 90 88 86 345 98 96 94 92 90 88 354 100 98 96 94 92 90 364 102 100 98 96 94 92 374 104 102 100 98 96 94...

Page 49: ...should rise and the suction tem perature will fall 4 If a temperature or pressure change is noticed the expansionvalveisoperating Ifnochangeisnoticed the valve is restricted the power element is faul...

Page 50: ...he system by first removing the refrigerant charge replacing and or installing liquid line drier evacuating and recharging S 115 COMPRESSOR BURNOUT When a compressor burns out high temperature develop...

Page 51: ...clined manometer measure the static pressure of the return duct at the inlet of the unit NegativePressure RETURN SUPPLY INCLINED MANOMETER Total External Static 2 Measurethestaticpressureofthesupplydu...

Page 52: ...1 Remove electrical power to unit Some units may have more than one source of power 2 Remove the wires from the limit control terminals 3 Using an ohmmeter test for continuity across the two terminal...

Page 53: ...imit switch re closes the controlgoesthroughapre purgeperiodandthenmakesan ignitionattempt Theindoorblowerremainson forthedelay off time during the re ignition attempt 1 If no voltage is measured on e...

Page 54: ...tingequipmentisusedon13SEERmodels Atwo stagecombinationredundantoperatortypegasvalve which provides all manual and automatic control functions requiredforgasfiredheatingequipmentisusedon15SEER models...

Page 55: ...etakeninto consideration such as inlet manifold gas pressure align ment andpositioning specificgravityandBTUcontentofthe gas being consumed Theonlytimeresizingisrequirediswhenareductioninfiring rate i...

Page 56: ...e Inlet Pressure Inlet Pressure Tap HONEYWELL MODEL VR8215 1 STAGE GAS VALVE MEASURING INLET AND MANIFOLD GAS PRESSURE With Power ON WARNING Line Voltage now present 3 Put furnace into heating cycle a...

Page 57: ...l for heat the control checks to see that the pressure switch is open If the control sees that the pressure switch is closed before the induced draft blower is energized the LED will flash a code of 2...

Page 58: ...00A may be used on models with AA revisions LPT 03 is compatible with both the White Rodgers and the Honeywellgasvalves For propane conversions above 2000 feet high altitude kit HA 02 is required in a...

Page 59: ...e Indoor thermostat calling for cool 1 Checkfor230voltsfromL1terminalofcontrolmoduleto L2 Novoltage checkwireconnections continuity etc 2 Check for 24 volts at R and C thermostat terminals on ignition...

Page 60: ...sureswitchisclosed theLEDstops flashingandthecontrolbeginstimingthe15secondpre purge 3 2 1 6 5 4 9 8 7 12 11 10 L2 L2 L2 L2 COOL HEAT UNUSED L1 L1 D1 FS Diagnostic LED Blower Off Delay Settings Transf...

Page 61: ...eath 1 DisconnecttheflamesensorwirefromterminalFSofthe ignition control module Flame Sensor Flame Sensor 2 Connect a microamp meter in series with this wire and terminal FS 3 Be sure the negative side...

Page 62: ...ENTHALPY CONTROL 2 1 3 50F 1K RELAY 1K RELAY COIL A B Y2 Y1 MULTI STAGE T STAT GMC CHT90 120 OR EQUIVALENT 1K RELAY CONTACTS 6 4 TR 1 T 1 P 1 P TR R W B T JUMPER BARBER COLEMAN AD 931 105 POTENTIOMET...

Page 63: ...T FAILURE TO DO SO MAY CAUSE PROPERTY DAMAGE PERSONAL INJURY OR DEATH ECONOMIZER GPC13MED102 103FOR PG13 15 M4 Wiring is subject to change Always refer to the wiring diagram on the unit for the most u...

Reviews: