


21
2. OPERATING INSTRUCTIONS
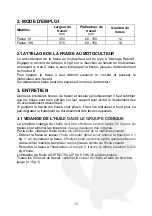
Models
Work width
mm
Work depth
mm
Number of
cultivators
Fresa 19
450
60 - 150
12
Fresa 19S
570
60 - 150
16
2.1 COUPLING THE CULTIVATOR TO THE ROTARY TILLER
The cultivator is attached to the rotary tiller with a "quick couple". Place the
cultivator coupling A fig.2 in the rotary tiller's coupling sleeve with pawl C in the
direction shown by the arrow (narrow seating) until coupling B spans into place.
To separate the cultivator first lift the coupling up and push the rotary tiller
forward.
The cultivator can be fitted with an optional road wheel.
3. MAINTENANCE
After the first working hours, it is good operating practice to check to be sure the
choppers are nicely tightened on their mounts to prevent them from shearing if
they have worked loose.
If the choppers become bent during work, cold straighten them so as not to alter
the hardening treatment given to the cutting surfaces.
3.1 CHANGING THE OIL IN THE BEVEL PAIR
First oil change after about 50 work hours to remove impurities due to normal
moving part running in.
Thereafter, change the oil every 200 hours as follows:
- Detach the cultivator and drain the oil by removing plug n.1 fig. 1, and tipping
the machine upside down. Change oil after some hours of work to take full
advantage of the increased fluidity of the hot oil.
- Tip the cultivator back to its normal position and pour the new oil through the
same plug. It is advisable to use 0.250 kg of AGIP ROTRA MP SAE 80W/90 oil.
Every 50 work hours, check the oil level with the dipstick (n.1 fig.1).
4. SPARE PARTS
When ordering spare parts from our Spare Parts Division, always specify:
Type of rotary cultivator
Cultivator series. For example:
Cultivator type 19S/E
The type and series are stamped on the rotary cultivator as shown in n.2 fig.1
Use only original parts.
Summary of Contents for FRESA 19
Page 3: ...3 Fig 1 Fig 2 Fig 3 Fig 4 ...
Page 6: ...6 ...
Page 12: ...12 ...
Page 18: ...18 ...
Page 28: ...28 ...
Page 34: ...34 ...
Page 39: ...Edito a cura dell UFFICIO PUBBLICAZIONI TECNICHE Matr 63800563 6 Ed Printed in Italy ...


