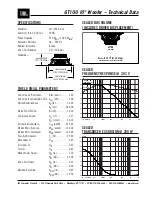
GoldenEar Technology
8
SuperSub XXL Manual
Placing Two Subwoofers in Your Listening Room
GoldenEar’s SuperSub subwoofers are engineered to be used singly or in stereo pairs. With a single subwoofer,
both left and right signals are combined (either at the subwoofer or at the receiver/processor). With stereo
subwoofers, the left and right low frequency signals can be reproduced by their own individual subwoofers.
The use of one subwoofer achieves outstanding performance; however, the addition of a second subwoofer
(one for the left and one for the right channel) clearly offers the highest level of performance achievable for
both movies and music. Two subwoofers also couple much better to the air in your room (four times better) and
of course offer double the power.
In addition to the above mentioned setup for stereo subwoofers, some state-of-the-art home theater installations
have begun to use a separate subwoofer placed in the rear of the room and we recommend this for the
absolute ultimate in movie bass performance. When using two subwoofers, placing one in the front of the room
and the other in the rear of the room usually provides the best bass performance and sonic integration. If those
locations are not possible or if you want to experiment with placement options using two subwoofers, the
following procedure will be a helpful guide to achieving better bass performance. Refer to “Subwoofer
Connection” then proceed as follows:
1. Temporarily turn all speakers off (either by turning your amplifi er off or disconnecting them);
2. Connect and place one subwoofer in the central area of your listening room (follow directions for
connection, as outlined in the following section);
3. At a moderately loud level, play music or a video soundtrack with extended bass that is repetitive or
continuous;
4. Walk around your room and note where the bass sounds louder and where it sounds quieter;
5. Place the fi rst subwoofer within a louder bass area of your room; then place the second subwoofer within
a quieter bass area of your room;
6. Connect both subwoofers and switch all speakers back on; and switch the amplifi er on, or reconnect it;
7. Now follow “Fine Tuning” instructions after the Subwoofer Connection section to optimize your system’s
overall
bass
performance.
NOTE:
The preceding is only a guideline. You may want to use a bass test disc and SPL meter to more accurately
determine the bass characteristics of your listening room (see dealer for more information). Remember that room
acoustics vary, so it may take some experimenting with placement to achieve best performance.
7