background image

4

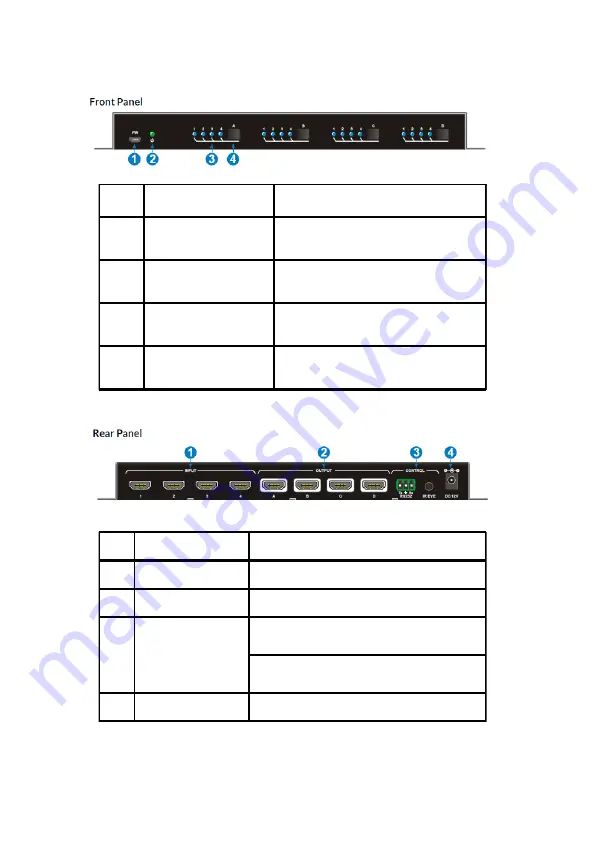
Product Layout

No. Name

Description

1

Firmware

Micro USB port for performing

firmware update

2

Power  LED

The LED is illuminated when

powered on

3

Input LEDs

One LED illuminates to indicate

the selected input source

4

Input  Select  Button Press the button to cycle through

the four input sources

No. Name

Description

1

INPUT (1-4)

Connects to your HDMI source devices

2

OUTPUT (A-D)

Connects to your HDMI displays

3

CONTROL

RS232: Connects to your computer's RS232

port using the included RS232 cable

IR Eye: Connects to the included IR

Receiver Extension cable

4

DC 12V Power Jack Connects to the included power adapter

Summary of Contents for Matrix44

Page 1: ...4x4 HDMI Matrix 4K User s Guide G4 0044A P N Matrix44 ...

Page 2: ...ybeforeinstallation and operation Please pay close attention to all warnings and hints for this device Do not expose this unit to rain heavy moisture or liquid Do not repair the device or open the enclosure without professional guidance to avoid electric shocks Doing so may void your warranty Keep the product in a well ventilated location to avoid damage from overheating Shut off power and make su...

Page 3: ... the 4 display devices with support for up to 4K 60Hz resolution Features Supports HDMI resolution up to 4K 60Hz 4 2 0 Supports 1080p 3D Compliant with HDMI 1 4 and HDCP 2 2 and backward compatible with previous versions Smart EDID management to match the connected displays Switching via front panel buttons IR remote or RS232 control Sturdy metal housing with surface mount mechanism Features firmw...

Page 4: ...ut source 4 Input Select Button Press the button to cycle through the four input sources No Name Description 1 INPUT 1 4 Connects to your HDMI source devices 2 OUTPUT A D Connects to your HDMI displays 3 CONTROL RS232 Connects to your computer s RS232 port using the included RS232 cable IR Eye Connects to the included IR Receiver Extension cable 4 DC 12V Power Jack Connects to the included power a...

Page 5: ...S232connectorthenconnecttheother end to a RS232 serial port of your computer this connection is needed only if you require device control via a computer system 4 ConnectyourHDMIdisplaystotheHDMI OUTPUT A D connectors with HDMI cables HDMI cables not included 5 Plug the included IR Receiver Extension cable into the IR EYE port This connection is needed only if you require device control using the i...

Page 6: ...ttontocyclethrough the various inputs IR Remote Control Press the Standby 1 button to enter or exit Standby mode To switch an input to one or more outputs first press the number corresponding to the desired INPUT then press one or more OUTPUTs or the ALL button then press the ENTER button to execute the command ...

Page 7: ... both buttons 1 4 MENU Press ENTER to execute the command Send the source device on input 4 to all of the displays INPUTS Press button 4 MENU Press the All button MENU Press ENTER to execute the command Set the EDID for one or more source devices to the EDID of a specific output MENU Press the EDID button INPUTS Press the desired button s or the ALL button OUTPUTS Pressthebuttoncorrespondingtothed...

Page 8: ...nwitha3rdpartyRS232control software such as CommWatch shown below Please use the same configuration settings for the RS232 control software of your choosing Select the COM port baud rate data bit stop bit and parity correctly RS232 Settings Baud rate 9600 Data bit 8 Stop bit 1 Parity None ...

Page 9: ...9 RS232Commands System Commands Signal Switching ...

Page 10: ...10 Preset Setting EDID Management HDCP Management ...

Page 11: ...facturers TM and may be omitted on the user s guide The pictures on the user s guide are just for reference and there may be some slight differences with the acutal products We reserve the rights to make changes without prior noticetoaproductorsystemdescribedhereintoimprove reliability function or design ...

Page 12: ...Thank you for choosing gofanco www gofanco com ...

Reviews: