background image

6. Operation Description

6. Operation Description

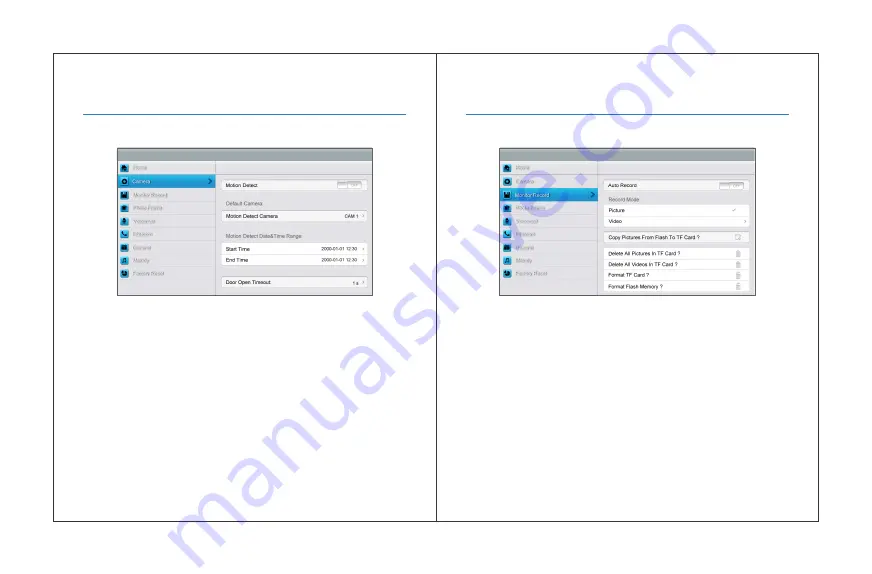
[Camera]

 setting page

In this page, you can turn 

[Motion Detect]

 on or off, set one camera as 

default  for  monitoring,  set  default  camera  for  motion  detection,  set 
detection start & end time and set door open timeout.

• To  set  a  default  camera  for  motion  detection,  enter  into  option  list: 

CAM1/CAM2/CCTV1/CCTV2/CCTV3/CCTV4 Choose one option 


Press 

[Return] 

button

• To set time range for motion detection, you can set the start time and 

the end time

• To set door open timeout, enter into option list: 1 s/2 s/3 s/Open While 

Pressing Choose one option 


Press 

[Return] 

button

Remark:

  Once  a  moving  object  is  detected,  camera  will  automatically 

capture a video of 15s. When monitoring door station or CCTV, motion 
detection will pause until the monitoring ends.

[Monitor Record]

 setting page

In this page, you can

• Turn 

[Auto Record]

 on or off. If 

[Auto Record]

 is on, the monitor will 

capture pictures or videos automatically, when door station calls in.

• Select picture or video record mode. To set video recording timeout, 

enter into drop-down option list: 15 s/30 s/60 s.

• Copy/delete pictures and videos

• Format TF card and flash memory

31

32

Summary of Contents for SeeThru

Page 1: ...view of the Godrej Policy of continuous development and improvement the dimensions as seen on the catalogue of the product may not match with the actual product The colour combinations of the product...

Page 2: ...13 5 1 Installation Location 13 5 2 Wire Monitor Installation 14 6 Operation Description 15 6 1 Main Screen 15 6 2 Visitor Call 17 6 3 Monitor Function 20 6 4 Multimedia 20 6 4 1 Image Video Storage 2...

Page 3: ...tallation Do not unplug the TF card when recording this generally will cause loss of data Please make sure to follow the instructions to prevent any danger or property losses Do not place the product...

Page 4: ...Door Release Button Touch button for releasing door 7 Touch Screen 7 inch touch screen 8 MIC Microphone 9 Power Cable AC power cable 10 Power Switch 11 TF Card Slot Socket for TF card NO Part Name Des...

Page 5: ...ion detection Leaving voice messages for family visitors Point to point intercom and broadcast Support digital photo frame 2 2 Main Functions Monitoring and talking with a visitor Door lock release Su...

Page 6: ...CTV and can only monitor the directly connected CCTV Extensions 3 4 1 System Layout CCTV connection mode 2 Only master monitor can connect to CCTV extensions get CCTV video from the master The extensi...

Page 7: ...gram Please be careful to wiring on polarity Intercom wiring diagram with one monitor 4 2 Wiring Diagram Intercom wiring diagram with master monitor and extensions pay attention to the impedance match...

Page 8: ...can only monitor the connected CCTV CCTV connection mode 2 Only the master can connect to CCTV extensions get CCTV video from the master The extensions monitor CCTV by sending requests to the master O...

Page 9: ...r Installation 1 Push down the button with screwdriver 2 Put the wire into the hole from the bottom 3 Release the screwdriver 4 Check the fastness of the wire 5 Remove wall hanger bracket behind monit...

Page 10: ...o page enter Image page enter Voicemail page enter Photo Frame page enter Intercom page enter Telephone page enter Setting page turn off screen In Leaving mode when door station calls in the monitor w...

Page 11: ...open the door turn off screen When a door station calls in press Talk to start to talk press Talk again to terminate the talk During the talk press Change to switch to other door station or CCTV and t...

Page 12: ...corresponding door station CCTV Remark The Transfer buttons will be in disable status under monitor mode If you insert TF card monitor can record image and video if you do not insert TF card monitor c...

Page 13: ...between TF card and flash memory show previous page zoom in out image and video show next page delete the selected image video You can press the icon or on the top left corner to switch Image Video re...

Page 14: ...e Switch between family message list and guest message list Remarks Up to 32 messages for family and 2 messages for guest When full the newest message will automatically overwrite the oldest message T...

Page 15: ...w next image delete 6 5 Intercom Function Press the Intercom icon on main screen choose the monitor you want to call and then press Call and then you can talk with the corresponding monitor Icon Defin...

Page 16: ...disable Mute function adjust volume enable disable call forwarding function Call Forwarding function is enable reset phone redial 6 6 1 Call Forwarding Function To use call forwarding function you nee...

Page 17: ...Door Station by Telephone When no one answers the call from door station the call will be transferred to your telephone During the talk input 2 to open the door 6 7 Setting page Press Setting icon to...

Page 18: ...time To set door open timeout enter into option list 1 s 2 s 3 s Open While Pressing Choose one option Press Return button Remark Once a moving object is detected camera will automatically capture a...

Page 19: ...ng mode Remark The Voicemail message is stored on the TF card This configuration will be invalid if there is no valid TF card inserted To record message for guest please see 6 4 3 In this page you can...

Page 20: ...With the CCTV mode of master monitor changing the extensions CCTV mode will change automatically Note that you should set the master and extension properly In this page you can Turn Touch Tone on or o...

Page 21: ...h door station Support two 4 wire door stations Connection with CCTV Support four 2 wire CCTV input Connection with extension Support 3 extension monitors monitor Connection with audio phone Support o...

Page 22: ...Notes Notes 39 40...

Reviews: