background image

GB

12

6. Before starting the equipment

The lawn mower is delivered unassembled. The
complete push bar and the grass collector must be
assembled before using the lawn mower. Follow the
operating instructions step-by-step and use the
pictures provided as a visual guide to easily
assemble the machine.

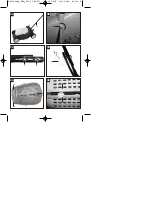
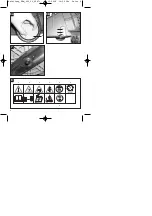
6.1 Fitting the push bar (Fig. 3a to 3d)

Fit a bottom push bar (Fig. 3a / Item 8) into the
opening provided for it (Fig. 3a) and secure it as
shown in Fig. 3b with a screw (Fig. 3b / Item 9).
Proceed in the same way on the other side.
When you fit the top push bar you can decide the
height of the push bar by selecting the appropriate
fastening hole (Fig. 3c). Fasten the top push bar
using either the holes L for a low position or H for a
high position. Screw the top push bar to the bottom
push bar as shown in Fig. 3d.

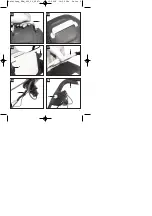
6.2 Fitting the grass box (Fig. 4a to 4f)

Fit the two halves of the grass box together (Fig. 4a /
Item 12). The two halves are identical. Ensure that all
the plastic lugs engage correctly (Fig. 4b). Next push
the grass box handle (Fig. 4c / Item 13) into the
openings on the grass box. Check that the handle is
secure and correctly positioned as shown in Fig. 4d.
Before you fit the grass bag you must ensure that the
motor is switched off and the blade is not rotating.
The grass box must be attached to the two hooks on
the mower (Fig. 4e / Item A). To do this, open the
ejector flap with one hand (Fig. 4f / Item 5) and attach
the grass box with the other hand as shown in Fig. 4f.
The ejector flap is held against the grass box by a
spring.

6.3 Setting the cutting heights
Important!

Adjust the cutting height only when the engine is
switched off and the power cable has been
disconnected.

Before you begin to mow, check to ensure that the
blade is not blunt and that none of the fasteners are
damaged. To prevent any imbalance, replace blunt
and/or damaged blades. To carry out this check, first
switch off the motor and pull out the power plug.

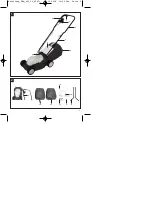
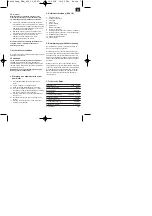
The cutting height is adjusted as shown in Figs. 6a
and 6b. To do this turn the hub cap clockwise to
release the axle (Fig. 6a) and remove the hub cap
with the screw and tire. The tires can now be fitted in
position 1, 2 or 3 to suit the required cutting height. Fit
all four tires at the same height so that the cutting
blade runs parallel to the lawn.

Position Cutting 

depth

1

60 mm

2

42.5 mm

3

25 mm

7. Operation

Before you connect the equipment to the mains
supply make sure that the data on the rating plate are
identical to the mains data. Connect the plug (Fig.
1/Item 6) to an extension cable. It is imperative to
secure the extension cable with the cable grip as
shown in Figure 5a.

Important!

To prevent the machine switching on accidentally,
the lawn mower is equipped with a safety lock-off
(Fig. 5b/Item A) which must be pressed before the
switching bar (Fig. 5b/Item B) can be activated. The
lawn mower switches itself off when the switch is
released.
Repeat this process several times so that you are
sure that the machine functions properly.
Before you perform any repair or maintenance work
on the machine, ensure that the blade is not rotating
and that the power supply is disconnected.
Repeat this process several times so that you are
sure that the machine functions properly. Before you
perform any repair or maintenance work on the
machine, ensure that the blade is not rotating and
that the power supply is disconnected.

Important! 

Never open the discharge flap if the grass box is
being emptied and the motor is still running. The
rotating blade can cause serious injuries.
Always secure the discharge flap and grass bag
carefully. Always switch off the motor before you
remove these items.
The safety distance between the blade casing and
the user provided by the guide struts must be
maintained at all times. Take special care when
mowing and changing direction on embankments
and slopes. Ensure that you have a secure surface
to stand on, wear shoes with anti-slip soles that offer
good grip, and long trousers. Always mow across the
slope (not in up or down direction). 
Do not use the mower on gradients exceeding 15°
for safety reasons.
Take special care when moving backwards and
pulling the lawn mower. Danger of stumbling.

Anleitung_ERM_900_30_SPK7:_  03.12.2008  14:55 Uhr  Seite 12

Summary of Contents for 34 002 42

Page 1: ...lectrique Istruzioni per l uso Tosaerba elettrico Manual de instruções Corta relvas eléctrico B Upute za uporabu Električne kosilice za travu Instrukcja obsługi Kosiarka elektryczna Instrucţiuni de utilizare Motocositoare electrică A Használati utasítás Elektromos fűnyírógép ERM 900 30 Anleitung_ERM_900_30_SPK7 _ 03 12 2008 14 54 Uhr Seite 1 ...

Page 2: ...a e respeite as instruções de serviço e de segurança antes de colocar o aparelho em funcionamento B Prije puštanja u rad pročitajte i pridržavajte se ovih uputa za uporabu i sigurnosnih napomena Przed uruchomieniem należy przeczytać instrukcję obsługi i wskazówki dotyczące bezpieczeństwa oraz stosować się do nich Înainte de punerea în funcøiune se vor citi μi respecta instrucøiunile de folosire μi...

Page 3: ...3 1 2 1 12 12 11 9 8 2 3 4 10 7 8 7 6 5 13 Anleitung_ERM_900_30_SPK7 _ 03 12 2008 14 54 Uhr Seite 3 ...

Page 4: ...3d 3a 3c 4a 3b 4b 8 L H 9 10 12 12 4 Anleitung_ERM_900_30_SPK7 _ 03 12 2008 14 54 Uhr Seite 4 ...

Page 5: ...5b 4c 4d 4e 4f 5a 11 A B 13 A A 11 5 5 Anleitung_ERM_900_30_SPK7 _ 03 12 2008 14 55 Uhr Seite 5 ...

Page 6: ...6a 7 8 1 3 4 7 6 5 6b A 3 A 2 1 2 6 Anleitung_ERM_900_30_SPK7 _ 03 12 2008 14 55 Uhr Seite 6 ...

Page 7: ... entfernen 5 Achtung das Messer rotiert nach Abstellen des Motors nach 6 Das Gerät nicht Regen oder Feuchtigkeit aus setzen 7 Achtung Anschlusskabel von den Schneide werkzeugen fernhalten 3 Gerätebeschreibung Bild 1 2 1 Ein Ausschalter 2 Kabelzugentlastung 3 Tragegriff 4 Fangkorb 5 Auswurfklappe 6 Netzstecker 7 Oberer Schubbügel 8 Unterer Schubbügel 9 Befestigungsschrauben für unteren Schubbügel 1...

Page 8: ...nwucht zu erzeugen Bei dieser Prüfung den Motor abstellen und den Netzstecker ziehen Die Verstellung der Schnitthöhe muss wie in Bild 6a und 6b dargestellt durchgeführt werden Drehen Sie dazu die Radkappe im Uhrzeigersinn um die Achse zu lösen Bild 6a und entfernen Sie die Radkappe samt Schraube und Rad Entsprechend der gewünschten Schnitthöhe können Sie das Rad nun in Position 1 2 oder 3 anbringe...

Page 9: ...wechselt werden Legen Sie die verwendete Geräteanschlussleitung schleifenförmig vor der verwendeten Steckdose auf die Erde Mähen Sie von der Steckdose bzw vom Kabel weg und achten Sie darauf dass die Geräte anschlussleitung immer im gemähten Rasen liegt damit die Geräteanschlussleitung nicht vom Rasen mäher überfahren wird Sobald während des Mähens Grasreste liegen bleiben muss der Fangsack entlee...

Page 10: ...n Bei übermäßiger Funkenbildung lassen Sie die Kohlebürsten durch eine Elektrofachkraft überprüfen Achtung Die Kohlebürsten dürfen nur von einer Elektrofachkraft ausgewechselt werden 9 4 Wartung Im Geräteinneren befinden sich keine weiteren zu wartenden Teile 9 5 Ersatzteilbestellung Bei der Ersatzteilbestellung sollten folgende Angaben gemacht werden Typ des Gerätes Artikelnummer des Gerätes Iden...

Page 11: ... if you damage the cable pull the plug out of the socket 5 Caution The cutters continue to run after the motor is switched off 6 Do not expose the equipment to rain or moisture 7 Caution Keep the power cable away from the cutters 3 Layout Fig 1 2 1 ON OFF switch 2 Cable strain relief clamp 3 Carry handle 4 Grass basket 5 Ejector flap 6 Mains plug 7 Top push bar 8 Bottom push bar 9 Fastening screws...

Page 12: ...cap clockwise to release the axle Fig 6a and remove the hub cap with the screw and tire The tires can now be fitted in position 1 2 or 3 to suit the required cutting height Fit all four tires at the same height so that the cutting blade runs parallel to the lawn Position Cutting depth 1 60 mm 2 42 5 mm 3 25 mm 7 Operation Before you connect the equipment to the mains supply make sure that the data...

Page 13: ...ains lead is always on the section of lawn that you have already mowed so that you do not run over the mains lead with the mower As soon as you see mown grass on the lawn whilst you are mowing the grass bag will need emptying Important Before you remove the grass bag switch off the motor and wait until the cutting tool reaches a standstill To remove the grass bag raise the discharge flap with one ...

Page 14: ...ualified electrician 9 4 Maintenance There are no parts inside the equipment which require additional maintenance 9 5 Ordering replacement parts Please quote the following data when ordering replacement parts Type of machine Article number of the machine Identification number of the machine Replacement part number of the part required For our latest prices and information please go to www isc gmbh...

Page 15: ... tous travaux de maintenance et en cas d endommagement de la tuyauterie retirez la fiche de la prise 5 Attention la lame tourne encore après l arrêt du moteur 6 N exposez pas l appareil à la pluie ni à l humidité 7 Attention maintenez le câble de raccordement loin du dispositif de coupe 3 Description de l appareil figure 1 2 1 Interrupteur Marche Arrêt 2 Déchargeur pour câble 3 Poignée 4 Panier co...

Page 16: ...igure 4e pos A Ouvrez pour ce faire d une main le clapet d éjection figure 4f pos 5 et accrochez avec l autre main le panier collecteur comme indiqué dans la figure 4f Le clapet d éjection est tiré par un ressort contre le panier collecteur 6 3 Réglage de la hauteur de coupe Attention Le déplacement de la hauteur de coupe peut seulement être entrepris lorsque le moteur est arrêté et le câble secte...

Page 17: ...herbe La partie inférieure du carter de la tondeuse à gazon doit être gardée propre et les dépôts d herbe absolument éliminés Les dépôts gênent le processus de démarrage altèrent la qualité de coupe et lʼéjection de lʼherbe Sur les pentes il faut suivre une ligne de tonte transversale par rapport à la pente Un glissement de la tondeuse à gazon est évité par une inclinaison vers le haut Sélectionne...

Page 18: ...r comme suit Desserrez la vis de fixation figure 7 Retirez la lame et remplacez la par une neuve Pour la pose d une lame neuve veillez au sens de montage de la lame Les ailettes de la lame doivent se dresser dans le carter moteur Ensuite resserrez la vis de fixation Le couple de serrage doit être env de 25 Nm 9 3 Brosses à charbon Si les brosses à charbon font trop dʼétincelles faites les contrôle...

Page 19: ...nzione Lame taglienti Staccate la spina dalla presa di corrente prima di eseguire lavori di manutenzione o in caso di danni del cavo 5 Attenzione la lama continua a ruotare anche subito dopo lo spegnimento del motore 6 Non esporre l apparecchio alla pioggia o all umidità 7 Attenzione tenete lontano dalla lama il cavo di alimentazione 3 Descrizione dell apparecchio Fig 1 2 1 Interruttore ON OFF 2 D...

Page 20: ...e indicato in Fig 4f Il portello di scarico viene tenuto chiuso verso il cestello di raccolta da una molla 6 3 Regolazione delle altezze di taglio Attenzione La regolazione dellʼaltezza di taglio deve venire eseguita solamente a motore spento e con il cavo della corrente staccato Prima di iniziare a tagliare lʼerba verificate che le lame siano affilate e che i loro dispositivi di fissaggio non sia...

Page 21: ...l taglio e sullo scarico dell erba Sui pendii le corsie formate dal taglio devono essere trasversali rispetto alla pendenza Per evitare che il tosaerba scivoli lateralmente basta inclinarlo verso l alto Scegliete l altezza di taglio a seconda della lunghezza effettiva del manto erboso Eseguite diverse passate in modo che ogni volta vengano tagliati al massimo 4 cm Prima di eseguire qualsiasi contr...

Page 22: ...nte Allentate la vite di fissaggio Fig 7 Togliete la lama e sostituitela con una nuova Nel montare la nuova lama fate attenzione al senso di montaggio Le alette della lama devono sporgere nel vano motore Quindi serrate di nuovo saldamente la vite di fissaggio La coppia di serraggio deve essere di ca 25 Nm 9 3 Spazzole al carbone In caso di uno sviluppo eccessivo di scintille fate controllare le sp...

Page 23: ... motor 6 Não exponha o aparelho à chuva ou à humidade 7 Atenção mantenha o cabo de alimentação afastado das ferramentas de corte 3 Descrição do aparelho figuras 1 2 1 Interruptor para ligar desligar 2 Cerra cabos 3 Pega de transporte 4 Cesto de recolha 5 Portinhola de expulsão 6 Ficha de alimentação 7 Barra de condução superior 8 Barra de condução inferior 9 Parafusos de fixação para a barra de co...

Page 24: ...estão danificados Substitua os dispositivos de corte que estejam rombos e ou danificados de modo a prevenir um desalinhamento Não se esqueça de desligar o motor e retirar a ficha da tomada antes de efectuar esta verificação O ajuste da altura de corte tem de ser feito conforme ilustrado nas figuras 6a e 6b Para tal rode o tampão da roda para a direita para soltar o eixo fig 6a e retire o tampão da...

Page 25: ...r qualquer controlo da lâmina Lembre se de que a lâmina ainda continua a girar durante alguns segundos depois de ter desligado o motor Nunca tente parar a lâmina Verifique regularmente se a lâmina está correctamente fixada em bom estado e bem afiada Caso contrário afie ou substitua a lâmina Caso a lâmina em movimento bata num objecto pare a máquina e espere até que a lâmina fique totalmente parada...

Page 26: ...ntido de montagem As aletas da lâmina devem apontar para o interior do compartimento do motor De seguida reaperte o parafuso de fixação O binário de aperto deve ser de aprox 25 Nm 9 3 Escovas de carvão No caso de formação excessiva de faíscas mande verificar as escovas de carvão por um electricista Atenção As escovas de carvão só podem ser substituídas por um electricista 9 4 Manutenção No interio...

Page 27: ...te uređaj kiši ili vlazi 7 Pozor priključni kabel držite podalje od rezaćih alata 3 Opis uređaja slika 1 2 1 Sklopka za uključivanje isključivanje 2 Mehanizam za sprječavanje zatezanja kabela 3 Ručka za nošenje 4 Sabirna košara 5 Poklopac otvora za izbacivanje 6 Mrežni utikač 7 Gornja potisna petlja 8 Donja potisna petlja 9 Vijci za pričvršćivanje donje potisne petlje 10 Vijci za pričvršćivanje go...

Page 28: ...zajedno s vijkom i gumom U skladu sa željenom visinom rezanja sad možete smjestiti kotače u položaj 1 2 ili 3 Sva 4 kotača postavite na istu visinu tako da rezaći nož bude paralelan sa smjerom košnje Pozicija Visina rezanja 1 60 mm 2 42 5 mm 3 25 mm 7 Rukovanje Prije priključivanja stroja provjerite odgovaraju li podaci na tipskoj pločici podacima o mreži Spojite mrežni utikač slika 1 poz 6 s prod...

Page 29: ...zbacivanje trave a drugom skinite vreću s nosača Prema sigurnosnom propisu poklopac otvora za izbacivanje zaklopi se prilikom skidanja vreće i zatvori stražnji otvor za izbacivanje Ostanu li ostaci trave visjeti u otvoru za lakše pokretanje motora svrsishodno je povući kosilicu natrag za oko 1 m Ostatke trave u kućištu kosilice i na radnom alatu ne uklanjajte rukama ili nogama nego prikladnim pomo...

Page 30: ...potrebnog rezervnog dijela Aktualne cijene i informacije potražite na web adresi www isc gmbh info 10 Zbrinjavanje i recikliranje Uredjaj se nalazi u pakovanju koje ga štiti od oštećenja prilikom transporta Ovo pakovanje je sirovina i zato se može ponovno upotrijebiti ili poslati na reciklažu Uredjaj i njegov pribor izradjeni su od različitih materijala kao npr metala i plastike Neispravne sastavn...

Page 31: ...ilnika 6 Nie pozostawiać urządzenia na deszczu chronić je przed wilgocią 7 Uwaga trzymać kabel zasilający z dala od elementów tnących 3 Opis urządzenia Rys 1 2 1 Włącznik Wyłącznik 2 Uchwyt antynaprężeniowy do kabla 3 Uchwyt do przenoszenia 4 Kosz na odpadki 5 Klapa otworu wyrzutowego 6 Wtyczka 7 Górna część uchwytu 8 Dolna część uchwytu 9 Śruby mocujące dolnego uchwytu 10 Śruby mocujące górnego u...

Page 32: ... aby poluzować oś rys 6a i zdjąć pokrywę koła wraz ze śrubami i oponami Zgodnie z żądaną wysokością cięcia można ustawić opony na pozycji 1 2 lub 3 Ustawić wszystkie 4 opony na równej pozycji aby nóż tnący był równolegle do trawnika Pozycja Wysokość cięcia 1 60 mm 2 42 5 mm 3 25 mm 7 Obsługa Przed podłączeniem urządzenia należy się upewnić że dane na tabliczce znamionowej urządzenia są zgodne z da...

Page 33: ...ciem worka należy wyłączyć urządzenie i poczekać aż zatrzyma się urządzenie tnące Przy wyciąganiu worka jedną ręką przytrzymać za klapę otworu wyrzutowego a drugą ręką wyciągać worek za uchwyt System bezpieczeństwa zatrzaskuje klapę otworu wyrzutowego przy wyjmowaniu worka i zamyka tylni otwór wyrzutowy Jeśli resztki trawy pozostają wiszące w otworze w celu łatwiejszego uruchomienia silnika należy...

Page 34: ...wiania części zamiennych należy podać następujące dane 앬 Typ urządzenia 앬 Numer artykułu urządzenia 앬 Numer identyfikacyjny urządzenia 앬 Numer części zamiennej Aktualne ceny artykułów i informacje znajdują się na stronie www isc gmbh info 10 Usuwanie odpadów i recycling Aby zapobiec uszkodzeniom podczas transportu urządzenie znajduje się w opakowaniu Opakowanie to jest surowcem który można użytkow...

Page 35: ... inerţie după oprirea motorului 6 Nu expuneţi aparatul la precipitaţii sau umiditate 7 Atenţie menţineţi cablul de alimentare la distanţă de sculele tăietoare 3 Descrierea aparatului Figura 1 2 1 Întrerupător pornire oprire 2 Descărcarea de tracţiune a cablului 3 Mâner 4 Coş colector 5 Clapetă de evacuare 6 Ştecher reţea 7 Etrier glisant superior 8 Etrier glisant inferior 9 Şuruburi de fixare pent...

Page 36: ...ate pentru a nu genera un excentric La această verificare opriţi motorul şi scoateţi ştecherul din priză Reglarea înălţimii de tăiere trebuie efectuată aşa cum este reprezentat în figurile 6a şi 6 b Rotiţi pentru aceasta capacul în sensul acelor de ceasornic pentru a desface axul Figura 6a şi îndepărtaţi capacul roţii împreună cu şurub şi cu anvelopă În funcţie de înălţimea de tăiere dorită puteţi...

Page 37: ...ratului sub formă de bucle în faţa prizei utilizate pe sol Începeţi să cosiţi îndepărtându vă de priză sau de cablu şi aveţi grijă ca acest cablu de alimentare să se afle întotdeauna pe peluza cosită astfel nu riscaţi să treceţi peste cablu De îndată ce în timpul cosirii pe peluză rămân resturi de iarbă sacul de colectare trebuie evacuat Atenţie Înainte de demontarea sacului colector opriţi motoru...

Page 38: ...chimba te numai de cåtre un electrician specializat 9 4 Întreøinerea 앬 În interiorul aparatului nu se gåsesc alte piese care trebuiesc întreøinute 9 5 Comanda pieselor de schimb La comanda pieselor de schimb trebuiesc menøionate urmåtoarele date 앬 Tipul aparatului 앬 Numårul articolului aparatului 앬 Numårul Ident al aparatului 앬 Numårul piesei de schimb necesare Preøurile actuale μi informaøii supl...

Page 39: ...s kép 1 Be Kikapcsoló 2 Kábel húzásmentesítő 3 Hordozófogantyú 4 Felfogókosár 5 Kidobáló csapóajtó 6 Hálózati csatlakozó 7 Felülső tolófül 8 Alulsó tolófül 9 Rögzítőcsavarok az alulsó tolófülhöz 10 Rögzítőcsavarok a felülső tolófülhöz 11 Kábelrögzítőszorítók 12 Felfogókosárgépházfél 13 Felfogókosárfogantyú 4 Rendeltetésszerűi használat A fűnyírógép házi és hobbykerti privát használatra alkalmas A ...

Page 40: ...át az óramutató forgási irányába azért hogy megeressze a tengelyt kép 6a és távolítsa el a keréksapkát a csavarral és a kerékkel együtt A kívánt vágásmagasságnak megfelelően most az 1 es 2 es vagy a 3 as pozícióba teheti a kereket Mind a 4 kereket ugyanarra a magasságra tenni azért hogy a vágókés párhuzamosan legyen a pázsithoz Pozíció Vágásmagasság 1 60 mm 2 42 5 mm 3 25 mm 7 Kezelés Győződjön me...

Page 41: ...késtartó állapotát Ha károsultak lennének akkor ki kell őket cserélni Fektesse a használt készülék csatlakoztatási vezetéket keresztkötésbe a használt dugóaljzat elé a földre A dugaszoló aljzattól illetve a kábeltól indulva nyírni a fűvet és ügyeljen arra hogy a készülék csatlakoztatási vezetéke mindig a lenyírt pázsiton legyen azért hogy ne tudja a fűnyírógép a készülék csatlakoztatási vezetékét ...

Page 42: ...k meg kell egyezniük a késben található stancolatoknak Ezután húzza az univerzális kulccsal ismét feszesre a rögzítőcsavart A szorítási nyomatéknak cca 25 Nm nek kellene lenni 9 3 Szénkefék Túlságos szikraképződés esetén ellenőriztesse le a szénkeféket egy villamossági szakember által Figyelem A szénkeféket csak egy villamossági szakember cserélheti ki 9 4 Karbantartás A készülék belsejében nem ta...

Page 43: ... shodu podle směrnice EU a norem pro výrobek A a következő konformitást jelenti ki a termékek re vonatkozó EU irányvonalak és normák szerint X pojasnjuje sledečo skladnost po smernici EU in normah za artikel deklaruje zgodność wymienionego poniżej artykułu z następującymi normami na podstawie dyrektywy WE W vydáva nasledujúce prehlásenie o zhode podľa smernice EÚ a noriem pre výrobok e деклаpиpа с...

Page 44: ...ive to returning the electrical device the owner is obliged to cooperate in ensuring that the device is properly recycled if ownership is relinquished This can also be done by handing over the used device to a returns center which will dispose of it in accordance with national commercial and industrial waste management legislation This does not apply to the accessories and auxiliary equipment with...

Page 45: ... uredjaje i pomoćni materijali bez električnih elemenata O Só para países da UE Não deite as ferramentas eléctricas para o lixo doméstico Segundo a directiva europeia 2002 96 CE relativa aos resíduos de equipamentos eléctricos e electrónicos e a respectiva transposição para o direito interno as ferramentas eléctricas usadas devem ser recolhidas separadamente e colocadas nos ecopontos para efeitos ...

Page 46: ...excluse accesoriile μi piesele auxiliare ale aparatului vechi fårå componente electrice A Csak EU országok Ne dobja az elektromos szerszámokat a házi hulladék közé A villamos készülékekkel és elektromos öregkészülékekkel kapcsolatos 2002 96 EG i europai irányvonalaknak valamint ezeknek a nemzeti jogban történő realizálásának megfelően az elhasznált villamos szerszámokat külön kell gyüjteni és egy ...

Page 47: ...utorizzazione da parte della ISC GmbH A reprodução ou duplicação mesmo que parcial da documentação e dos anexos dos produtos carece da autorização expressa da ISC GmbH B Naknadno tiskanje ili slična umnožavanja dokumentacije i pratećih papira ovih proizvoda čak i djelomično kopiranje moguće je samo uz izričito dopuštenje tvrtke ISC GmbH Przedruk lub innego rodzaju powielanie dokumentacji wyrobów o...

Page 48: ...on riserva di apportare modifiche tecniche Salvaguardem se alterações técnicas B Zadržavamo pravo na tehnične izmjene Zastrzega się wprowadzanie zmian technicznych Se rezervå dreptul la modificåri tehnice Technikai változások jogát fenntartva 48 Anleitung_ERM_900_30_SPK7 _ 03 12 2008 14 57 Uhr Seite 48 ...

Page 49: ...49 Anleitung_ERM_900_30_SPK7 _ 03 12 2008 14 57 Uhr Seite 49 ...

Page 50: ...50 Anleitung_ERM_900_30_SPK7 _ 03 12 2008 14 57 Uhr Seite 50 ...

Page 51: ... external influences e g damage caused by the device being dropped and normal wear resulting from proper operation of the device This applies in particular to rechargeable batteries for which we nevertheless issue a guarantee period of 12 months The guarantee is rendered null and void if any attempt is made to tamper with the device 3 The guarantee is valid for a period of 2 years starting from th...

Page 52: ... prescriptions de maintenance et de sécurité l infiltration de corps étrangers dans l appareil comme par exemple du sable des pierres ou de la poussière l emploi de la force ou l influence extérieure comme par exemple les dommages dus à une chute ainsi que l usure normale conforme à l utilisation Ceci est particulièrement valable pour les accumulateurs pour lesquels nous offrons toutefois une péri...

Page 53: ...entiti dalla mancata osservanza delle norme di sicurezza e di manutenzione dalla penetrazione di corpi estranei nell apparecchio come per es sabbia pietre o polvere dall impiego della forza o dall influsso esterno come per es danni dovuti a caduta e dall usura normale e dovuta all impiego Ciò vale particolarmente per batterie per esse concediamo tuttavia 12 mesi di garanzia Il diritti di garanzia ...

Page 54: ...penetração de corpos estranhos no aparelho por exemplo areia pedras ou pó do uso da força ou de impactos externos como por exemplo danos causados pela queda do aparelho bem como do desgaste normal resultante da utilização do aparelho Isto é válido especialmente para os acumuladores aos quais concedemos uma garantia de 12 meses O direito de garantia extingue se no caso de já ter havido uma tentativ...

Page 55: ...li korištenje nedopuštenih alata ili pribora u slučaju nepridržavanja uputa za održavanje i sigurnosnih odredbi zbog prodiranja stranih tijela u uređaj npr pijeska kamenja ili prašine nasilne primjene ili vanjskih utjecaja kao npr oštećenja zbog pada kao i zbog uobičajenog trošenja tijekom korištenja To naročito vrijedi za baterije za koje ipak dajemo jamstvo od 12 mjeseci Zahtjev za jamstvo prest...

Page 56: ... z przeznaczeniem Odnosi się to szczególnie do akumulatorów na które udzielamy jednak 12 miesięcznej gwarancji Oczywiście w okresie tych 2 lat przysługują Państwu również uprawnienia gwarancyjne w ramach ustawowej rękojmi Gwarancja obowiązuje na terenie Republiki Federalnej Niemiec lub w kraju generalnego przedstawiciela handlowego jako uzupełnienie obowiązujących lokalnie przepisów ustawowych Pro...

Page 57: ...solicitarea aparatului sau folosirea uneltelor ataşabile sau auxiliarilor neadmişi neluării în considerare a prescripţiilor referitoare la lucrările de întreţinere şi siguranţă intrarea corpurilor străine în aparat cum ar fi nisip pietre sau praf recurgerea la violenţă sau inflenţe străine cum ar fi de exemplu deteriorări datorită căderii precum şi datorită uzurii normale conformă utilizării Acest...

Page 58: ... nem engedélyezett betétszerszámok vagy tartozékok a karbantartási és biztonsági határozatok figyelmen kívül hatása idegen testek behatolása a készülékbe mint például homok kövek vagy por erőszakbehatolás vagy idegen behatások mint például leejtés általi károk úgymint a használat általi szokásos kopások által keletkező károk ki vannak zárva Ez különösen azokra az akkukra érvényes amelyekre még egy...

Page 59: ...Fremdkörpern in das Gerät wie z B Sand Steine oder Staub Gewaltanwendung oder Fremdeinwirkungen wie z B Schäden durch Herunterfallen sowie durch verwendungsgemäßen üblichen Verschleiß ausgeschlossen Dies gilt insbesondere für Akkus auf die wir dennoch eine Garantiezeit von 12 Monaten gewähren Der Garantieanspruch erlischt wenn an dem Gerät bereits Eingriffe vorgenommen wurden 3 Die Garantiezeit be...

Page 60: ...ndung möglichst genau Dadurch können wir für Sie Ihre Reklamation schneller bearbeiten und Ihnen schneller helfen Eine zu ungenaue Beschreibung mit Begriffen wie Gerät funktioniert nicht oder Gerät defekt verzögert hingegen die Bearbeitung erheblich Service Hotline kontaktieren oder bei iSC Webadresse anmelden es wird Ihnen eine Retourennummer zugeteilt l Ihre Anschrift eintragen l Fehlerbeschreib...

Reviews: