Go!Control 2GIG-CNTRL2 Operation & User’S Manual Download Page 12

10

Basic Operation

Door Locks

Z-Wave door locks can be locked or unlocked 

from  the  Control  Panel,  at  the  lock  with  the 

lock’s keypad, or with the lock’s metal key.

The  currently  supported  Z-Wave  lock  models 

available are:

• Kwikset Smartcode Deadbolt
• Kwikset Smartcode Lever
• Yale Real Living Push Button Deadbolt
• Yale Real Living Touchscreen Deadbolt
• Schlage Wireless Keypad Deadbolt
• Schlage Wireless Keypad Lever

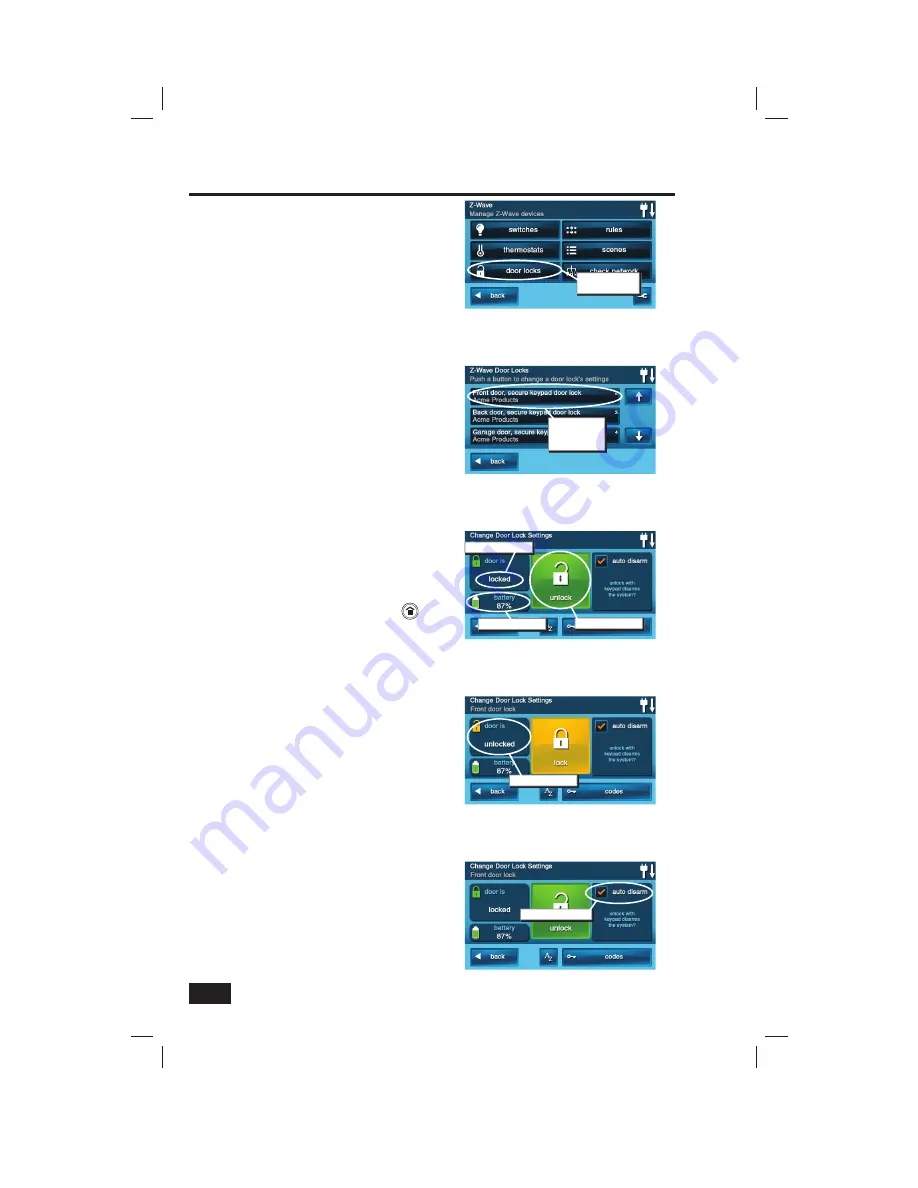
To control a Z-Wave door lock, use the following steps:

1. 

From the Home Screen press the 

SERVICES

 button.

2. 

From the Manage Z-Wave Devices Screen, press 

the  

DOOR LOCKS 

button.

3. 

A list of all installed door locks will be displayed. 

If there are more than three door locks, use the 

 or 

 arrows to scroll the list.

4. 

Press the display where the device is listed to 

display the control buttons for the door lock.

5. 

The  upper  left  of  the  display  shows  the  door 

lock’s  current  status  (locked  or  unlocked).  The 

lower left of the display shows the door locks 

battery condition.

6. 

To control the door lock, press the large  

LOCK

 or 


UN-LOCK

 action button.

7. 

Press the 

BACK

 button three times or the 

button on the Control Panel to exit Services.


NOTE: 

The Control Panel supports, but the 

Schlage  Wireless  Keypad  Deadbolt  does 

not support remote unlocking & locking.

Auto Disarm

The  system  supports  an  option  to  disarm  the 

Control Panel when the door lock is unlocked 

from its keypad.

1. 

On the Change Door Locks Settings Screen, check 

the   

AUTO  DISARM

  option  to  automatically 

disarm the Control Panel whenever the door lock 

is opened from the lock’s keypad.


NOTE: 

If  the  user  has  been  setup  with  a 

User  Access  Schedule,  or  if  the  user  has 

been  disabled,  the  Control  Panel  will  not 

disarm  if  the  user’s  access  is  currently 

invalid. The lock will still operate.


NOTE: 

If  auto-disarm  is  enabled,  it  is  not 

recommended to arm the system away with 

no  delay.  Doing  so  may  cause  the  system 

briefl y  to  trigger  an  alarm  when  the  door  is 

unlocked, due to the (short) delay between the 

door being unlocking and the panel disarming.

Manage Z-Wave Devices Screen

Press DOOR 

LOCKS button

Door Lock Select Screen

Press door 

lock’s device 

button

Door Lock Settings Screen

Current condition

Battery status

Action button

Door Lock Screen After Pressing Un-Lock

Current condition

Auto Disarm Option

Auto disarm option

Summary of Contents for 2GIG-CNTRL2

Page 1: ...E V1 9 LINEAR P N 233494 X4 INK BLACK MATERIAL 20 LB MEAD BOND WITH 80 LB WHITE COATED COVER SIZE 5 500 X 8 500 SCALE 1 1 FOLDING ALBUM FOLD BINDING SADDLE STITCH Wireless Security System 2GIG CNTRL2...

Page 2: ...is the capability to remotely control your Z Wave network of devices from your own computer using a Web browser over the Internet This provides you with home automation control from anywhere in the w...

Page 3: ...Devices 12 Creating Scenes 12 Z Wave Switches 13 Z Wave Thermostats 13 Z Wave Door Locks 13 Testing Scenes 13 Editing Scenes 14 Changing a Device s Action 14 Removing a Device s Action 14 Renaming a...

Page 4: ...Wave devices that are repeating the wireless signals Beyond simple controlling of a single device multiple device control commands can be assigned using a Scene A Scene can be run on its own or Rules...

Page 5: ...OSTATS button will display the currently included thermostat devices The DOOR LOCKS button will display the currently included door lock devices The RULES button will display the currently programmed...

Page 6: ...to be added to the network at this time 6 Press BACK when finished Additional Z Wave Devices If additional Z Wave compatible devices are purchased and your home control network expands these steps ca...

Page 7: ...c keyboard to assign a name up to 40 characters to the device Use the arrow key to shift to capital letters Use the arrow key to shift to lower case letters Press the key to access numeric and symbol...

Page 8: ...f there are more than three switches use the or arrows to scroll the list 4 Press the display where the device is listed to display the control buttons for the switch 5 The display indicates if the sw...

Page 9: ...is listed to display the control buttons for the switch 5 The display indicates if the switch is OFF or ON If the switch is ON the dimming level with a number 1 12 will be shown below Press the desire...

Page 10: ...ay the control buttons for the thermostat 5 The display shows the current temperature the thermostat setpoint the thermostat s battery status the thermostat mode and the fan mode When the thermostat m...

Page 11: ...the current mode displayed When the thermostat mode is auto 2 setpoints are displayed heat and cool 2 The temperature setpoint is immediately transmitted to the thermostat Setting the Fan Mode If the...

Page 12: ...tton 7 Press the BACK button three times or the button on the Control Panel to exit Services NOTE The Control Panel supports but the Schlage Wireless Keypad Deadbolt does not support remote unlocking...

Page 13: ...r s new 4 8 digit Door Lock User Code then enter it again to verify the code 5 A progress screen will be displayed while the new code is being sent to the door lock 6 A confirmation screen will be dis...

Page 14: ...use the following steps 1 From the Home Screen press the SERVICES button 2 From the Manage Z Wave Devices Screen press the SCENES button 3 From the Z Wave Scenes Screen press the ADD SCENE button 4 Us...

Page 15: ...OK NOTE The device will not activate while setting Steps 7A 7B 7C The scene must be run or triggered by an event with a rule Testing Scenes 8 The assigned action s for the Scene will be displayed Repe...

Page 16: ...anage Z Wave Devices Screen press the SCENES button 3 A list of programmed Scenes will be displayed Press the name of the Scene to edit 4 Press the desired device s button to select it 5 Press the del...

Page 17: ...ne will also delete any Rule associated with the Scene To delete a Scene use the following steps 1 From the Home Screen press the SERVICES button 2 From the Manage Z Wave Devices Screen press the SCEN...

Page 18: ...s Screen press the ADD RULE button 4 Use the or arrows to choose a system event to trigger the Scene The events available are System Armed Away System Armed Stay System Disarmed Exit Delay Started Ent...

Page 19: ...ected event occurs the scene can also be edited here by pressing the Run this Scene button 6 Press OK to change the Rule or CANCEL to quit Deleting Rules Rules can be deleted individually To delete a...

Page 20: ...the device This button may also be called bind learn or may not be labeled NOTE Some devices may require pressing the program button more than once refer to the device s instructions 3 When the device...

Page 21: ...Press the trouble alert icon to display the device s the network has detected trouble with 4 Go to the displayed devices location s and inspect for un plugged or missing devices Either correct the de...

Page 22: ...LER button The Control Panel will display Learning Z Wave Controller and wait for a signal from the primary controller 2 Press and release the include button on the primary controller This button may...

Page 23: ...listed The controller listings will show the controller s name manufacturer and network node number 3 Press BACK to quit View All Devices Use the following steps to display all the devices programmed...

Page 24: ...ent positions in the installation it is recommended to rediscover the network so the routing path will be re configured Use the following steps to rediscover the network 1 From the Advanced Toolbox Sc...

Page 25: ...uarantee that interference will not occur in a particular installation If this equipment does cause interference to radio or television reception which can be determined by turning the equipment off a...

Page 26: ...roller 20 LEARN CONTROLLER button 20 Limited warranty 23 LOCK button 10 M Multi level switches 2 7 N NAME button 14 Naming devices 5 Network diagnostics 19 Network maintenance 18 19 Network setup 4 5...

Page 27: ...L DEVICES button 21 View controllers 21 VIEW CONTROLLERS button 21 Viewing thermostats 8 W Warranty service 23 Z Z Wave Association reports 2 Z Wave devices 2 Z Wave door locks 13 Z Wave network 2 Z W...

Page 28: ...YOUR LOCAL ALARM INSTALLATION AND SERVICE PROFESSIONAL Copyright 2012 233494 X4 v1 9...

Reviews: