GNE 157307 Installation, Operation And Maintenance Manual Download Page 12


12 

2.  The  black,  low-pressure  chemical  nozzle  must  be 

used to spray chemicals. 

3. Squeeze the spray gun trigger.  The chemical injector 

will draw the chemical into the water stream. 

4. Spray detergent onto the surface and allow it to soak.  

Chemicals  need  time  to  work  properly.    Follow  the 
chemical  manufacturer’s  recommendations  for  the 
recommended time. 

5. Change back to high pressure to rinse by inserting one 

of the high-pressure nozzles. 

6.  Hold  the  lance  with  two  hands  in  a  sturdy  stance 

position. 

7. Point lance at dirty surface and squeeze trigger.


8.  Wash  from  the  bottom  to  the  top,  using  side-to-side 

motions.  This washes away heavy dirt and allows the 
detergent to soak as you work toward the top. 

9.  Use  the  width  of  the  spray  pattern  to  wash  in  a  wide 

path.  Overlap spray paths for complete coverage. 

10.The nozzle should be 12” to 24” from the work, closer 

for tough areas.   


Caution:  Be  careful  on  painted  or  delicate  surfaces, 
the pressure may damage the surface if the nozzle is 
too close. 


11.  Small  parts  should  be  washed  in  a  basket  so  the 

pressure  does  not  push  them  away.    Larger, 
lightweight parts should be clamped down. 

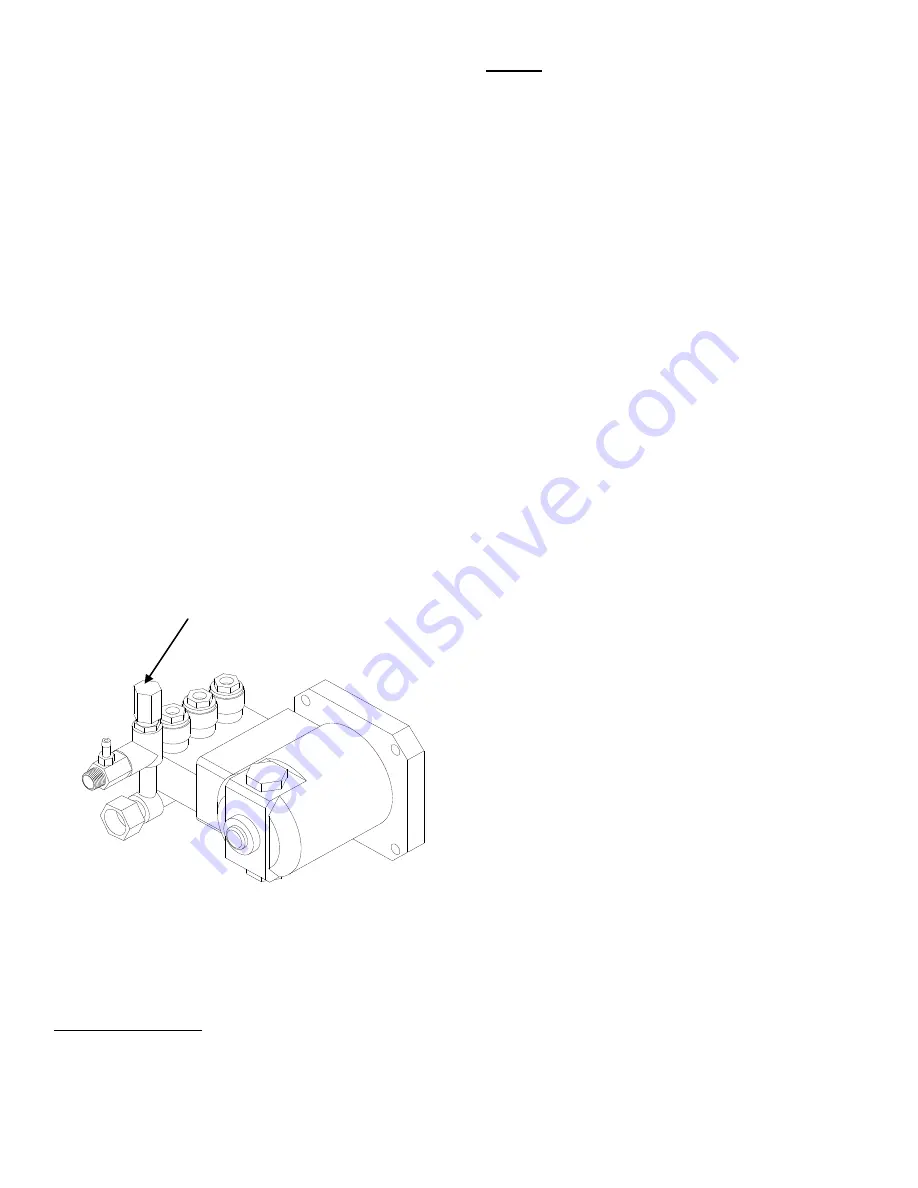
12.  The  pressure  washer  is  set  to  the  maximum  rated 

pressure  when  it  leaves  the  factory.    To  adjust  the 
pressure, turn the unloader knob counter-clockwise. 


WARNING:    Do  not  alter  the  unloader  valve’s 
maximum  pressure.  Excess  pressures  could  cause 
serious  injury  and/or  pump  damage.    Any  alteration 
other  than  turning  the  adjustment  knob  will  void 
your warranty. 

 
For Steam (Optional) 

1. Set the thermostat to 250

F. 

2. Turn the Heat switch ON. 
3. Insert the steam nozzle into the nozzle holder. 


To Stop 

1. If detergents were used, draw clear water through the 

detergent  inlet  line  to  purge  detergent.  Failure  to  do 
so may clog the chemical injector. 

2. If the burner was used, turn off the “Heat” switch and 

pump  cold  water  through  the  coil  for  3  minutes.  
Insufficient  cool  down  period  of  high  pressure  hose 
will  cause  excessive  wear  and  eventual  rupturing  of 
hose. 

3. Turn the pump switch OFF. 
4. Turn OFF the water supply. 
5. Squeeze the trigger to relieve the system pressure. 


Unloader  

Summary of Contents for 157307

Page 1: ...and or changes in specifications at any time without incurring any obligation to install them on units previously sold Quick Facts Pump Oil Pump is shipped with oil Change oil plug and check pump oil level before starting Use non detergent SAE 30 or Cat 22158 Water Make sure your water flow is 20 higher than the pressure washer s flow rate Make sure your water is clean and particle free Storage Do...

Page 2: ...not run machine without sufficient lubrication or sufficient water to cool the pump 9 Wear safety glasses gloves face protection and appropriate clothing when operating the machine 10 Do not operate this machine with broken or missing parts Never alter the manufacturer s original design or deactivate any safety device on the machine 11 Risk of exposure to dangerous chemicals Wear protective gloves...

Page 3: ...otection from the risk of electric shock Should replacement of the plug or cord become necessary use only identical replacement parts that include GFCI protection 2 For a product rated more than 125 volts GROUND FAULT CIRCUIT INTERRUPTER PROTECTION To comply with the National Electric Code NFPA 70 and to provide additional protection from the risk of electric shock this pressure washer should only...

Page 4: ...ard tap water 20 100psi Motor Horsepower 2 0 hp Maximum Temperature 250 F Approved Fuels 1 or 2 Diesel Kerosene Fuel Oil Fuel Capacity 8 25 gal Discharge Hose 3 8 x 50 Power Requirements Dedicated NEMA Receptacles 5 20R Volts 115V Amps 20A Hertz 60Hz Phase single Dimensions Length 38 Width 26 Height 43 Ship Weight 385 lb ...

Page 5: ...ressure Water Outlet 11 Tee 20 Quick Connector 3 Motor 12 Safety Relief Valve 21 Spray Gun 4 Burner 13 Pump 22 Grip 5 Fuel Fill Cap 14 Gun Hooks 23 Lance Wand 6 Fuel Tank 15 Power Switch 24 Power Cord Hangers 7 Control Box 16 Thermostat 25 High Pressure Hose Hanger 8 Elbow 17 Service Panel 26 Garden Hose Water Inlet 9 Swivel Fitting 18 Nozzles ...

Page 6: ...npack Separate and identify all components Use the assembly instructions in this manual for assembly High Pressure Hose Qty 1 Wheel Retainer Qty 2 Spray Gun Grip Qty 1 Wheel Qty 2 Pressure Washer Qty 1 Fastener Bag Qty 1 Nozzle Qty 6 ...

Page 7: ...way from frame 3 Slide the two wheel retainers onto the end of the axle Tighten the setscrew with a hex wrench Description Qty Wheel 2 Wheel Retainer 2 B 1 Install the pressure hose onto the pressure washer as shown 2 Connect the other end of the pressure hose to the spray gun as shown 3 Make sure all plumbing connections are tight Description Qty Spray Gun Lance 1 Spray Hose 1 Wheel Retainer Whee...

Page 8: ...tape from oil fill cap B Make sure the oil is 1 2 way up oil sight glass Universal Tractor Transmission Oil or Mobil 1 15W50 SAE Non Detergent order Cat Pump Oil Item 22158 Quantities Of Fluid Pump Type of Fluid QTY Cat 2DX SAE 30 8 5oz 0 25L ...

Page 9: ... where exhaust fans may cause an insufficient supply of oxygen Proper combustion can only be obtained when there is a sufficient supply of oxygen available for the amount of fuel being burned If it is necessary to install a unit in a poorly ventilated area outside fresh air may have to be piped to the burner and a fan installed to bring sufficient air into the unit VI Oil Burner Burner Air Adjustm...

Page 10: ...ned for a pressurized water source such as a city water faucet Sucking water out of a tank may cause pump cavitation and damage to your pump However the inlet pressure of the pump must not exceed 115 psi 8 bar E Always use a flexible rubber hose for your water supply Do not use rigid piping F Do not pump flammable liquids or liquids containing incompatible chemicals or solvents III Before Starting...

Page 11: ...turn off IMPORTANT Do not run the machine in hot mode without any fuel in the fuel tank The fuel pump will be damaged if it is run dry To Clean WARNING Wear eye ear hand foot and skin protection at all times while operating this pressure washer DANGER Do not point the spray wand at yourself or at any person Bodily injury may result from water under high pressure CAUTION Be careful on painted or de...

Page 12: ... damage the surface if the nozzle is too close 11 Small parts should be washed in a basket so the pressure does not push them away Larger lightweight parts should be clamped down 12 The pressure washer is set to the maximum rated pressure when it leaves the factory To adjust the pressure turn the unloader knob counter clockwise WARNING Do not alter the unloader valve s maximum pressure Excess pres...

Page 13: ...eed repairs A GNE pressure washer is no exception At times a GNE pressure washer may be inoperable because repairs are required GNE Product Support will assist in these repairs as needed but if an inoperable pressure washer creates a major expense to your business then we strongly recommend the following 1 Have someone on staff who is trained in the operation of the pressure washer and is capable ...

Page 14: ...sure washer if the hose is cracked worn or leaking A Check all hoses for leaks B Check all hoses of worn areas Changing The Pump Oil Change oil after first 50 hours then every 3 months or 500 hours 1 Remove oil drain plug 2 Drain pump oil 3 Replace oil drain plug 4 Fill pump oil according to table below 5 Use sight glass to fill to proper level Quantities Of Fluid Pump Type of Fluid QTY CAT SAE 30...

Page 15: ... the inlet strainer when finished Coil Desooting Poor grades of fuel oil or inadequate combustion air will cause heavy soot build up on the outside surface of the heating coil These deposits will insulate the coil This will restrict the air flow through the coil further aggravating the soot build up Most coils will never require desooting However to desoot a coil 1 Wear protective clothing goggles...

Page 16: ...rame 2 Remove the 4 nuts that attach the burner to the heating chamber You do not have to disconnect the fuel lines or the electric co 3 Let the burner fall away from the heat exchanger 4 Clean off carbon deposits which may have accumulated on the tips of the electrodes 5 Reset the spacing as shown below 4 Nuts 00793 00794 1 16 1 8 5 16 Electrodes ...

Page 17: ...to hose or tee depending on model 3 Unthread the removable outlet fitting with the swivel still attached from the flow switch assembly 4 Remove the shuttle 5 Clean the inside of the brass flow switch body and the shuttle with water and a soft brush 6 Insert the shuttle into the brass flow switch in the orientation shown Note Aligning the male tabs on the shuttle to the female guides inside the bra...

Page 18: ...nstructions to prevent the pump from freezing during storage Winter Storage Items needed 12 piece of garden hose or equivalent funnel and RV antifreeze approximately 2 gallons 1 Attach the garden hose with funnel to the pump inlet see illustration 2 Pour RV antifreeze into the funnel 3 Turn the unit on and make sure the burner is off 4 Let the pump run no more than 15 seconds at a time until antif...

Page 19: ... all connections between pump and gun for leaks Tighten loose components and replace damaged components Gun leaking internally Replace spray gun Smoke From Heat Exchanger Causes Solutions Air band not adjusted properly due to different elevation Adjust the air band until the burner burns cleanly See Oil Burner under Installation Instructions Poor quality fuel Use Kerosene for the cleanest burn Wat...

Page 20: ...20 157307 Rev A Parts Breakdown ...

Page 21: ...1 17 305208 Tee 8FP 1 49 777617 Leeson 2 HP Motor 1 18 785933GB Metal tube thermostat guard 1 50 779303GB Control Box Cover 1 19 779228 Coil Assembly 1 51 31985 Grommet 1 20 33387 Insulation Can 1 52 779301GB Control Panel Weldment 1 21 779232 Fire Chamber 1 53 35198 Grommet 7 16 ID 6 22 36180 Vented Wrap Stainless 1 54 778197 Nozzle 5 pack 2 0 1 23 38120 Insulation Gasket 1 55 778198 Steam Nozzle...

Page 22: ...22 Ref PART DESCRIPTION QTY 1 778154 Cat 2DX 1 2 35918 Thermal Protector 1 4 1 6 777837 3 8 Plug 1 7 777411 3 8 Tee 1 8 38596 Inlet Filter 1 Cat 2 DX Pump Breakdown ...

Page 23: ...23 ...

Page 24: ...24 ...

Page 25: ...25 ...

Page 26: ...Cat 2DX Pump Exploded View 26 ...

Page 27: ...uch as engines are guaranteed by their manufacturer and can be serviced at factory authorized locations near you Any costs incurred due to replacement or repair of items outside of a GNE approved facility is the responsibility of the buyer and not covered under warranty GNE can supply you with the service center location in your area This warranty specifically excludes the following failure of par...

Page 28: ...28 Distributed by GNE 20195 S Diamond Lake Rd STE 100 Rogers MN 55374 ...

Reviews: