background image

AC40G

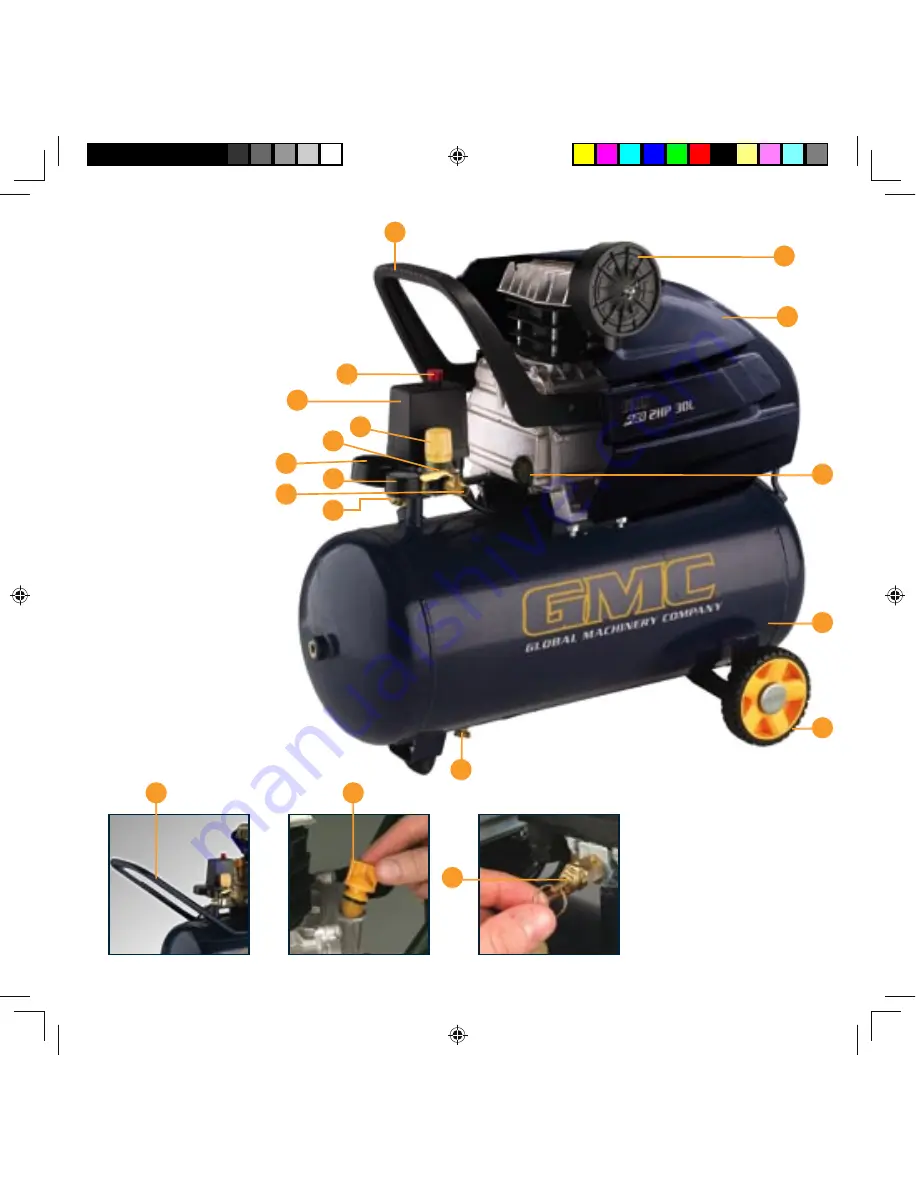
Know your product

1. Handle
2. Pressure switch cover
3. On/off switch
4. Tank pressure gauge 
5. Regulating knob
6. Regulated outlet valve
7. Regulated outlet 

pressure gauge

8. Safety valve
9. Non-return valve
10. Drain cock
11. Air tank
12. Wheel (x 2)
13. Safety shield
14. Oil filling cap
15. Air filter assembly
16. Oil level glass
17. Oil drain plug 

(not shown)

18. Air tap

9

11

13

15

12

16

1

3

2

6

9

7

10

5

4

1

8

18

14

AC30G_AC40G

12/8/05, 4:49 PM

9

Summary of Contents for AC30G

Page 1: ...N MANUAL Melbourne Perth Auckland Hong Kong Shanghai Taipei New York Verona London Paris Warning Do not switch on for the first time without first filling with oil 30 Litre 40 Litre Air Compressors 2HP 2 5HP AC30G_AC40G 12 8 05 4 48 PM 1 ...

Page 2: ...nd to be defective in materials or workmanship the tool or the offending faulty component will be replaced free of charge with another of the same item A small freight charge may apply The warranty replacement unit is only made available by returning the tool to the place of purchase with a confirmed register receipt Proof of purchase is essential We reserve the right to reject any claim where the...

Page 3: ...art This equip operates AC mains When filter becomes dirty or oily replace cartridge Refer to instruction manual Air InletŁ Filter Warning Air discharged from this unit is not suitable for human consumption Warning Test the safety relief valve daily Refer the instruction manual Operating Read instruction manual prior to starting unit This equipment operates from AC mains only ilter becomes r oily ...

Page 4: ... it is a Warranty claim spare part or user information please phone our Help Line for an immediate response Phone 1300 880 001 in Australia or 0800 445 721 in New Zealand Introduction Your new GMC power tool will more than satisfy your expectations It has been manufactured under stringent GMC Quality Standards to meet superior performance criteria You will find your new tool easy and safe to opera...

Page 5: ...nts to do the job best handled by a heavier duty tool Never use a tool for a purpose for which it was not intended 7 Dress correctly Do not wear loose clothing or jewellery They can be caught in moving parts Rubber gloves and non slip footwear are recommended when working outdoors If you have long hair wear a protective hair covering 8 Use safety accessories Safety glasses and earmuffs should alwa...

Page 6: ...t before making any adjustments or maintenance including renewing the lubricating oil To reduce the risk of fire or explosion never spray flammable liquids in a confined area It is normal for the compressor motor and pressure switch to produce sparks during use If sparks come into contact with petrol vapours or solvents they may ignite the vapours and cause a fire or explosion Always operate the c...

Page 7: ...possible damage to the motor Use of an extension cord voids the warranty After long working periods external metal parts could be hot Always press the on off button down to switch off the compressor before switching off the power or removing the power plug Do not use the compressor without first checking the oil level It must be close to the red circle as viewed on the oil gauge NOTE The compresso...

Page 8: ...line which is not supported is extremely dangerous and can whip around very quickly both with the capability of striking people and blowing foreign particles into the air Do not attempt to catch the air line but immediately keep bystanders well clear and turn off the air supply to the hose turn off the compressor at the On Off button and then remove the hose from the compressor Contents of carton ...

Page 9: ...ulated outlet valve 7 Regulated outlet pressure gauge 8 Safety valve 9 Non return valve 10 Drain cock 11 Air tank 12 Wheel x 2 13 Safety shield 14 Oil filling cap 15 Air filter assembly 16 Oil level glass 17 Oil drain plug not shown 18 Air tap 9 11 13 15 12 16 1 3 2 6 9 7 10 5 4 1 8 18 14 AC30G_AC40G 12 8 05 4 49 PM 9 ...

Page 10: ...tank 3 Fit the flat washer split washer and nut Tighten the nut from the underside of the wheel and tap on the wheel cover 4 Repeat for the second wheel Rubber feet Fit the rubber feet on the bracket on the front underside of the tank using the screws washers and nuts supplied Oil WARNING The air compressor must be filled with oil before first use To prevent possible spillage of oil during transpo...

Page 11: ...ut valve 6 Open the valve by rotating the air tap 18 so it is in line with the air outlet refer to the OPEN picture To close the valve rotate the air tap so it is facing to the right or the left side of the air valve refer to the CLOSED picture 4 Start the compressor by following the procedure in the section To start and stop the compressor For the first time of operation run the compressor for 10...

Page 12: ...regulating valve anti clockwise NOTE If you do not allow the air to discharge while you are setting the regulator the pressure as indicated on the regulated outlet gauge will be incorrect This gauge ONLY indicates the correct pressure while air is being discharged from the outlet 5 On completion of the task i e when you have finished using the compressor or when you are leaving the compressor unat...

Page 13: ... replace the switch Faulty motor Use authorised service centre to repair or replace the motor Main compressor sticking tight Use authorised service centre to repair or replace faulty parts Main compressor sticking tight Moving parts damaged by heat due to insufficient lubrication Use authorised service centre to check crankshaft bearings con rod piston rings etc and replace where necessary Moving ...

Page 14: ...ent pressure or decreased outlet capacity Motor running too slow Use authorised service centre to check and repair if necessary Dirty air filter cartridge Clean or replace the filter cartridge Leaking safety valve Use authorised service centre to repair or replace the switch Leaking pipe Use authorised service centre to check and repair if necessary Damaged gasket Use authorised service centre to ...

Page 15: ...Y IF THE SAFETY VALVE DOES NOT WORK AS ABOVE General inspection 1 Regularly check that all the fixing screws are tight 2 The supply cord of the tool should be checked frequently for damage If damaged have the cordset replaced by an authorised service facility to avoid a hazard Cleaning 1 Keep the tool s air vents unclogged and clean at all times 2 Remove dust and dirt regularly Cleaning is best do...

Page 16: ...estions or give comments about any GMC product With continuing product development changes may have occurred which render the product received slightly different to that shown in this instruction manual The manufacturer reserves the right to change specifications without notice Note Specifications may differ from country to country The GMC 777 Helpline operates from 7am to 7pm 7 days a week EST Th...

Reviews: