background image


PSD1206


- PSD1210 

- SIL 3 - SIL 2 Switching Power Supply 24 Vdc 

G.M. International ISM0076-7 

SAFE AREA, ZONE 2 GROUP IIC T4, 

NON HAZARDOUS LOCATIONS, CLASS I, DIVISION 2, GROUPS A, B, C, D T-Code T3, CLASS I, ZONE 2, GROUP IIC T3


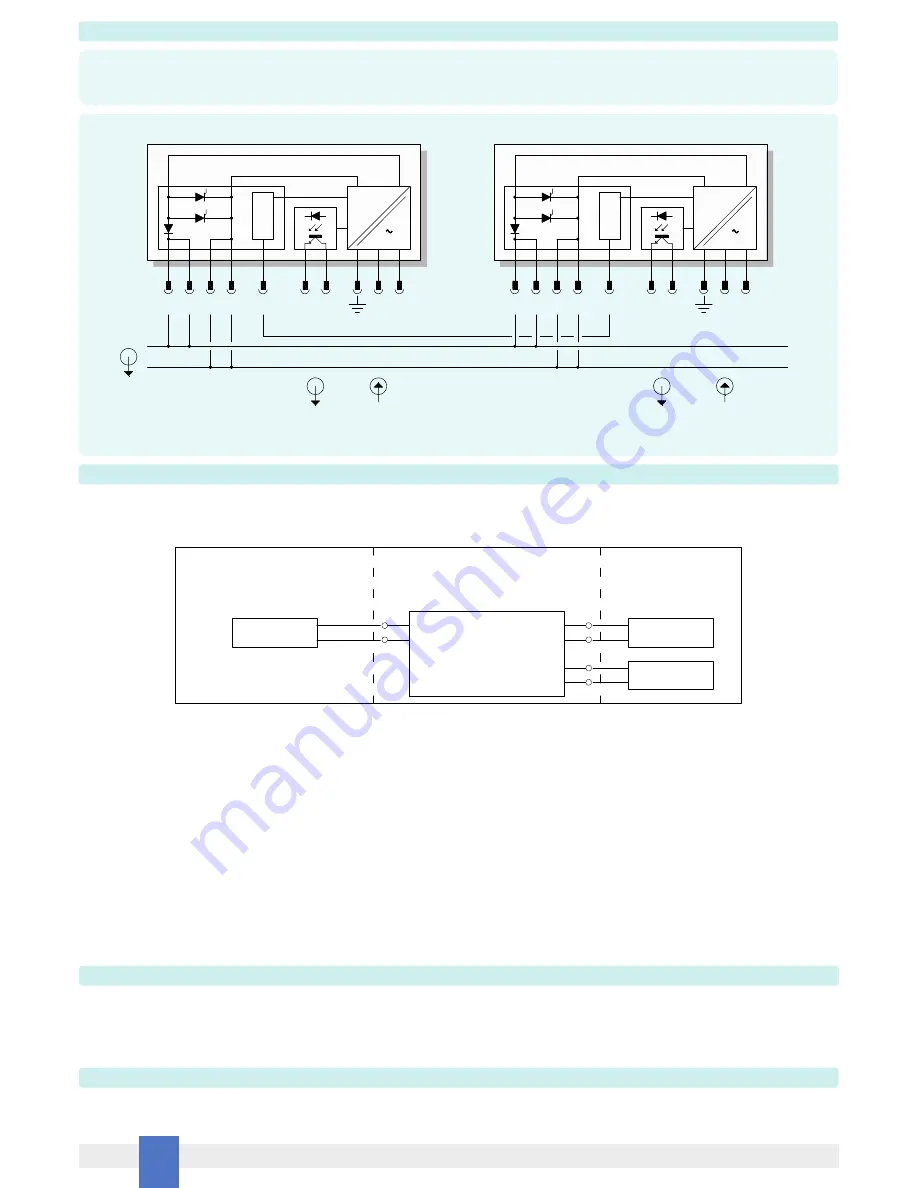
Function Diagram 

Non-incendive field wiring is not recognized by the Canadian Electrical Code, installation is permitted in the US only. 
For installation of the unit in a Class I, Division 2 or Class I, Zone 2 location, the wiring between the control equipment and the PSD1206, PSD1210 shall be accomplished via conduit 
connections or another acceptable Division 2, Zone 2 wiring method according to the NEC and the CEC. 

For Intrinsic Safety application limits the line supply voltage to a maximum of 250 Vrms, not to be connected to control equipment that uses or generates more than 
250 Vrms or Vdc with respect to earth ground. 

PSD1206, PSD1210 must be installed, operated and maintained only by qualified personnel, in accordance to the relevant national/international installation standards 
(e.g. IEC/EN60079-14 Electrical apparatus for explosive gas atmospheres - Part 14: Electrical installations in hazardous areas (other than mines), BS 5345 Pt4, VDE 165, ANSI/ISA 
RP12.06.01 Installation of Intrinsically Safe System for Hazardous (Classified) Locations, National Electrical Code NEC ANSI/NFPA 70 Section 504 and 505, and the Canadian Electrical 
Code CEC) following the established installation rules. 

The power supply must be placed in an enclosure with IP4X protection degree when used in locations providing adequate protection against the entry of solid foreign 
objects or water capable of impairing safety, or be placed in an enclosure with IP54 protection degree for other locations. 

De-energize main power source (turn off power supply voltage), wait at least 3 minutes to discharge internal capacitors before plug or unplug the terminal blocks when installed in 
Hazardous Area/Hazardous Locations or unless area is known to be nonhazardous. Hazardous voltage are present at the input terminal block and inside the unit when connected to the 
main supply voltage, do not touch electrical connection and do not put conductive object inside the unit. 

Warning: substitution of components may impair Intrinsic Safety and suitability for Division 2, Zone 2. 
Explosion Hazard: to prevent ignition of flammable or combustible atmospheres, disconnect power before servicing or unless area is known to be nonhazardous. 

Failure to properly installation or use of the equipment may risk to damage the unit or severe personal injury. 

The unit has no serviceable parts inside, do not open the enclosure

. The unit cannot be repaired by the end user and must be returned to the manufacturer or his authorized 

representative, any unauthorized modification must be avoided. 


Warning 

PSD1206, PSD1210

Power Supply

FM Approved under

non-incendive field wiring

Unclassified Locations or

Hazardous (Classified) Locations

Class I, Division 2, Groups A, B, C, D, T-Code T3

Class I, Zone 2, Group IIC, IIB, IIA, T-Code T3

Hazardous (Classified) Locations

Class I, Division 2, Groups A, B, C, D

Class II, Division 2, Groups E, F, G

Class III, Division 2

Class I, Zone 2, Group IIC, IIB, IIA

FM Approved under non-incendive field

wiring (permitted only for US installations),

UL Listed or third party approval

Non-incendive 

Equipment

Unclassified Locations

-24Vdc

+24Vdc

+

-

FLT+

L/+
N/-

FLT-

-

+

Supply Line

Control 

Equipment

Must not use or generate

more than 250 Vrms or Vdc

Storage 

 If after an incoming inspection the unit is not installed directly on a system (parts for spare or expansion with long storage periods) it must be conveniently stocked. Stocking area 
characteristics must comply with the following parameters: Temperature: –20 to +60 °C, the –45 to +80 °C in the data sheet is meant for limited periods, mainly to arrange for air 
transport, -10 to +30 °C are preferred. Humidity: 0 to 90 %, long period high humidity affects the package integrity, 0 to 60 % humidity is preferred. 
Vibration: no prolonged vibration should be perceivable in the stocking area to avoid loosening of parts or fatigue ruptures of components terminals. 
Pollution: presence of pollutant or corrosive gases or vapors must be avoided to prevent corrosion of conductors and degradation of insulating surfaces. 
 

Disposal 

 The product should not be disposed with other wastes at the end of its working life. It may content hazardous substances for the health and the environment, to prevent possible harm 
from uncontrolled waste disposal, please separate this equipment from other types of wastes and recycle it responsibly to promote the sustainable reuse of material resources. 
This product should not be mixed with other commercial wastes for disposal. 


MODELS PSD1206 - PSD1210

+

+

-

-

-

+

L/+ N/-

=

_

CS

Cur

re

nt 

Sh

aring

Fault 

Output 1

Supply 

Input 1

24 Vdc 

Output Bus

MODELS PSD1206 - PSD1210

+

+

-

-

-

+

L/+ N/-

=

_

CS

Cur

re

nt 

Sh

aring

Fault 

Output 2

Supply 
Input 2

Connection for current sharing

SIL 3

PSD1206 or PSD1210 is an isolated Switching Power Supply unit installed on a standard EN50022 T35 DIN Rail located in Safe Area/Non Hazardous Locations or Zone 2, Group IIC, 
Temperature Classification T4, Class I, Division 2, Groups A, B, C, D, Temperature Code T3 and Class I, Zone 2, Group IIC, IIB, IIA Temperature Code T3 Hazardous Area/Hazardous 
Locations (according to EN/IEC60079-15, FM Class No.3611, CSA-C22.2 No. 213-M1987, CSA-E60079-15) within the specified operating temperature limits Tamb -20 to +60 °C and 
mounting conditions. 


Summary of Contents for PSD1206

Page 1: ...0076 7 PSD1206 PSD1210 INSTRUCTION MANUAL INSTRUCTION MANUAL SIL 3 SIL 2 Switching Power Supply 24Vdc 10A 250W Output Zone 2 Div 2 DIN Rail Mounting Model PSD1210 SIL 3 SIL 2 Switching Power Supply 24Vdc 6A 150W Output Zone 2 Div 2 DIN Rail Mounting Model PSD1206 ...

Page 2: ...e event and continue to operate without interruption Refer to instruction manual ISM0076 for a detailed diagram of the output current PSD1206 Switching Power Supply 24 Vdc 6A Output PSD1210 Switching Power Supply 24 Vdc 10A Output Characteristics 2 Technical Data 2 Ordering Information 3 Features 3 Function Diagram 3 Warning 4 Storage 4 Disposal 4 Operation 5 Installation 5 Start up 6 High load fu...

Page 3: ...Class I Zone 2 Group IIC IIB IIA T3 installation Protection class IP 20 Dimensions PSD1206 width 200 mm height 95 mm depth 110 mm Features SIL 3 according to IEC 61508 for Tproof 3 6 years 10 20 of total SIF two units in parallel with NE Load SIL 2 according to IEC 61508 for Tproof 9 10 years 10 20 of total SIF two units in parallel with ND Load SIL 2 according to IEC 61508 for Tproof 1 3 years 10...

Page 4: ...re The unit cannot be repaired by the end user and must be returned to the manufacturer or his authorized representative any unauthorized modification must be avoided Warning PSD1206 PSD1210 Power Supply FM Approved under non incendive field wiring Unclassified Locations or Hazardous Classified Locations Class I Division 2 Groups A B C D T Code T3 Class I Zone 2 Group IIC IIB IIA T Code T3 Hazardo...

Page 5: ...wly rotate until the LED turn off in this way you set the threshold value at 26 3 V Finally rotate the Vout Adjust trimmer until the output voltage has reached the new requested value of 25 V Installation The terminal block are not usable as breaking device according to EN60950 The wiring cables have to be proportionate in base to the current and the length of the cable For PSD1206 typical cable s...

Page 6: ...d particularly their polarity Check conductors for exposed wires that could touch each other causing dangerous unwanted shorts Turn on power the power on green led must be lit check the supply voltage generated by PSD1206 PSD1210 is 24 Vdc High load fuse breaking capacity Figure below shows the current waveform through the short circuit connection 1 The peak short circuit current is about 430 A 2 ...

Page 7: ...tic 79 with diagnostic 112 with diagnostic In order to judge the failure behavior of the considered modules the following definitions for the failure of the product must be considered Fail Safe State The fail safe state is defined as the output reaching the user defined threshold In normally energized NE loads is defined as the output being between 20 V and 30 V load current up to 80 of rated or l...

Page 8: ...ected failure rate λSU Safe Undetected failure rate SIF Safety Instrumented Function SIS Safety Instrumented System SIL Safety Integrity Level T Proof Test Maintenance TI Proof Test Interval for example 1 5 10 years with 1 year 8760 hours Maintenance time is considered 8 hours The following assumptions have been made during the Failure Modes Effects and Diagnostic Analysis of the Switching Power S...

Page 9: ...0 Λsd 0 00 FIT λsu 542 20 FIT λdd 0 00 FIT λdu 134 80 FIT SFF 80 09 PFDavg vs T Proof with determination of SIL supposing module contributes 10 of entire safety function T Proof 1 year PFDavg 5 90 E 04 Valid for SIL 2 See Note 2 in the section Notes T Proof 3 years PFDavg 1 77 E 03 See Note 3 and Note 4 In the section Notes T Proof 6 years PFDavg 3 54 E 03 See Note 3 and Note 4 In the section Note...

Page 10: ...f Total Fail Ann Undet Total Fail Safe Undetected λsu Fail High 99 of Total Fail High Fail Low Fail Annunciation Undetected 99 of Total Fail Ann Undet Fail Not Part λnotpart MTBF MTTF MTTR 1 λsd λsu λdd λdu λnotpart MTTR MTTFS 1 λsd λsu 349 80 134 00 0 21 0 59 327 20 20 79 215 00 58 41 174 00 134 years 349 years Fail No Effect 214 00 Total Fail Dangerous Detected λdd 0 00 Total Fail Safe Detected ...

Page 11: ...for SIL 2 See Note 2 in the section Notes T Proof 5 years PFDavg 4 65 E 04 Valid for SIL 2 See Note 2 in the section Notes T Proof 9 years PFDavg 9 40 E 04 Valid for SIL 2 See Note 2 in the section Notes T Proof 10 years PFDavg 1 10 E 03 See Note 3 and Note 4 in the section Notes In following table it s reported the _System AVG TI x years PFD with determination of SIL supposing module contibutes 2...

Page 12: ... be 1 00 E 02 This limit is satisfied from the calculated PFDavg value therefore the module is valid for SIL 1 application Note 5 Considering a SIL 1 application the total PFDavg value of the SIF must be 1 00 E 01 according to table 2 of IEC 61508 1 and table 3 1 of ANSI ISA 84 01 1996 However as the module under consideration contributes for only 10 of the entire SIF the PFDavg value of the modul...

Page 13: ...IL 3 with T proof 6 years or SIL 2 with T proof 10 years For ND load c SIL 2 with T proof 9 years or SIL 1 with T proof 10 years d SIL 2 with T proof 10 years During T proof of each power supply unit the power supply system can sustain the maximum load current but SIL value changes from SIL 3 to SIL 2 for NE load or from SIL 2 to SIL 1 for ND load because redundancy N 2 is absent For NE load a SIL...

Page 14: ...t 1 Current sharing capability Proof test 2 Paralleling diode operation Proof test 3 Crowbar A operation Proof test 4 Crowbar B operation Proof test 5 Over voltage protection Possible Proof Tests to reveal Dangerous Undetected Faults Ammeter range 0 to 10 A 0 1 A resolution or better 300 W variable resistor load from 2 to 25 Ω current up to 10 A to test PSD1210 or 150 W variable resistor load from...

Page 15: ...pply voltage V2 by rotating its Vout Adjust trimmer clockwise until obtaining 24 6 V 3 Verify that output current A3 is at 75 of full load and that output current A2 is instead at 25 4 Re connect current sharing connection and verify that voltage are approximately the same V1 V2 5 Verify that output current A3 is about 60 of full load and that output current A2 is instead about 40 6 Regulate the s...

Page 16: ...g and check that voltage drop is between 0 3V and 0 7V 3 Turn on the second PS 4 Turn off the PS under test 5 Check that voltage V2 between the diodes is between 22 V and 26 V 6 Paralleling diode operation Connect the two power supplies as shown in the following image Turn off also the second PS and disconnect voltmeter V2 from the Out diodes pins of the overvoltage crowbar test jig 7 MODELS PSD12...

Page 17: ...d observe that the corresponding output voltage V1 increases simultaneously while rotating 4 At this point Crowbar A will trigger the shortcircuit and output voltage V1 will be 2 V Maximum voltage V1 obtained just before the crowbar s trigger point should be between 27 0 V and 29 0 V 5 Turn off the PS immediately by opening the supply switch I1 so that the crowbar is reset 6 Rotate potentiometer P...

Page 18: ...e PS immediately by opening the supply switch I1 so that the crowbar is reset 5 Crowbar B operation Connect the power supply as shown in the following image Output voltage value V1 should be greater than 24 V nominal at 80 of full load Now after checking this condition rotate potentiometer P1 counter clockwise slowly to decrease its resistance and observe that the corresponding output voltage V1 i...

Page 19: ...the PS by closing switch I1 2 Verify that the output voltage V1 is between 25 5V and 28V nominal at 80 of full load and without load 3 Overvoltage Protection operation Connect the power supply as shown in the following image MODELS PSD1210 PSD1206 Turn off the PS 4 CS Sharing current I1 _ PR A1 V1 L N 220 Vac 4 3 2 1 ON OFF Vout adjust Diode test TPF1210 C2 C1 B2 B1 A2 A1 D2 D1 S2 COM S1 ...

Page 20: ...The equation of PFDavg applicable when the component or sub system is new and when λdu are 99 known by proof test is When these tests do not detect at least 99 of λdu the same equation changes to where Et is the effectiveness of proof test 0 100 SL can be intended as 1 Time between two proof tests with 99 100 effectiveness 2 Time between two replacements 3 Component Life time if no substitution an...

Page 21: ... Sharing Current Sharing L N CS L N CS L N CS _ _ _ Fault Output 2 Supply Input 2 Fault Output 3 Supply Input 3 Fault Output 4 Supply Input 4 To obtain higher output voltage of 48 V with 100 redundance it is possible to connect two modules in series plus two redundant modules in parallel as shown in the figure Output voltage can be furtherly increased maintaining redundancy by paralleling more uni...

Page 22: ...Voltage Example of setting output voltage and alarm threshold suppose to have a power supply standard with 24 Vdc output and thresholds set at 22 8 25 2 V Suppose you want to set the output at 25 V with 23 7 26 3 V threshold value The procedure to be used is the following rotate the Vout Adjust trimmer until the voltage has reached the new upper threshold value of 26 3 V Rotate the Alarm Adjust tr...

Page 23: ...nder normal operating conditions They are designed to operate trouble free and with high stability for long time If a unit is found not meeting specifications or in a failure condition then it requires recalibration or servicing Any repair made by unauthorized personnel may completely invalidate the safety characteristics of the unit Repair not made by GM International is prohibited If a unit fail...

Reviews: