background image


Osicus User Guide V8 

09/09/2021 

Page 

11

 of 

46


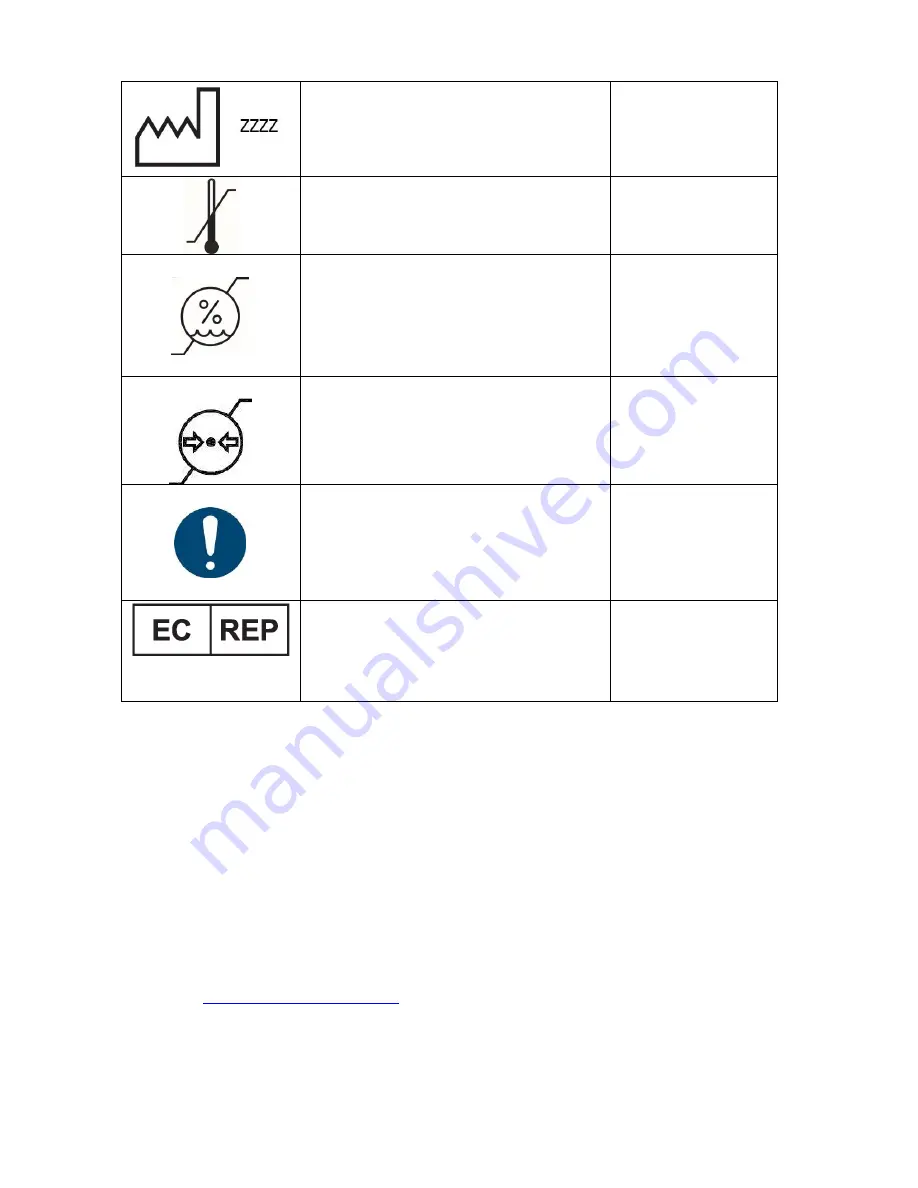
Date of Manufacture 

Where ZZZZ: Date of Manufacture 


BS EN ISO 15223-1


Instrument Label 


Temperature Limit 


BS EN ISO 15223-1


Instrument Shipper 

Packaging 


Humidity Limitation 


BS EN ISO 15223-1


Instrument Shipper 

Packaging 


Atmospheric Pressure limitation 


BS EN ISO 15223-1


Instrument Shipper 

Packaging 


Mandatory Action Sign 


ISO 7010- M001 

Operating Manual 


Authorized Representative in the 

European Community 


BS EN ISO 15223-1 


Instrument Shipper 

Packaging & User 

Manual 


ADDRESS AND CONTACT DETAILS: 


MANUFACTURED BY:   


EU AUTHORIZED REPRESENTATIVE:   

 
GM Instruments Ltd   


Advena Ltd 

Block 1 Annickbank Innovation Campus 


Tower Business Centre, 2

nd

 Flr 

Annick Road   


Tower Street 

Irvine    


Swatar 

KA11 4LF  


BKR 4013 

UK 


Malta 

TEL: +44 (0)1294 554664 
EMAIL: [email protected] 
WEBSITE: 

www.gm-instruments.com


Summary of Contents for Osicus

Page 1: ...Osicus User Guide V8 09 09 2021 Page 1 of 46 Osicus Audiometer User Guide Version 8 ...

Page 2: ...n of Audiograms 28 7 4 Predictive Analysis 28 8 Running Hearing Tests 30 8 1 Calibration check 30 8 2 Patient Preparation 30 8 3 Automatic Operation 31 8 4 The Testing Screen 31 8 5 Manual Operation 32 8 6 Audiograms and HSE Categories 32 8 7 Comparison of Audiograms 33 8 8 Printing Audiograms 33 9 Categorisation of Results H SE Categories 34 10 Troubleshooting and Error Messages 36 11 Factors whi...

Page 3: ...s and improvements to any products described in this document without prior written notice Under no circumstance shall GM Instruments be responsible for the loss of any data or income or any special incidental consequential or indirect damages howsoever caused The contents of this document are provided as is Except as required by applicable law no warranties of any kind either expressed or implied...

Page 4: ...will be corrected at no cost to the purchaser within the first year except for shipping charges to and from the point of service This warranty does not apply to those parts that are subject to normal wear and tear such as cords ear cushions and headbands Replaceable parts which may deteriorate with use will be supplied at a reasonable cost The manufacturer s warranty is void if the audiometer is r...

Page 5: ...supply The operation of the system can be safely terminated by switching off or removing the mains plug If your desktop PC or printer does not have a power supply approved for a patient environment then an isolation transformer which is in compliance with BS EN 60601 should be used to power the PC printer and the Osicus You must use the isolation transformer to ensure that the Osicus is in complia...

Page 6: ...1 1 and medically approved then the Printer and PC can be positioned within the patient environment as shown below Figure 2 Patient Environment for Medically approved PC Printer In circumstances where the PC and or printer are not medically approved but are to be used within the patient environment then an isolation transformer which is in compliance to BS EN 60601 1 MUST be used to ensure safety ...

Page 7: ...ted to less than 0 5 mA Any incident which results in actual or potential injury or death to a subject while using the Osicus should be immediately communicated to GM Instruments at the address below The Osicus should only be connected to other mains powered devices such as computers and printers which comply with EN 60950 1 and we also advise the use of a separating transformer Unless computers a...

Page 8: ... Humidity 30 to 90 Ambient Pressure 98kPa to 104kPa Warm up time 5 Minutes Transport Storage Storage Transport Temperature 40 C to 60 C Relative Humidity 30 to 90 Supply Power Voltage 5V DC from USB Current 0 2 A Tone Type Tone switching Tone Presentation Tone Interruption Pulsed Automatic Mode Tone Switching Pulsed Manual Mode Response Required during TONE or as set by the user from the Options m...

Page 9: ...ertaken using Referenced Transducers and Acoustic Coupler see calibration certificate supplied EMC Effects Please refer to page 7 and Appendix 1 of this manual Service Life Safety and Performance The service life of the Osicus has been evaluated to be 10 years from the date of manufacture Additional Technical Information relative to BS EN 60601 1 is also provided in Appendix 2 ...

Page 10: ...cket Response Button Direct Current IEC 60417 5931 _ Instrument Label Computer Via USB Port For connected parts marked only connect the accessories supplied with the instrument These parts have been tested for use with the instrument for compliance to standards IEC 60601 1 and IEC 60601 1 2 Symbols used on labelling and packaging Symbol Meaning Location Manufacturer BS EN ISO 15223 1 Instrument La...

Page 11: ...nstrument Shipper Packaging Mandatory Action Sign ISO 7010 M001 Operating Manual Authorized Representative in the European Community BS EN ISO 15223 1 Instrument Shipper Packaging User Manual ADDRESS AND CONTACT DETAILS MANUFACTURED BY EU AUTHORIZED REPRESENTATIVE GM Instruments Ltd Advena Ltd Block 1 Annickbank Innovation Campus Tower Business Centre 2nd Flr Annick Road Tower Street Irvine Swatar...

Page 12: ...sts The subject upon whom the hearing testing is performed is expected to be an employee working in high noise environments being screened in line with the Health and Safety Executive s regulations on noise at work or being routinely screened as a part of a workplace health programme Subsequently they come from all walks of life and are of workingage The Osicus audiometer is expected to be used in...

Page 13: ...B 3 Connect the audiometer to the computer using the USB Cable Insert the USB memory stick into the USB port on the computer then open Windows Explorer and navigate to the USB drive There you will find 4 folders named Osicus Installation Files Osicus 2 Drivers Dotnetfx Manuals NB Do not connect Osicus to the PC until all program software and USB driver software installation has been completed Soft...

Page 14: ...hould be removed using the Add Remove Programs utility in the Control Panel and then the Osicus installation program should be run again Uninstalling Osicus will not remove the Osicus result files which by default will be found in c audio results Assuming all is well the screens you will see during installation are shown below Figure 2 1 1 Select Installation Folder Figure 2 1 2 Confirm Installati...

Page 15: ...Osicus User Guide V8 09 09 2021 Page 15 of 46 Figure 2 1 3 Installing Window Figure 2 1 4 Installation Complete Window ...

Page 16: ...o rectify this issue you will need to change the Osicus folder from being read only To do this navigate to Computer C Drive Program Files x86 GM Instruments Right click on the Osicus folder and open the properties menu Next you will need to ensure you have the permission to modify this folder Open up the Security tab and select the user that you are currently signed in as Check to see if Full Cont...

Page 17: ...nge for you Figure 2 2 3 Edit Permissions Window Next navigate back to the General tab of the Osicus Properties window Uncheck the Read Only Only applies to files in this folder button press Apply and then OK A confirmation window will then appear Click OK The Osicus solo program will now save your settings for the next time you use the program Figure 2 2 4 Osicus Folder Properties ...

Page 18: ...t to let the program make changes to your computer Click yes If you are using a 32 bit computer click and run USBdriver x86 exe installation wizard instead The Device Driver Installation Wizard will then open Click on Next to continue Figure 3 1 1 Device Driver Installation Wizard Start Up The installation wizard then installs the drivers onto your computer As this is happening a windows warning m...

Page 19: ...same place when the Osicus has enumerated the drivers stating that the drivers were successfully installed for this device This prompt may appear after a slight delay the length of which will depend on how fast your computer runs You are now ready to start running tests with the audiometer Figure 3 1 4 Driver Installation Complete Correct installation of the USB drivers can be confirmed through th...

Page 20: ...ential for its correct operation are Headphone plug if a booth is used link the socket marked Headphone on the front of Osicus to the booth with a stereo booth cable and connect the Osicus earphone plug to the corresponding socket inside the booth If no booth is available connect the red plug directly into the socket marked right Switch Response button plug if a booth is used link the socket marke...

Page 21: ...t the programs run ok In the Home Screen click Select Audiometer and check that the audiometer and headphone serial numbers match with those connected In the Osicus testing program Home Screen select Perform Machine Checks follow the instructions and confirm the Osicus is functioning and receiving response correctly Click on print to check the operation of the printer The system is now ready for u...

Page 22: ...en is the central point where the functions of the audiometer can be accessed Clicking on the Home icon at any time will return you to the Home screen From the Home screen you can create New records Find records Run Tests and Exit the program all by clicking on the associated icon Additionally you can prepare the audiometer for use by using the 4 setup buttons Perform machine Checks Select Audiome...

Page 23: ...e other and logs your response to the tones This allows you to hear each frequency listening for distortion or a change in level If you click on Save the responses to the test tones will be saved to a file for record keeping purposes 6 4 Select Audiometer Viewing this screen allows you to check that you are using the correct audiometer earphone combination and that the calibration file is up to da...

Page 24: ...rs The date of last calibration is displayed with the audiometer details After calibration you will be supplied with a file containing calibration information To update the calibration information press the Change button browse to this file and click on Ok 6 5 Settings The location of the Calibration File and location where audiograms generated will be Saved are specified here Note that if you wis...

Page 25: ...esponses 6 6 Tester Information Enter the name of the person who will be doing the tests and the company they represent 7 Subject Details 7 1 New Subject When you click on New a screen which allows the entry of Name Gender ID Number and Date of Birth is offered Name Enter details as First name Last name Gender Use the menu to select ID Number Letters or numbers are accepted for entry but as the co...

Page 26: ...mat is DD MM YYYY An example of a completed screen is shown below 7 2 Find Subject The search can be based on the content of a particular folder directory and its sub folders directories It can be done manually by clicking on browse or it can be done automatically by entering the Surname or an ID Personnel Number An example of a search based on partial ID is shown below ...

Page 27: ...tails Tests Audiograms tabs to view the previously generated data The details tab will show the Subject information entered The Tests tab will show all of the stored audiograms for the selected person If you want to view a particular audiogram select it and click on Display Test or click on the Audiograms tab An example of a completed audiogram brought back from saved records is shown on the follo...

Page 28: ...tures of the Asra Osicus software Hearing test data can be analysed by intelligent algorithms and future hearing trends can be predicted The predicted audiogram shows how the intelligent analysis thinks the subject s audiogram will look in a year s time It assumes no change in hearing protection or in the current working noise environment Although analysis is made to the highest possible standards...

Page 29: ...Osicus User Guide V8 09 09 2021 Page 29 of 46 ...

Page 30: ...known to put on the headset remove glasses and earrings if they interfere with the fit of the headset Advise them to press and release the button as soon as they hear the tone The red audiocup goes on the right ear and the blue headset on the left Click on the Test button to start the test On completion compare the audiogram with the previously recorded audiogram for that artificial ear or test pe...

Page 31: ...ty Executive This section describes among other things the default settings in the program and the recommended steps in normal usage It also gives a more detailed description of all the menu facilities which are provided in the program 8 4 The Testing Screen To use automatic operation check that the Automatic Test tab is set as shown above and decide whether or not you want to have standard tone p...

Page 32: ... Test tab as shown above To produce a tone select the frequency amplitude ear and then press the Produce Tone button As each tone is produced points will be plotted on the audiograms showing the progress of the test The audiogram will show the last response at each frequency If no response is recorded at 90 dBHL this will be recorded as no response on the audiogram 8 6 Audiograms and HSE Categorie...

Page 33: ...uring the test and will be printed on the audiograms The results must be saved to the database before exiting the test window Results can be saved by pressing the Save button The audiograms and related information can be printed as a report by pressing the Print button 8 7 Comparison of Audiograms To compare the selected audiogram with another click the Compare Audiograms tab at the bottom of the ...

Page 34: ...al Practitioner or to a hospital audiology clinic are made in cases of poor hearing when the thresholds are above the levels indicated in the Referral table below Warnings are given to the employee when the thresholds indicate mild hearing impairment as indicated in the H SE Warning table below These levels indicate that the employee s hearing is not as good as might be expected at his her age The...

Page 35: ...percentile i e hearing level normally experienced by 1 person in 20 Suggests significant NIHL Sum of hearing levels at 1 2 3 4 and 6 kHz Compare value with figure given for appropriate age band and gender in Table A1 Referral 4 Rapid Hearing Loss Reduction in hearing level of 30dB or more within 3 years or less Such a change could be caused by noise exposure or disease Sum of hearing levels at 3 4...

Page 36: ...us The follow the instructions in the Installation section of this manual File Not Saved The audiogram has not been saved Is the folder and the path to it if saving over a network to a server valid and does the user currently logged on have permissions to save to it File already exists Ok to overwrite You are attempting to overwrite an existing file with this one No calibration data has been found...

Page 37: ...nts Headset positioning Remove glasses ear rings etc Place the headset so it sits comfortably on the head with the headband adjusted for best fit Patient cooperation Advise the patient to press and release the button as soon as they hear the tone A familiarisation facility is available when using the Single test button 12 Maintenance Technical Information The Osicus audiometer should have its cali...

Page 38: ...olution or cleaning wipes Do not allow liquid to run into theenclosure 14 2 Patient Contact Parts Must be cleaned with a non alcoholic wipe and care taken to prevent liquid build up The Earphone Cushions Audiocup cushions and the Response Button must be cleaned with a non alcoholic cleaning or disinfection wipe Care should be taken to prevent the build up of liquid on the earphone Note The use of ...

Page 39: ...certificate 16 Spare Parts and Consumables Additional consumables or spare parts can be ordered against the codes below Item Part No Response Button Unit ASRA OSICUS P R BUT Earphone cable ASRA OSICUS CORD Earphone Cushion Pair EARPHONE CUSHIONS Audiocup Cushion AUDIOCUP CUSHIONS Earphones TDH39 DD45 EARPHONE Audiocup Background Noise Reduction Headset ASRA OSICUS SR HEAD Carry Case OSICUS TRANSIT...

Page 40: ...gured and installed put into service in accordance with the instructions guidance provided herein and is used only in the configuration as supplied Changes or modifications to the Osicus may result in increased emissions or decreased immunity of the instrument in relation to EMC performance The Osicus should be used only with the cables accessories and transducers provided by GM Instruments The ca...

Page 41: ...r s declaration electromagneticimmunity The Osicus is intended for use in the electromagnetic environment specified below The customer or the user of the Osicus should assure that it is used in such anenvironment Immunity test IEC 60601 test level Compliance level Electromagnetic environment guidance Electrostatic discharge ESD IEC61000 4 2 2 4 6 8 kV contact 2 4 8 15 kV air 2 4 6 8 kV contact 2 4...

Page 42: ... Guidance on the Electromagnetic environment in which to operate the instrument cont Guidance and manufacturer s declaration electromagneticimmunity The Osicus is intended for use in the electromagnetic environment specified below The customer or the user of the Osicus should assure that it is used in such anenvironment Immunity test IEC 60601 test level Compliance level Electromagnetic environmen...

Page 43: ...h the following symbol NOTE 1 At 80 MHz and 800 MHz the higher frequency range applies NOTE 2 These guidelines may not apply in all situations Electromagnetic propagation is affected by absorption and reflection from structures objects and people a Field strengths from fixed transmitters such as base stations for radio cellular cordless telephones and land mobile radios amateur radio AM and FM rad...

Page 44: ...upplied PSU enclosure does not provide protection against the ingress of liquids but does have level 2 degree of protection and is rating IP20 6 4 There are no parts which are supplied sterile or are required to be sterile 6 5 The Osicus Audiometer is NOT suitable for use in an oxygen rich environment 6 6 The Osicus Audiometer is rated for continuous use 7 2 2 The Osicus serial number can be found...

Page 45: ...t Powering down the PC 7 9 2 13 There are no parts which need routine maintenance or servicing other than general housekeeping such as keeping the equipment clean and cables free of twisting 7 9 2 15 The EXPECTED SERVICE LIFE of the Osicus has been evaluated and determined to be 10 years from the date of manufacture After this time the Osicus and the accessories Headset Response Button and supplie...

Page 46: ... patient environment and the laptop desktop PC are used in the non patient environment Connect only items that have been specified as part of or specified as being compatible with the Osicus Audiometer Supplied and compatible spare parts and accessories are listed in Section 15 16 of this manual Assembly of ME SYSTEMS and modifications during actual service life shall be evaluated based on the req...

Reviews: