background image

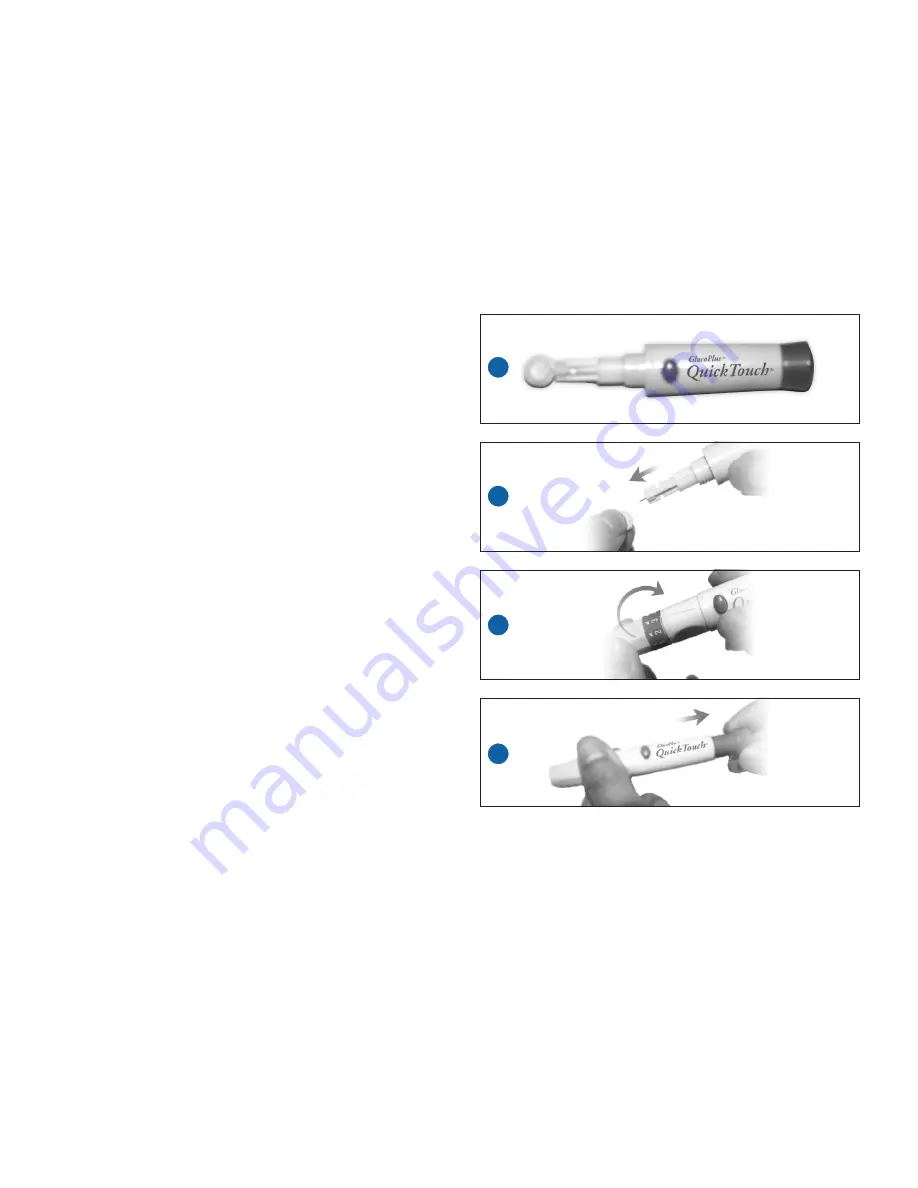
1

Remove the depth adjustment cap. Insert a
lancet into the lancet holder and push down
until it is fully seated.

2

Twist off the protective disk until it separates
from the lancet.

3

Replace the lancing device cap and set the
puncture depth to the desired number. 

Note:

the larger the number setting the deeper

the puncture.

4

Pull back the cocking mechanism until it makes
a click, and then release. If it does not click, the
device may have been cocked when the lancet
was inserted.

12

1

2

3

4

Summary of Contents for Blood glucose Complete monitoring system

Page 1: ...se Complete Monitoring System Syst me de surveillance de la Glyc mie User s Manual Guide d utilisation Allows easy application from left or right side of the test strip Lecteur de la gauche ou de la d...

Page 2: ...people with diabetes Before using your GlucoPlus System for the first time please refer to Quick Reference Guide included in this package Should you require further information please study this User...

Page 3: ...10 PREPARE FOR BLOOD SAMPLING 11 CODING YOUR METER 13 PERFORMING A TEST WITH GLUCOPLUS BLOOD GLUCOSE TEST STRIP 14 UNDERSTANDING YOUR TEST RESULT 16 REFERENCE 17 TO RECALL RESULTS STORED IN MEMORY 18...

Page 4: ...l Solution The GLUCOPLUS Blood Glucose Complete Monitoring System includes GLUCOPLUS Blood Glucose Meter with one 3V Lithium Battery Preinstalled GLUCOPLUS Blood Glucose Test Strips GLUCOPLUS Control...

Page 5: ...e values in setting mode 4 BUTTON Use button to recall the information stored in meter s memory and to increase values in setting mode 5 NOTES You may hold the or button down to scroll the numbers for...

Page 6: ...d Glucose Test Strips are intended for in vitro diagnostic use with capillary whole blood or GLUCOPLUS Control Solution Results will not be accurate if used with plasma or serum samples GLUCOPLUS Syst...

Page 7: ...sure that the GlucoPlus Blood Glucose Meter and GlucoPlus Blood Glucose Test Strips are working together properly PERFORM A TEST PAGE 14 Gently shake the control solution apply a drop on the test stri...

Page 8: ...eck that the meter is operating properly Use when performing quality control check on your meter Insert the check strip into test strip slot with label side up as below You should obtain an acceptable...

Page 9: ...ime date and a moving strip appear press BUTTON for 3 seconds at the beep sound the year will flash for example for the year 2004 number 4 will appear 3 Press and release the or button to obtain the d...

Page 10: ...UICKTOUCH ADJUSTABLE LANCING DEVICE Used with lancet to obtain a blood sample 1 Depth adjustment Cap 2 Lancet Holder 3 Cocking control 4 Release Button LANCET Used with lancing device to obtain a bloo...

Page 11: ...until it separates from the lancet 3 Replace the lancing device cap and set the puncture depth to the desired number Note the larger the number setting the deeper the puncture 4 Pull back the cocking...

Page 12: ...trip into the slot the meter will activate The last code number will appear on the screen 2 Press button until you hear the sound of buzzer and the code value flashes press or button to obtain the cod...

Page 13: ...ruction 3 Remove new test strip from vial Be sure to tightly replace vial cap after removing test strips Insert test strip immediately into test strip slot as illustrated on the meter above strip slot...

Page 14: ...blood drop covers the test confirmation window When blood is applied to the strip a line movesonthedisplayuntilmeasurementiscompleted 8 Test result appears in mmol L or mg dL depending on the pre set...

Page 15: ...the test strip vial cap tightly sealed Was the test strip used before the expiration date Were the test strips stored away from extreme temperatures in very cold or hot weather or from areas of high h...

Page 16: ...REFERENCE 1 Tietz N W textbook of Clinical Chemistry P 2190 1994 2 American Diabetes Association Position Statement Diabetes Care Vol 19 Suppl 1 p S4 1996 17...

Page 17: ...SULTS STORED IN MEMORY Turn meter on when test strip flashes press button till you hear a beep sound Pressing button allows you to see each test stored in the memory The record will appear in order fr...

Page 18: ...uring Range 30 600 mg dL or1 6 33 3 mmol L 6 Measuring Time Less than 15 seconds 7 Memory Capacity 192 test results with time date 8 Average Display 1 7 14 21 28 days average 9 Power Supply One 3 volt...

Page 19: ...sting 2 times a day When the battery symbol appears on the meter display battery is getting low FIG a You will still be able to test with low battery but you should replace it as soon as possible When...

Page 20: ...d lift upward FIG c Remove the old battery and insert the new 3 volt Lithium battery into the battery compartment being sure to align the plus and minus signs correctly FIG d Lower the battery compart...

Page 21: ...outside of the meter with a soft cloth slightly dampened with water Do not get moisture into the test strip slot STORAGE AND HANDLING Keep your meter free of dust Protect it from extremes in temperatu...

Page 22: ...Blood Glucose Meter or the way in which you are performing a test These messages help to identify certain problems but do not appear in all cases when a problem has occurred and in most cases problems...

Page 23: ...r s immediately Blood glucose result may be lower than 1 6 mmol L or 30 mg dL If this not confirm the way you feel review proper testing procedure and perform a quality check Repeat test If LO still a...

Page 24: ...act Glucoplus Customer Services or your local distributor for help 25 Battery is low Change battery soon Battery is dead Only memory results can be recalled Change battery now Test strip may be damage...

Page 25: ...nfo glucoplus ca www glucoplus ca GUARANTEE The makers guarantee that the Glucoplus Blood Glucose Monitoring System shall be free of defects in material and workmanship for a period of six years This...

Page 26: ...GlucoPlus Inc 2323 Halpern Ville St Laurent Qu bec Canada H4S 1S3 Tel 514 331 5188 Fax 514 331 5488 E mail info glucoplus ca www glucoplus ca...

Reviews: