Glow-worm SS 115 Instructions For Use Manual Download Page 12

4.6 Installation procedure

IMPORTANT.­

With regards to the Manual Handling 

Operations, 1992 Regulations, the following lift operation 

exceeds the recommended weight for a one man lift.

Unpack the Glow-worm cylinder and check the contents refer 

to section 3.  

NOTE:

 Position the Glow-worm cylinder in accordance with 

section 4.1 Siting.

4.7 Central Heating pipework

To prevent the Glow-worm cylinder from overheating the 2 

port motorised valve supplied with the cylinder must be fitted 

to the Central Heating flow to the indirect coil, see diagram 

4.4.

4.8 DHW system Pipework

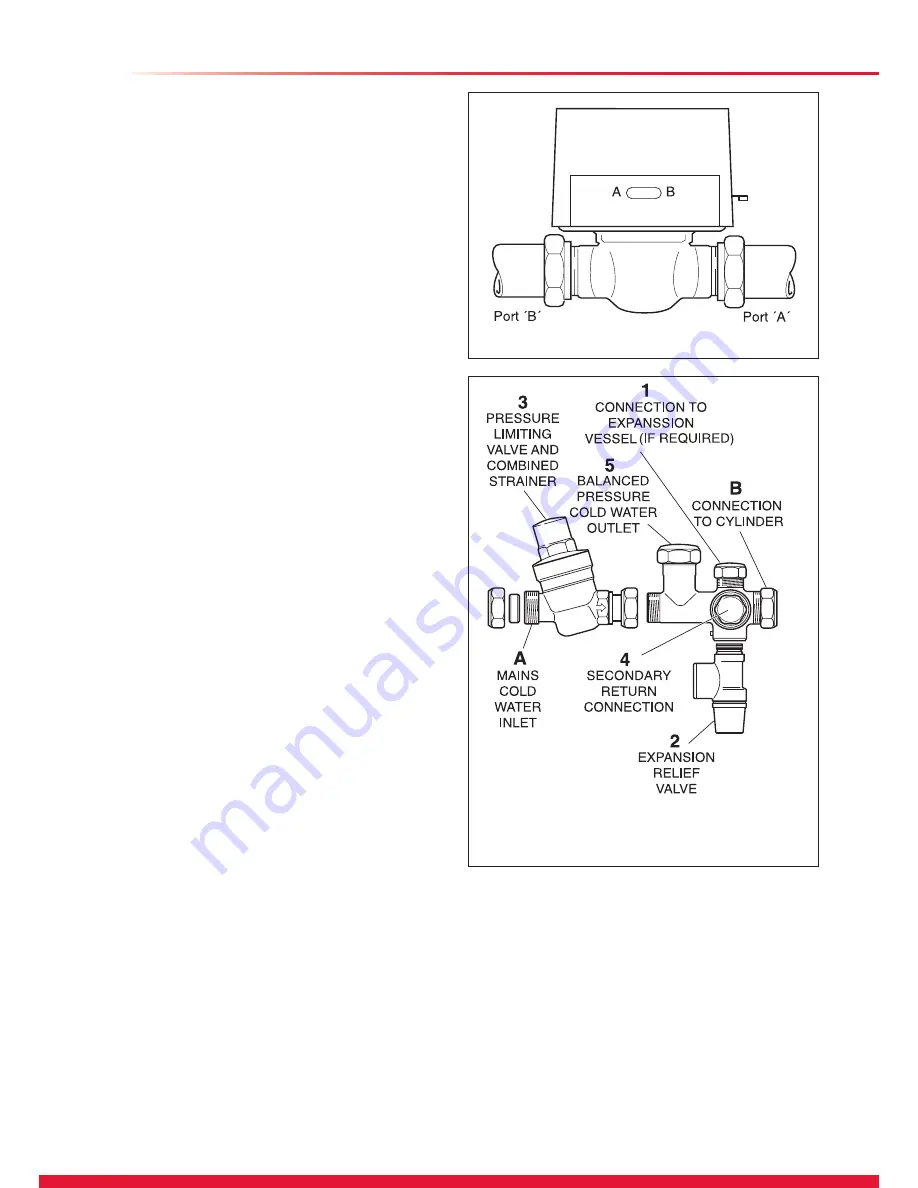
Connect the two cold water control valves together as shown 

in diagram 4.7, ensuring that the orientation of the valves, 

when installed in the cold mains supply, allows the 15mm 

outlet of the expansion relief valve to be connected to the 

tundish.

Install the discharge pipe from the expansion relief valve so 

that it has a continuous fall to outside in a safe and visible 

position where it will be unaffected by frost.

Never cap or block the outlet of the expansion relief valve.

Activate the expansion relief valve regularly to prevent from 

calcification.

Provide a cold water mains supply to the Glow-worm cylinder. 

To ensure optimum performance from the Glow-worm 

cylinder, and particularly in installations where the balanced 

pressure cold water outlet (5, diagram 4.7) is to be used, the 

pipework provided from the building mains stop valve to the 

Glow-worm cylinder should be minimum 22 mm copper tube.

Install a drain valve in the cold mains supply between the 

Glow-worm cylinder and the cold water control valves at the 

lowest point.

Install the assembled cold water control valves, see diagram 

4.7 in the cold mains supply at a convenient position adjacent 

to the Glow-worm cylinder, ensuring adequate space exists 

for service access and allow for connection of the discharge 

pipe from relief valves.

The discharge pipes should be discharging either directly or 

via a manifold to a tundish. The relief valves must be within 

600 mm of the tundish, see diagram 4.5.

The Glow-worm cylinder  is provided with an external 

expansion vessel.

Connect the expansion vessel to the installed water controls 

by either:

i.

   Screwing the vessel directly into the control assembly at 

the purpose provided connection (4, diagram 4.7) or,

ii.

   Connecting the vessel to the control assembly via 

copper pipe or a suitable approved flexible connection hose, 

ensuring that the vessel is adequately supported (1, diagram 

4.7).

NOTE:

 An optional ”Remote Expansion Vessel Mounting Kit” 

is available for use with Glow-worm cylinders (Accessory No. 

0020000000). The kit contains a wall mounting bracket. 

Connect the balanced pressure cold water supply (if required) 

to the cold water control pack, see diagram 4.7.

­­­

NOTE:

 In areas where the mains water pressure is high (4 

bar or above) the cold water supply to a bath or shower mixer 

valve can be taken from the balanced pressure cold water 

outlet (5, diagram 4.7) of the cold water controls. This will 

ensure that both hot and cold supplies to the mixer valve are 

at approximately the same pressure. The cold water supply 

for all other terminal fittings should be tee'd into the cold water 

supply pipework to the Glow-worm upstream of the cold water 

controls.

4  Installation

­­­IMPORTANT:

 No isolation valve shall be installed between 

the assembled cold water control valves and the cylinder.

12555

12556

Connect the DHW outlet pipework to the 22 mm domestic hot 

water outlet on the Glow-worm cylinder. Continue with 22 mm 

size pipe to the first tee fitting after which 15 mm pipework 

should be adequate. If the pipe runs are of excessive length or 

there are several terminal fittings supplied, extend the length 

of pipework in 22 mm.

Connect the secondary return if required, as described in  

section 3.2 Secondary Return.

4.9 Safety valve discharge pipework

Connect the temperature/pressure relief and expansion 

relief valves to the tundish using 15mm pipe and install the 

discharge pipework from the tundish in accordance with 

section 4.4 Discharge Pipework.

Diagram 4.6

Diagram 4.7

12

Summary of Contents for SS 115

Page 1: ...12563 Unvented hot water storage cylinders SS 115 SS 150 SS 175 SS 200 SS 250 SS 300 Instructions for Use Installation and Servicing www glow worm co uk ...

Page 2: ...ives you peace of mind plus valuable protection against breakdown Benchmark places responsibilities on both manufacturers and installers The purpose is to ensure that customers are provided with the correct equipment for their needs that it is installed commissioned and serviced in accordance with the manufacturer s instructions by competent persons and that it meets the requirements of the approp...

Page 3: ...urrent issue of the Gas Safety Installation and Use Regulations be handed to the user on completion of the installation CONTENTS DESCRIPTION SECTION PAGE Testing and Certification 4 Design Description 4 Technical Data 1 5 Instructions for Use 2 6 Note to Installer 3 8 Installation 4 8 Commissioning 5 15 Maintenance 6 15 Fault Finding 7 16 INTRODUCTION INSTALLATION MAINTENANCE 3 ...

Page 4: ...er mains inlet connections for optimum flow rate To achieve optimum performance from the Glow worm cylinder an adequate cold water mains supply pressure and flow rate must be available see section 4 2 Mains Water pressure DHW Temperature Control The Glow worm cylinder is supplied fitted with an adjustable domestic hot water DHW thermostat with thermal cut out and manual reset button which controls...

Page 5: ... 0 C bar Net weight 28 30 33 39 44 49 kg Weight full 145 175 205 245 310 340 kg Height 969 1179 1339 1499 1789 2109 mm Cylinder connections Cold mains inlet 22 mm compression DHW outlet 22 mm compression Balanced pres cold water outlet 22 mm compression DHW secondary return G 3 4 CH flow 22 mm compression on 2 port valve CH return 22 mm compression Electrical connections 3 kW Immersion heater 230 ...

Page 6: ...ter cylinder together with a boiler provides you a modern efficient high performance heating and hot water system Because your Glow worm hot water cylinder is supplied with water directly from the mains you get the benefit of mains pressure hot water at your hot taps without the need for storage tanks in the loft and without a hot water pump The Glow worm cylinder is made from high quality stainle...

Page 7: ...e Health and safety Executive to the prevailing standards installation book and building regulations at the time of installation 4 The benchmark cylinder commissioning checklist must be completed on installation and kept up to date 5 The Glow worm cylinder must be serviced annually 6 The installation must be in an appropriate location and its use is restricted to potable water chloride levels less...

Page 8: ...alve 6 0 bar incorporating a non return valve E Pressure limiting valve 3 5 bar incorporating a line strainer 3 Note to Installer 4 Installation 4 2 Mains Water Pressure The DHW performance of an Glow worm unvented cylinder installation will depend on to the available mains water supply pressure and flow rate To achieve optimum performance from the Glow worm cylinder a suitable cold mains water su...

Page 9: ...pework Increase the diameter of the pipework if the total resistance of the discharge pipework exceeds the figures shown in the table below The installation of the discharge pipework must be in accordance with G3 see diagram 4 1 600mm maximum 28 mm discharge pipe with 4 elbows and 7 m length from tundish to discharge point Resistance for 4 elbows at 1 0 m each 4 0 m Resistance of discharge pipe 7 ...

Page 10: ... take place the method of termination shown in diagram 4 2 is satisfactory Examples of points to consider when deciding whether a location for the high level discharge is suitable are 1 The possibility taking into account wind effect that someone may be in the path of the water being discharged and if so whether the temperature of the discharge water will have been sufficiently reduced to not be d...

Page 11: ...4 Installation FUNCTIONAL DIAGRAM 12553 FUNCTIONAL DIAGRAM 12554 Diagram 4 4 Diagram 4 5 11 ...

Page 12: ...irectly or via a manifold to a tundish The relief valves must be within 600 mm of the tundish see diagram 4 5 The Glow worm cylinder is provided with an external expansion vessel Connect the expansion vessel to the installed water controls by either i Screwing the vessel directly into the control assembly at the purpose provided connection 4 diagram 4 7 or ii Connecting the vessel to the control a...

Page 13: ...hed The Glow worm cylinder and accompanying boiler may be controlled using various programmers and room thermostats details of which are given in section Control Options The Glow worm cylinder has a factory fitted cylinder thermal cut out thermostat and manual reset Diagram 4 8 IMPORTANT Before resetting the thermal cutout or changing the temperature setting of the thermostat switch the electrical...

Page 14: ... board type E N L 4 E E N L 7 10 4 N E L N E 4 9 N L E 4 10 N L 7 6 6 9 N Room Thermostat Boiler Terminal Main Supply 3 Amp Fused L N 3 4 5 6 7 8 9 10 SL 1 2 3 Central Heating 2 Port Motorised Valve Hot Water 2 Port Motorised Valve Cylinder Stat E BL BR GR OR L N Pump E BL BR GR OR L N HW ON CH ON 2 Channel Programmer L N L in L out N BR Brown BL Blue GR Grey OR Orange W White HW Hot Water CH Cent...

Page 15: ...ck up immersion heater thermostat to 60 C see diagram 4 8 5 4 Benchmark Log Book Complete the Benchmark Cylinder Commissioning Checklist included in the inside back pages of these instructions 5 5 User s Instructions Hand these instructions for use to the user for retention and instruct in the safe operation of the boiler and cylinder Advise the user of the operation of the cylinder thermostat and...

Page 16: ...12560 Diagram 7 1 FAULT A 7 Fault Finding 16 ...

Page 17: ...12561 Diagram 7 2 FAULT B 7 Fault Finding 17 ...

Page 18: ...7 Fault Finding 12564 FAULT C Diagram 7 3 18 ...

Page 19: ...7 Fault Finding 12562 FAULT D Diagram 7 4 19 ...

Page 20: ...20 ...

Page 21: ...21 ...

Page 22: ...COMMISSIONING CHECKLIST MAINS PRESSURE HOT WATER STORAGE SYSTEM ...

Page 23: ...D Number Comments Signature SERVICE 7 Date Energy Efficiency Checklist completed Yes No Engineer Name Company Name Telephone Number Engineer ID Number Comments Signature SERVICE 9 Date Energy Efficiency Checklist completed Yes No Engineer Name Company Name Telephone Number Engineer ID Number Comments Signature SERVICE 2 Date Energy Efficiency Checklist completed Yes No Engineer Name Company Name Tele...

Page 24: ...1 www high efficiency info Because of our constant endeavour for improvement details may vary slightly from those shown in these instructions Glow worm Nottingham Road Belper Derbyshire DE56 1JT 0020005469 02 07 10 ...

Reviews: