background image

36

EN

WARRANTY

Within the period of 2 years from the date of purchase of the product, GLOBALO undertakes to cov-
er all repair costs for faults which are obviously caused by manufacturing defects. The warranty 
does not cover burnt bulbs, fuses and filters, as well as any damage due to faulty installation and 
ventilation system.

In addition, the warranty does not apply in the following cases:

•  Application in the catering industry.
•  Application for any other purposes than household use.
•  Use of the device not in accordance with the operating instructions and its intended purpose.
•  Circumstances beyond the control of the manufacturer, including, without limitation: uncon-

trolled power surge, flooding, obstruction of the ventilation duct.

•  Apparent mechanical damage after installation of the device.

* applies to range hoods with touch control

If after following the above-mentioned guidelines the problem is still not solved, contact an authorised household appliance repair service. 
Do not try to repair the hood yourself. A list of authorised repair centers is provided on the warranty card and on the website.

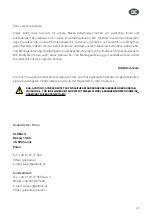
Problem

Possible reason

Solution

Number „4” on the display is blinking, and 

after 5 min. the speed level changes to 3*.

The hood is equipped with a turbo mode, 

which automatically changes to level 3 af-

ter 5 minutes of operation to save energy.

The turbo mode should only be used for 

intensive cooking.

The hood can only be operated using 

the control panel, it does not react to the 

remote control*.

The battery in the remote control is flat or 

the remote is too far from the device.

Replace the battery.

Low suction efficiency.

The filters may be dirty.

Wash or replace the anti-grease filter. 

Replace the carbon filter (if any).

One or more light bulbs are not lit.

Burnt halogen or LED bulb.

Replace the bulb in accordance with the 

user manual.

The hood generates excessive noise and 

vibration.

The reason may be incorrect installa-

tion of the hood to the wall or kitchen 

cabinet. Not all of the screws required 

were screwed in, or the screws were not 

tightened enough, leaving clearance.

The hood must be fixed to the wall or cab-

inet using the number of screws indicated 

by the manufacturer. After adjusting the 

position of the hood vertically and hori-

zontally, tighten all the mounting screws.

LED STRIP REPLACEMENT

The installation must be carried out by qualified personnel.

Summary of Contents for Loteo 60

Page 1: ...a montażu i użytkowania EN Operating and installation instructions DE Gebrauchs und Montageanleitung PL Okap kuchenny do zabudowy EN Built in range hood DE Einbau Dunstabzugshaube Loteo Loteo 60 80 Loteo 60 80 PLUS ...

Page 2: ...OKAPU PODŁĄCZENIE ELEKTRYCZNE CZYSZCZENIE I KONSERWACJA FILTR WĘGLOWY FILTR PRZECIWTŁUSZCZOWY STEROWANIE PRACĄ OKAPU CO ROBIĆ W RAZIE NAPOTKANIA PROBLEMU ETYKIETA ENERGETYCZNA SPOSOBY ZMNIEJSZENIA WPŁYWU PROCESU GOTOWANIA NA ŚRODOWISKO SERWIS ROZWIĄZYWANIE PROBLEMÓW WYMIANA PASKA LED INFORMACJE O GWARANCJI 4 5 6 6 7 8 9 12 13 13 13 14 14 15 16 16 16 17 18 18 19 ...

Page 3: ...eż jej zachowanie aby móc z niej skorzystać w każdej chwili Zespół GLOBALO Dla zapewnienia Państwu maksymalnego bezpieczeństwa w użytkowaniu zakupionego urządze nia najważniejsze treści niniejszej instrukcji zostały wyróżnione następującym symbolem SYMBOL UWAGA WSKAZUJE NA MOŻLIWE NIEBEZPIECZEŃSTWA W UŻYTKOWANIU OKAPU DLA WŁASNEGO BEZPIECZEŃSTWA WSKAZÓWKI OZNACZONE TYM SYMBOLEM NALEŻY BEZWZGLĘDNIE...

Page 4: ...wo zapalić Zasysane powietrze przez okap nie może być odprowadzane do kanału kominowego służącego do odprowadzania spalin z urządzeń spalających gaz lub inne paliwo nie dotyczy to okapów z obiegiem zamkniętym Jeżeli posiadasz w domu inne urządzenia o zasilaniu nieelektrycznym np piece na paliwa ciekłe grzejniki przepływowe termy zadbaj o wystarczający dopływ powietrza w pomieszczeniu Nie pociągaj ...

Page 5: ...ektrycznego i elektronicznego oraz baterii Prowadzący punkty zbiórki w tym lokalne punkty zbiórki sklepy oraz gminne jednostki tworzą odpowiedni system umożliwiający oddanie tego sprzętu oraz baterii jeżeli występują Prawidłowa utylizacja zużytego sprzętu oraz baterii jeżeli występują przyczynia się do unik nięcia szkodliwych dla zdrowia ludzi i środowiska naturalnego konsekwencji wynikających z m...

Page 6: ...WIĘK SZE NIŻ 90 STOPNI NIE ZALECA SIĘ STOSOWANIA ZMIAN PRZEKROJU PRZEWODU WIĘKSZEGO NA MNIEJSZY NP WYLOT POWIETRZA Ø15 CM NA WYLOT POWIETRZA Ø12 CM ZADBAJ ABY W POMIESZCZENIACH GDZIE BĘDZIE ZAINSTALOWANY OKAP WIELKOŚĆ OTWORU DO LOTOWEGO BYŁA CO NAJMNIEJ TAK DUŻA JAK WIELKOŚĆ WYCIĄGU POWIETRZA ZAPOBIEGNIE TO POWSTAWANIU PODCIŚNIENIA I OKAP BĘDZIE FUNKCJONOWAŁ PRAWIDŁOWO JEŻELI W POMIESZCZENIU ZNAJD...

Page 7: ...strukcji obsługi urządzenia grzewczego podana jest większa od ległość niż wskazana powyżej dostosuj się do takich wskazań Montaż okapu przedstawiony jest na rysunkach Rys 5 Rys 12 W trakcie jego przeprowa dzenia przestrzegaj ogólnie obowiązujących przepisów dotyczących odprowadzenia powietrza z pomieszczeń UWAGA ŚRUBY I ELEMENTY MOCUJĄCE STOSUJ ZGODNIE Z INSTRUKCJĄ W PRZECIWNYM WYPADKU MOŻE ZAISTN...

Page 8: ...efy montowania okapu znajduje się gniazdko wtykowe i czy można podłączyć okap do przewodu wentylacyjnego odprowadzającego opary na zewnątrz Sprawdź czy w miejscach w których będą wykonane wiercenia nie znajdują się przewody in stalacyjne elektryczne hydrauliczne itp Przygotuj następujące narzędzia miarkę ołówek wiertarkę wkrętarkę wiertło Ø3 mm śru bokręt poziomicę UWAGA ZACHOWAJ OSTROŻNOŚĆ ABY NI...

Page 9: ... Przygotuj szafkę do montażu okapu wycinając otwór w spodzie szafki zgodnie z rysunkiem min 530 max 586 min 20 600 280 800 min 710 max 766 min 20 280 LOTEO 60 LOTEO 80 Rys 5 2 Wymontuj filtr aluminiowy przeciwtłuszczowy Rys 6 ...

Page 10: ...ywierć cztery otwory Ø3 mm nieprzelotowe i umieść w nich wkręty 150 X 61 5 X 338 x4 Ø 3 mm 4 2x16 7 mm X min 20mm Rys 8 Rys 7 4 Zawieś dwa kątowniki montażowe na wkrętach i zamontuj okap przykręcając sześć śrub imbusowych ...

Page 11: ...11 PL x6 M5x12 Rys 9 5 W celu regulacji położenia okapu ustaw go tak aby jego dolny panel przylegał do spodu szafki poprzez regulacje elementem A następnie dokręć wkręty śrubokrętem Rys 10 A A ...

Page 12: ...12 PL 6 Zamontuj filtr przeciwtłuszczowy i zamknij jego osłonę 7 Podłącz rurę do króćca silnika Rys 11 Rys 12 ...

Page 13: ... łagodne środki myjące Nie używaj środków ściernych Czyszczenie okapu wykonuj przynajmniej raz w miesiącu lub co 35 godzin pracy okapu Do mycia okapu w żadnym wypadku NIE UŻYWAJ ŚRODKÓW NA BAZIE ALKOHOLU Elementy satynowe inox wyczyść specjalnymi preparatami przeznaczonymi do tego celu np BERNER FILTR WĘGLOWY Okap może być wyposażony w filtr węglowy Zastosuj go wyłącznie wtedy kiedy okap nie jest ...

Page 14: ...e oświetlenia Aby włączyć oświetlenie okapu należy nacisnąć przycisk Ponowne naciśnięcie powoduje wyłączenie oświetlenia 1 2 2 1 2 4 3 4 5 4 3 5 6 FILTR PRZECIWTŁUSZCZOWY Okap jest wyposażony w filtr aluminiowy który częściowo zatrzymuje cząstki tłuszczu pocho dzące z gotowania Możesz umyć filtr ręcznie poprzez zanurzenie go na 15 minut w wodzie o temperaturze 40 50ºC z dodatkiem płynu do naczyń P...

Page 15: ...sokiej temperatury nie wyłączył się bezpiecznik termiczny silnika W tym celu wyłącz urządzenie i odczekaj około 20 30 min aż bezpiecznik termiczny osiągnie właściwą temperaturę i ponownie włącz okap Upewnij się że wtyczka jest włączona do sieci Wyjmij wtyczkę sieciową aby zrestartować urządzenie do stanu wyjściowego Odczekaj około 15 20 sekund po czym ponownie wetknij wtyczkę do gniazdka Alternaty...

Page 16: ...w przy aktualnej intensywności gotowania SERWIS Jeżeli pomimo naszej dokładnej kontroli jakości stwierdzą Państwo nieprawidłowości w pracy i funkcjonowaniu zakupionego urządzenia prosimy o kontakt z naszym serwisem gdzie zawsze można uzyskać fachową pomoc Pracownicy serwisu służą swą pomocą od poniedziałku do piątku w godzinach od 9 00 do 17 00 pod numerami telefonów 48 13 49 27 560 wew 3 oraz 48 ...

Page 17: ...zczenia lub wymiany filtra przeciwtłuszczowego Naciśnij i przytrzymaj przez ok 6s pole na panelu dotykowym Umyj filtr lub wymień na nowy Wyświetlacz pokazuje jedynie znak minus oraz kropka w prawym dolnym rogu okap nie reaguje na próbę włą czenia Panel dotykowy został zablokowany jest to funkcja ułatwiająca mycie okapu Aby wyłączyć blokadę należy nacisnąć i przytrzymać przez ok 10s pole z symbo le...

Page 18: ...tryb turbo który po 5min pracy automatycznie zmienia bieg na trzeci w celu oszczędzania energii Trybu turbo należy używać jedynie przy intensywnym gotowaniu Okap można obsługiwać jedynie za pomocą panelu sterowania nie reaguje na pilota Wyczerpała się bateria w pilocie lub odległość jest zbyt duża Należy wymienić baterię na nową Okap słabo zasysa opary Prawdopodobną przyczyną są zanieczysz czone f...

Page 19: ...IA MECHANICZNE KTÓRY MIMO TO ZOSTAŁ ZAMONTOWANY NIE PODLEGA WYMIANIE PRZED MONTAŻEM OKAPU NALEŻY GO ROZPAKOWAĆ DOKONAĆ DOKŁADNYCH OGLĘDZIN POWIERZCHNI ORAZ SPRAWDZIĆ KOMPLETNOŚĆ WYPOSAŻENIA W CELU ZIDENTYFIKO WANIA EWENTUALNYCH USZKODZEŃ WIDOCZNE USZKODZENIA ZEWNĘTRZNE REKLAMOWANE PO MONTAŻU SĄ RÓWNIEŻ WYŁĄCZONE Z ROSZCZEŃ GWARANCYJNYCH ZA SZKODY POWSTAŁE WSKUTEK BEZPOŚREDNICH LUB POŚREDNICH DZIAŁ...

Page 20: ... BEFORE HOOD INSTALLATION HOOD INSTALLATION POWER SUPPLY CONNECTION CLEANING AND MAINTENANCE CARBON FILTER ANTI GREASE FILTER SETTINGS IN CASE OF PROBLEMS ENERGY LABEL REDUCING THE IMPACT OF COOKING ON THE ENVIRONMENT SERVICE AND MAINTENANCE TROUBLESHOOTING LED STRIP REPLACEMENT WARRANTY 22 23 24 24 25 26 27 30 31 31 31 32 32 33 33 34 34 34 35 35 36 36 36 37 ...

Page 21: ...ily accessible place so that you can consult it at any time GLOBALO team In order to ensure the maximum safety of the device the most important information has been marked with the following symbol THE CAUTION SYMBOL INDICATES POSSIBLE DANGERS WHEN USING THE HOOD FOR YOUR OWN SAFETY CAREFULLY FOLLOW THE INSTRUCTIONS INDICATED BY THIS SYMBOL Company Headquarters GLOBALO ul Maków 10 38 500 Sanok Pol...

Page 22: ...deep frying overheated fat can easily ignite The air sucked in by the hood must not be discharged into a flue pipe used for exhaust fumes from appliances burning gas or other fuels this does not apply to recirculation hoods If you have other non electric appliances in the house e g liquid fuel cookers flow through heaters water heaters make sure that there is sufficient air supply in the room Do n...

Page 23: ...lectrical and electronic equipment and batteries if any to special collection points for such items Operators of collection facilities including local collection points shops and municipal units must have in place an appropriate system enabling the users to return such equipment and batteries Proper disposal of waste equipment and batteries prevents harmful impact of hazardous components of these ...

Page 24: ...MITED TO MINIMUM THE ANGLES SHOULD NOT EXCEED 90 COMBINING DUCTS WITH DIFFERENT CROSS SECTIONS IS NOT RECOMMENDED E G Ø15 CM WITH Ø12 CM ENSURE THAT THE SIZE OF THE SUCTION OPENING IS AT LEAST AS BIG AS THE SIZE OF THE AIR EXHAUST THIS WILL PREVENT NEGATIVE PRESSURE AND ENSURE PROPER FUNCTIONING OF THE HOOD IF THERE ARE ANY OPEN FLAME APPLIANCES IN THE ROOM E G SOLID AND LIQUID FUEL COOKERS FIREPL...

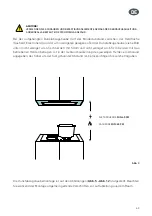
Page 25: ...the cooker manual indicates a greater distance than specified above follow the instructions in the cooker manual Installation of the product is shown in Figures 5 12 During installation follow the general reg ulations concerning air extraction CAUTION USE SCREWS AND FASTENERS APPROVED IN THE MANUAL TO AVOID THE RISK OF ELECTRIC SHOCK ELECTRIC COOKERS MIN 45 CM GAS COOKERS MIN 65 CM Fig 3 ...

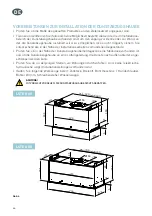
Page 26: ... socket near the hood installation space and whether it is possible to connect the hood to a ventilation duct for fume extraction Make sure there are no lines of electric and plumbing installations in places where holes will be drilled Prepare the following tools tape measure pencil drill driver Ø3 mm drill bit screwdriver level CAUTION TAKE CARE NOT TO SCRATCH THE HOOD LOTEO 60 LOTEO 80 290 min 5...

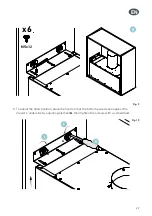
Page 27: ...inet where the hood is to be installed by cutting a hole in the bottom of the cabinet as shown in the figure min 530 max 586 min 20 600 280 800 min 710 max 766 min 20 280 LOTEO 60 LOTEO 80 Fig 5 2 Remove the aluminium anti grease filter Fig 6 ...

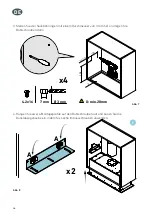
Page 28: ... x6 A A 3 Drill four Ø3mm blind holes and insert screws 150 X 61 5 X 338 x4 Ø 3 mm 4 2x16 7 mm X min 20mm Fig 8 Fig 7 4 Place two angle brackets on the screws and mount the hood by screwing in six Allen screws ...

Page 29: ...9 EN x6 M5x12 Fig 9 5 To adjust the hood position place the hood so that the bottom panel leans against the drawer s underside by adjusting element A then tighten the screws with a screwdriver Fig 10 A A ...

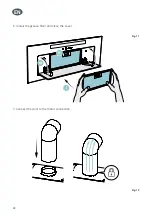
Page 30: ...30 EN 6 Install the grease filter and close the cover 7 Connect the duct to the motor connection Fig 11 Fig 12 ...

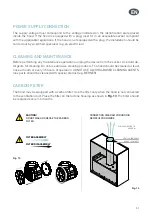
Page 31: ... tergents for cleaning Do not use abrasive cleaning products The hood should be cleaned at least once a month or every 35 hours of operation DO NOT USE ALCOHOL BASED CLEANING AGENTS Inox parts should be cleaned with special product e g BERNER CARBON FILTER The hood may be equipped with a carbon filter Use the filter only when the hood is not connected to the ventilation duct Place the filter on th...

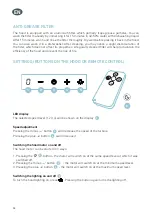
Page 32: ...witching the lighting on and off To turn the hood lighting on press Pressing the button again turns the lighting off 1 2 2 1 2 4 3 4 5 4 3 5 6 ANTI GREASE FILTER The hood is equipped with an aluminium filter which partially traps grease particles You can wash the filter manually by immersing it for 15 minutes in 40 50ºC water with dishwashing liquid After 15 minutes wash and rinse the filter thoro...

Page 33: ...c installation is not pulled out Check if the thermal cutout of the motor has not been activated due to high temperature If this is the case switch off the device and wait for about 20 30 minutes until the temperature returns to normal then switch the hood on again Make sure that the plug is inserted in the socket Remove the plug to restart the device Wait for about 15 20 seconds and then plug it ...

Page 34: ...xtraction at the current cooking intensity SERVICE AND MAINTENANCE If despite our strict quality control you find any irregularities in the operation and functioning of the purchased device please contact our service department to receive professional assistance of our team The service support is available Monday to Friday from 9 00 am to 5 00 pm at 48 13 49 27 560 extension 3 and 48 609 055 660 o...

Page 35: ... for approx 6s the button on the panel Clean the filter or replace it with a new one The display only shows the sign minus and dot in the lower right corner the hood does not start when switched on The touch panel is locked this is a function used to facilitate cleaning of the hood To deactivate the lock press and hold the on off sign for approx 10s No sign appears on the display the hood does not...

Page 36: ...d and on the website Problem Possible reason Solution Number 4 on the display is blinking and after 5 min the speed level changes to 3 The hood is equipped with a turbo mode which automatically changes to level 3 af ter 5 minutes of operation to save energy The turbo mode should only be used for intensive cooking The hood can only be operated using the control panel it does not react to the remote...

Page 37: ...NY MISSING COMPONENTS OR DAMAGE ANY VISIBLE EXTERNAL DAMAGE CLAIMED AFTER INSTAL LATION IS EXCLUDED FROM THE WARRANTY GLOBALO MAX SHALL NOT BE HELD LIABLE FOR DAMAGE CAUSED DIRECTLY OR INDIRECTLY BY PER SONS ANIMALS OR OTHER OBJECTS AS A RESULT OF NON COMPLIANCE WITH THE INSTRUCTIONS IN THIS MANUAL IN PARTICULAR THOSE CONCERNING INSTALLATION OPERATION AND MAINTENANCE OF THE DEVICE ...

Page 38: ...ER DUNSTABZUGSHAUBE ELEKTRISCHER ANSCHLUSS REINIGUNG UND WARTUNG KOHLEFILTER FETTFILTER STEUERUNG DER DUNSTABZUGSHAUBE WAS IST BEI PROBLEMEN ZU TUN ENERGIEETIKETT METHODEN ZUR REDUZIERUNG DER UMWELTEINWIRKUNG DES KOCHPROZESSES KUNDENDIENST LÖSUNG DER PROBLEME AUSTAUSCHEN DER LED STREIFEN INFORMATIONEN ÜBER DIE GARANTIE 40 41 42 42 43 44 45 48 49 49 49 50 50 51 51 52 52 52 53 53 54 55 55 ...

Page 39: ...h diese Gebrauchs und Montageanleitung gut aufzubewahren damit Sie jederzeit auf sie zugreifen können GLOBALO Team Um Ihnen maximale Sicherheit bei Gebrauch des von Ihnen gekauften Gerätes zu gewährleisten sind die wichtigsten Inhalte dieser Anleitung mit folgendem Symbol markiert DAS ACHTUNG SYMBOL DEUTET AUF MÖGLICHE GEFÄHRDUNGEN BEI GEBRAUCH DER DUNSTAB ZUGSHAUBE FÜR IHRE SICHERHEIT SIND DIE MI...

Page 40: ...zugshaube angesaugte Luft darf nicht in die Abgasleitung über die bei der Verbrennung von Gas oder anderen Brennstoffen erzeugte Abgase abgeleitet werden eingeleitet dies gilt nicht für Dunstabzugshauben mit geschlossenem Kreislauf Wenn Sie andere nichtelektrische Geräte in Ihrer Wohnung haben z B Flüssigbrennstoffofen Durchlaufheizkörper Durchlaufwasserheizer sorgen Sie für eine ausreichende Luft...

Page 41: ...ische und elektronische Geräte und Batterien zu übergeben Die Betreiber von Abfallssammelstellen darunter auch von lokalen Abfallssammelstellen Geschäften und kommunalen Abfallssammelstellen bilden ein geeignetes System für die Abgabe solcher Geräte und Batterien falls vorhanden Eine richtige Entsorgung der abgenutzten Geräte und Batterien falls vorhanden trägt zur Vermeidung der für die menschlic...

Page 42: ...OHLEN VON EINEM LEITUNGSDURCHMESSER IN EINEN ANDEREN ZU WECH SELN VON EINEM HÖHEREN DURCHMESSER IN EINEN GERINGEREN DURCHMESSER Z B VON EINEM LUFTAUSLAUF Ø15 CM IN EINEN LUFTAUSLAUF Ø12 CM VERGEWISSERN SIE SICH DASS IN RÄUMEN WO EINE DUNSTABZUGSHAUBE EINGEBAUT WIRD DIE ZULUFTÖFFNUNG ZUMINDEST SO GROSS WIE DER LUFTABZUG SELBST IST DADURCH WIRD VERHIN DERT DASS EIN UNTERDUCK ENSTSTEHT UND ES WIRD AU...

Page 43: ...st in der Gebrauchsanleitung des jeweiligen Herdes ein Abstand angegeben der höher als der hier genannter Abstand ist berücksichtigen Sie solche Vorgaben Die Dunstabzugshaubemontage ist auf den Abbildungen Abb 5 Abb 12 dargestellt Beachten Sie während der Montage allgemein geltende Vorschriften zur Luftableitung aus dem Raum ACHTUNG VERWENDEN SIE SCHRAUBEN UND BEFESTIGUNGSELEMENTE GEMÄSS DER GEBRA...

Page 44: ... Nähe der Dunstabzugshaubemontagezone eine Steckdose vorhanden ist und ob die Dunstabzugshaube an eine Lüftungsleitung die Dünste nach außen ableitet ange schlossen werden kann Prüfen Sie ob an denjenigen Stellen wo Bohrungen durchzuführen sind keine elektrische hydraulische u dgl Installationsleitungen vorhanden sind Halten Sie folgende Werkzeuge bereit Zollstock Bleistift Bohrmaschine Handschrau...

Page 45: ...ie einen Schrank zur Montage der Dunstabzugshaube indem Sie gemäß der Zeich nung eine Bohrung im Schrankboden herstellen min 530 max 586 min 20 600 280 800 min 710 max 766 min 20 280 LOTEO 60 LOTEO 80 Abb 5 2 Bauen Sie den Aluminium Fettfilter aus Abb 6 ...

Page 46: ...Durchmesser von 3 mm her und legen Sie Bohrschrauben darin 150 X 61 5 X 338 x4 Ø 3 mm 4 2x16 7 mm X min 20mm Abb 8 Abb 7 4 Hängen Sie zwei L Montageprofile auf den Bohrschrauben auf und bauen Sie die Dunstabzugshaube ein indem Sie sechs Imbussschrauben anwenden ...

Page 47: ... der Abzugshaube einzustellen muss sie so positioniert werden dass ihre Unterseite bündig mit dem Boden des Schranks abschließt indem Punkt A eingestellt wird anschließend ziehen Sie die Bohrschrauben mit einem Schraubenzieher an Abb 10 A A ...

Page 48: ...48 DE 6 Den Fettfilter einsetzen und den Deckel schließen 7 Verbinden Sie das Rohr mit dem Motorstutzen Abb 11 Abb 12 ...

Page 49: ...wenden Sie keine Schleifmittel Reinigen Sie die Dunstabzugshaube zumindest einmal im Monat oder immer nach 35 Betriebsstunden Zur Reinigung der Dunstabzugshaube VERWENDEN SIE AUF KEINEN FALL REINIGUNGSMITTEL AUF ALKOHLOBASIS Die Satinteile Inox reinigen Sie mit den zu diesem Zweck vorgesehenen Präparaten wie z B BERNER KOHLEFILTER Die Dunstabzugshaube kann mit einem Kohlefilter ausgestattet werden...

Page 50: ...wird mit der Höchstdrehgeschwindigkeit eingeschaltet 1 2 2 1 4 3 4 3 5 6 FETTFILTER Die Dunstabzugshaube ist mit einem Aluminiumfilter ausgestattet das die Fettpartikel die beim Kochen erzeugt werden teilweise zurückhält Sie können das Filter manuell reinigen indem Sie es 15 Minuten lang in ein mit Geschirrspülmittel vermischtes Wasser Temperatur 40 50ºC ein tauchen Nach 15 Minuten beginnen Sie mi...

Page 51: ...g der Dunstabzugshaube ist mit einer Funktion ausgestattet die ermöglicht die Tur bine automatisch auszuschalten falls innerhalb von 2 Stunden keine neuen Steuerungsbefehle erfolgen WAS IST BEI PROBLEMEN ZU TUN Die Dunstabzugshaube funktioniert überhaupt nicht Prüfen Sie ob die Sicherung in der Hauselektroinstallation nicht ausgeschaltet wurde Prüfen Sie ob wegen hoher Temperatur die Motor Thermos...

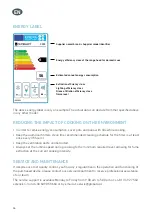
Page 52: ...e dann an einem anderen Tag wie die Dunst abzugshaube funktioniert Das oben abgebildete Energielabel dient nur als Beispiel Bei jedem anderen Modell können die tatsächlichen Daten von den oben genannten abweichen METHODEN ZUR REDUZIERUNG DER UMWELTEINWIRKUNG DES KOCHPROZESSES Um den Energieverbrauch zu reduzieren kochen Sie immer in abgedecktem Geschirr Halten Sie die Aluminiumfilter sauber die zu...

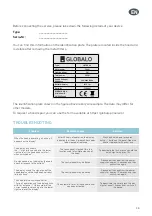
Page 53: ...es von Ihnen gekauften Gerätes fest wenden Sie sich bitte an unsere Serviceabteilung wo Sie jederzeit professionelle Hilfe bekommen können Das Servicepersonal steht für Sie von Montag bis Freitag von 9 00 Uhr bis 17 00 Uhr zur Ver fügung Tel Nr 48 13 49 27 560 App 3 und Mobil 48 609 055 660 oder E Mail serwis globalo pl Der oben gezeigte Datenschild gilt nur als Beispiel In jedem anderen Modell kö...

Page 54: ...ltfläche mit einem Plussymbol zu betätigen und dann ca 10 Sekunden lang gedrückt zu halten oder die Dunstabzugshaube ist auszuschalten Bei der vierten Drehgeschwindig keitsstufe blinkt die Ziffer 4 auf dem Display nach 5 Minuten wechselt das Gerät von der vierten in die dritte Drehgeschwindigkeitsstufe Die Dunstabzugshaube ist mit dem Turbomodus ausgestattet der nach 5 Minuten die aktuelle Drehges...

Page 55: ... des Gerätes ACHTUNG WAREN MIT MECHANISCHEN SCHÄDEN DIE DENNOCH INSTALLIERT WURDEN WERDEN NICHT AUS GETAUSCHT VOR MONTAGE DER DUNSTABZUGSHAUBE IST SIE AUSZUPACKEN DIE OBERFLÄCHE GE NAU ZU ÜBERPRÜFEN UND DIE AUSSTATTUNG AUF VOLLSTÄNDIGKEIT ZU PRÜFEN UM EVENTUELLE SCHÄDEN ZU IDENTIFIZIEREN GEWÄHRLEISTUNGSANSPRÜCHE DIE SICH AUF SICHTBARE ÄUSSERE SCHÄDEN BEZIEHEN DIE NACH MONTAGE BEANSTANDET WERDEN SI...

Page 56: ...ma GLOBALO ul Maków 10 38 500 Sanok Polska Poland Polen Tel 48 13 49 27 560 https globalo pl e mail biuro globalo pl Serwis Service Kundendienst Tel 48 13 49 27 560 wew 3 Kom 48 609 055 660 e mail serwis globalo pl https globalo pl serwis Ver 1 Copyright ...

Reviews: