Globalinx Talk-100 User Manual Download Page 7

TALK-100 User’s Manual   5

Installing without a Router

Installing with a Router

LED Status Lights

F

Telephone

Router

Computer

Computer

A

B C

E

Internet

DSL or Cable  

Modem

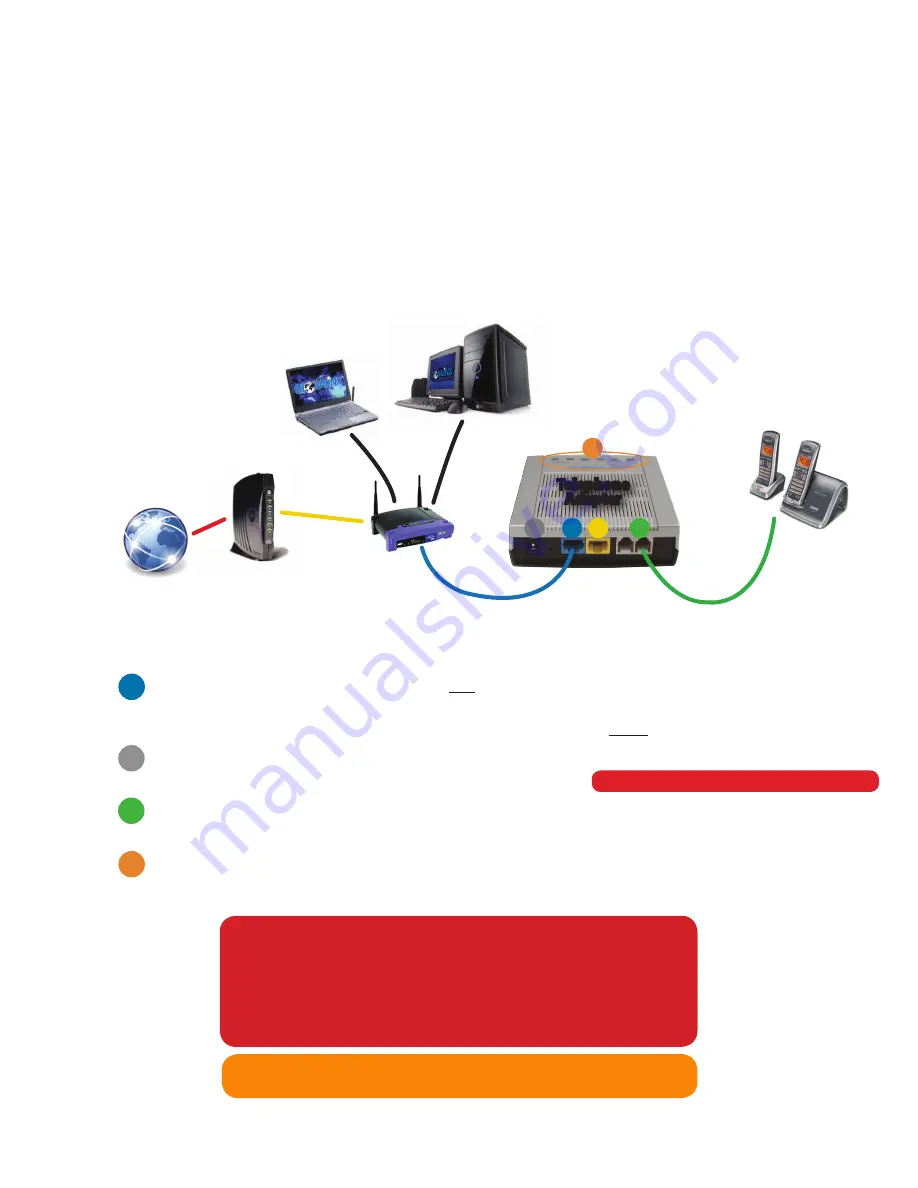
Using a Router?  Just follow these simple steps to connect your Telephone Adapter:

Note:  This set-up assumes your Modem is already connected to your Router (as shown above with the yellow line).

Insert the provided blue Ethernet Cable into the blue 

WAN port


[B]

 of the Telephone Adapter and connect the other 

end of the Ethernet Cable to an available Ethernet port on your Router.  You can now connect your PC to another  

available Ethernet port on your Router (shown above with black lines). The yellow port 

[C] 

will not be used.

Insert the provided Power Adapter into the 

Power Connection 

[A]

 and connect the other end to a wall outlet. Allow up 

to 5 minutes for the Telephone Adapter to fully boot up before placing a call. 
Connect a standard touch-tone analog telephone to the Telephone Adapter. To do this, insert the telephone cable into 

the 

Phone 1 port 

[E]

 and connect the other end of the telephone cable to the telephone.

When the

 Phone


1 LED Status Light


[F] 

turns a solid color, your service is ready to use.

1

STEP #

2

STEP  #

3

STEP #

4

STEP #

Telephone

Adapter

IMPORTANT NOTICE, READ FIRST!

Once you have connected the Power Adapter into the Power Connection of  
the device it may take up to 5 minutes to activate your new Telephone Adapter  
and get it connected to the GLOBALINX

®

 network. DO NOT unplug the power or  

Internet cable during this waiting period or you will damage the unit. When 
the Phone 1 Status Light turns a solid color, your service is ready to use.


If all LED Status Lights flash green simultaneously, DO NOT unplug  

       power Ethernet cords. This means the device is automatically upgrading.

NOTE:

DO NOT UNPLUG AT THIS TIME OR YOU WILL DAMAGE THE UNIT

.

Summary of Contents for Talk-100

Page 1: ...with respect to this documentation and disclaims any implied warranties of merchantability quality or fitness for any particular purpose The information in this document is subject to change without n...

Page 2: ...TALK 100 3 Included Equipment 3 4 Installing the TALK 100 4 Without a Router 4 With a Router 5 5 Product Overview 8 9 System Specifications 8 9 6 Basic Operation 10 Placing a Phone Call 10 Call Hold 1...

Page 3: ...ow to operate and manage your GLOBALINX TALK 100 Digital Telephone Adapter and make the best use of its many upgraded features including simple and quick installation and 3 way conferencing Safety Com...

Page 4: ...Support Once GLOBALINX Technical Sup port has determined that the unit should be replaced a RMA number will be issued to the purchaser The warranty is valid for twelve 12 months from date of sale and...

Page 5: ...s Manual 3 3 Connect Your TALK 100 Included Equipment The TALK 100 DTA package contains One TALK 100 Telephone Adapter One Ethernet Cable One Power Adapter TALK 100 Telephone Adapter Ethernet Cable P...

Page 6: ...ll outlet Allow up to 5 minutes to fully boot up before placing a call Connect a standard touch tone analog telephone to the Telephone Adapter To do this insert the telephone cable into the Phone 1 po...

Page 7: ...fortheTelephoneAdaptertofullybootupbeforeplacingacall Connect a standard touch tone analog telephone to the Telephone Adapter To do this insert the telephone cable into the Phone 1 port E and connect...

Page 8: ...n WAN Port Blue Connect to the cable or DSL modem or router for Internet connection Ethernet Port Yellow Connect the Ethernet port to your PC RESET Factory Reset button Press for 7 seconds to reset fa...

Page 9: ...ternet LED Red Device unable to connect to the Internet no IP address on the WAN side Device has already registered with SIP server and FSX port 1 is enabled Phone LED 1 active green blinking Incoming...

Page 10: ...ing Call Policy Call Accept Call Forward Call Block MWI Message Waiting Indicator RFC 3842 IVR Interactive Voice Response Speed Dial Phone Book Network Functionality Remote Firmware Upgrade Secure HTT...

Page 11: ...lts Reset button Dimensions 108 W x 33 D x 105 H mm Weight 168 g Operation Environment Operating Temperature 0 C 40 C Operating Humidity 20 85 non condensing Storage Environment Storage Temperature 20...

Page 12: ...ed Toggle between incoming call and current call by pressing the FLASH button First call is placed on hold Press the FLASH button to toggle between two active calls 3 Way Conferencing The TALK 100 sup...

Page 13: ...one number 79 Call Forward Out of Svc 70 menu 71 Call Forward Selective 63 menu 83 menu Caller ID Block 67 N A Caller ID Block Release N A 82 no Call Return 69 N A Call Trace 57 N A Call Waiting FLASH...

Page 14: ...sconnect all cables from this device before servicing or disassembling Use ONLY an appropriate power adapter or cord for your device Connect it to the right supply voltage Do NOT allow anything to res...

Page 15: ...nd used in accordance with the instructions may cause harmful interference to radio communications However there is no guarantee that interference will not occur in a particular installation If this d...

Reviews: