background image

19

means the dash cam isn’t recording.

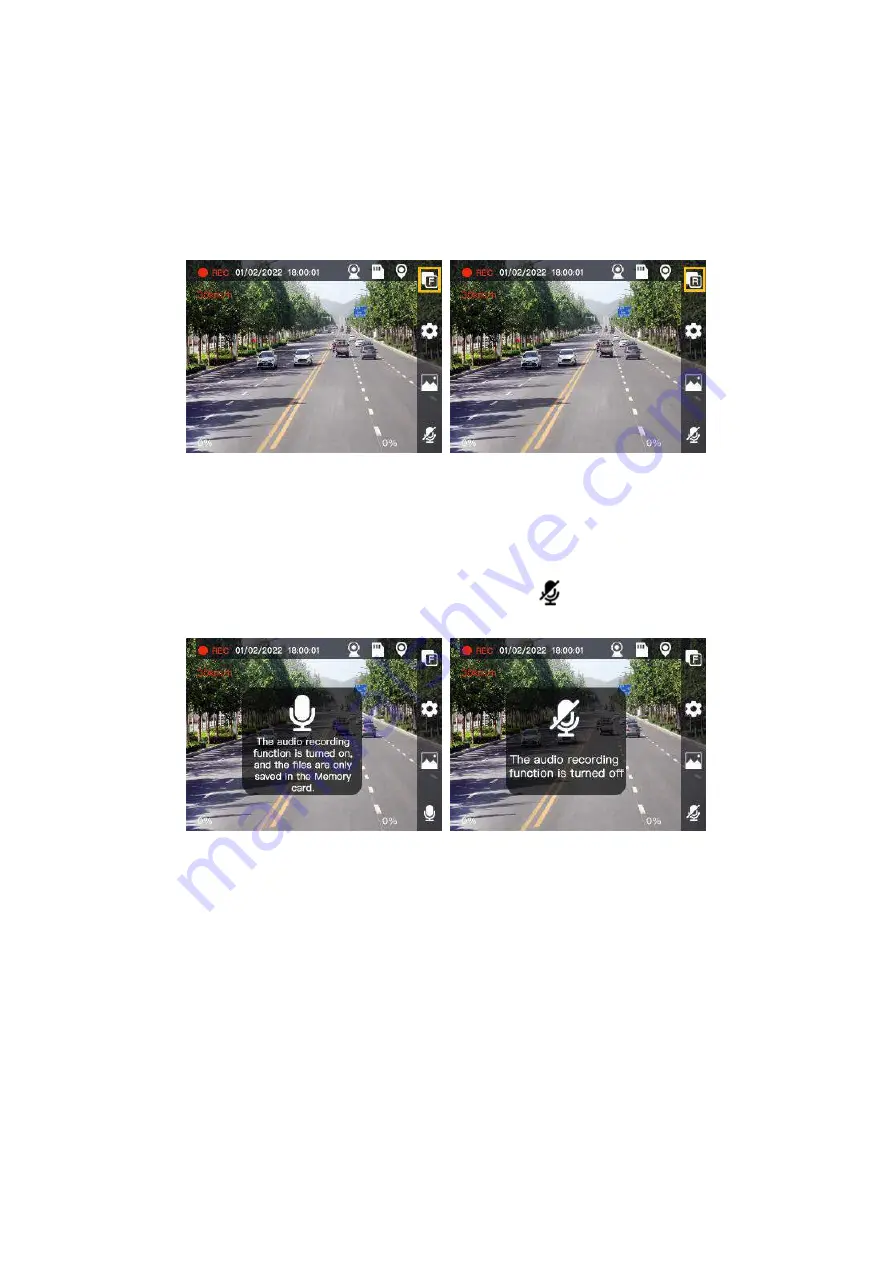
Front / rear camera recording switch

• F for Front camera: Default to display front camera recording.

• R for Rear camera: Switch to display Rear camera recording.

Front / rear camera recording switch

Audio recording

System is default off, but able to turn on by switching

.

Audio recording switch

5.2 Emergency Recording

Emergency recording starts working under 2 conditions as below:

(1)

Impact motion recording

• If the dash cam detect an impact whilst normal recording, it will start emergency
recording.

• If impact motion set as [high sensitivity], even slight impact would be detected.

Summary of Contents for KY181

Page 1: ...1 KY181 User Manual AI Dash Cam ...

Page 2: ...t Specification 7 2 4 Package Contents 8 3 Installation 9 3 1 Installing Memory Card 9 3 2 In Vehicle installation Front Camera 9 3 3 In Vehicle installation Rear Camera 11 3 4 Connect car power cable 12 4 AI Functions 14 4 1 Auto calibration 14 4 2 Lane Departure Warning 14 4 3 Forward Collision Warning 14 4 4 Virtual Bumper 15 4 5 Pedestrian Collision Warning 15 ...

Page 3: ... 4 8 Rear Collision Warning 17 5 Dash Cam Recording 18 5 1 Normal recording 18 5 2 Emergency Recording 19 5 3 Parking Mode Recording 21 6 Playback mode 21 7 Menu and Settings 23 7 1 Settings 23 7 2 AI Function Settings 26 8 Simple troubleshooting 27 ...

Page 4: ...ous personal injury or death DO NOT seek to access the information stored on the device or change the device settings whilst driving The device should only be operated when your vehicle is stationary and you are parked in a safe place in compliance with local laws Always maintain awareness of your surroundings and do not stare at the display or become distracted by the display Focusing on the disp...

Page 5: ...mble the device and accessories without authorization otherwise the device and accessories will not be covered by the warranty 2 Product Introduction 2 1 Product Feature 1 True 4k wide vision 3840 2160P resolution high definition recording to capture every subtle detail of the driving process 2 Wide Dynamic Recognition WDR Clearly record details in both highlights and shadows even in extremely str...

Page 6: ...mergency braking and collisions the crash video is saved separately 8 Multi camera support Can be connected to front and rear cameras for full security protection 9 Wide Angle 140 140 FOV enables camera to easily capture multiple lanes and reduce shooting blind spots 10 Start simultaneously the camera will automatically start recording after the vehicle is started and the camera will automatically...

Page 7: ...6 2 2 Product Overview Front Camera Rear Camera ...

Page 8: ...B Flash 128MB GPS Dual System GPS GLONASS Screen 2 8 Built in G sensor Impact detection Memory Card External Memory Card 32 to 256GB Card in FAT32 UHS III A1 Angle Aperture Front Camera F1 75 FOV 140 Rear Camera F1 9 FOV 150 Recording Resolution 8MP 30FPS 2MP 25FPS Recording Format MP4 ...

Page 9: ...nts AI Dash Cam Rear Camera Car Power Adapter Rear Camera Cable Static Stickers for AI Dash Cam Quick Start Guide Warranty Card User Manual Online Cable Tidy Tool Optional Memory Card Reader Optional Hardware Kit Optional ...

Page 10: ... the Memory Card Note Do not remove or insert the memory card while the power is on as this may damage the card or the video content therein 3 2 In Vehicle installation Front Camera 1 Select a mounting location You can mount the device in the left center or right of your windshield Note It is recommended that the front camera be mounted behind the rear view mirror to avoid obstructing the driver s...

Page 11: ...he 3M adhesive side and stick the AI Dash Cam into the dashed box in the middle of the static sticker Make sure the front camera is horizontal and facing straight to the windshield to capture the desired view such as the road in the center Place the bracket firmly on the mounting position of the static sticker for 30 seconds 3M adhesive The Static Sticker 3 Adjust the Front camera Note Recommend t...

Page 12: ...e cover layer to expose the 3M adhesive surface Ensure that the cable port of rear camera directs to the right side and the view captured is desired field Firmly place the mount on the mounting location of windshield for 30 seconds 3M adhesive 3 Plug the rear camera cable into the connector on the rear camera Rear camera connector 4 Route the rear camera cable and plug another end of cable into th...

Page 13: ...te Rear camera connector should orient to the right 3 4 Connect car power cable 1 Plug the power cable into the Power Connector MINI USB connector of the front camera Power cable plugin 2 Route the power cable and hide the power cable along or behind the trim or headline to make sure the view of driver unobstructed Plug the car power adapter into the DC 12V outlet of your vehicle as below pictures...

Page 14: ...13 Overall wire alignment diagram ...

Page 15: ...nt Vehicle speed 60km h and the lane center driving vehicle state is changing to across the lane the AI system will issue related sound alert to driver and display alert icon on the dash cam screen Lane Departure Warning 4 3 Forward Collision Warning When current Vehicle speed 30km h and the Time to Collision TTC between the vehicle and the vehicle ahead is less than 2 7s the AI system will issue ...

Page 16: ...ll issue related sound alert to driver and display alert icon on the dash cam screen Virtual Bumper 4 5 Pedestrian Collision Warning When the distance between the vehicle and the pedestrian ahead Current vehicle speed 1 2S and 60km h Current vehicle speed 1km h the AI system will issue related sound alert to driver and display alert icon on the dash cam screen Pedestrian Collision Warning ...

Page 17: ...in 7 meter distance is approaching from the rear side lane the AI alert will be triggered 1 The LED indicator light will be solid on to remind the driver The faster the speed the farther the alarm can be triggered up to 12 5 meters 2 When there is a car on your left rear the orange LED on the left will be on and when there is a car on your right rear the green LED on the right will be on Level 2 A...

Page 18: ...l display on the dash cam screen The faster the speed the farther the alarm can be triggered up to 12 5 meters Lane Changing Assistance 4 8 Rear Collision Warning If the on driving vehicle 30km h the Time to Collision TTC between the vehicle and the vehicle behind is less than 2 7s the AI system will issue related sound alert to driver and display alert icon on the dash cam screen Rear Collision W...

Page 19: ... turn off from Video Settings Time stamp Front camera default as 4K 30fps able to set as 4K 30fps or 2K 30fps or 1080P 30fps Video Settings Video resolution Rear camera default as 1080P 5 1 Normal recording After the vehicle is started the dash cam automatically turns on and starts recording After the vehicle is turned off the recording will stop automatically Note REC red light flashing means the...

Page 20: ...ar camera recording switch Audio recording System is default off but able to turn on by switching Audio recording switch 5 2 Emergency Recording Emergency recording starts working under 2 conditions as below 1 Impact motion recording If the dash cam detect an impact whilst normal recording it will start emergency recording If impact motion set as high sensitivity even slight impact would be detect...

Page 21: ...on can start emergency recording whilst under the normal recording mode Emergency Recording Button Pushing the emergency button can also start emergency recording whilst not under the normal recording mode like under playback mode Note The screen displays the icon which is on the process of emergency recording for 15s recording file Emergency recording GPS position Positioned screen displays Non p...

Page 22: ... Pushing can enter the playback mode and select or to choose the file type Normal Emergency Parking and select to enter and review 1 3 types of recording file normal emergency and parking Types of recording file 2 Each recording type has 2 channel file Front view and Rear view Types of channel file 3 The dash cam supports loop recording to allow continuous recording by replacing the file in Normal...

Page 23: ... won t be replaced or erased 4 The playback progress adopts the forward timing method and the file duration remains unchanged Video playback interface 5 Push 1 to change the speed by 1X 2X 4X 8X on a loop ...

Page 24: ... are settable 2 Collision sensitivity setting G sensor support impact motion When detect a impact the dash cam can start emergency recording with 2 cameras 3 Parking Mode default as turn off Able to turn on by working with extra hardware kit 2 Format the Memory card The memory card may need to be formatted in the following situations ...

Page 25: ...Format Confirmation 2 When the Memory card isn t FAT32 the screen will display as below please change a new memory card FAT32 Formatting Requests 3 Factory Default Settings 1 Factory Default Settings is an option that restores all settings of the AI Dash Cam to factory settings 2 The screen will display as below ...

Page 26: ...lect all settings will get back to the factory default then back to Setting Page Select No change then back to Settings Page Resetting progress 4 About Product information and system version number the screen displays as below ...

Page 27: ...rward Collision warning Pedestrian Collision Warning Stop Go Virtual Bumper Rear Collision Warning Lane Change Assistance They all default as turn on and can adjust the warning sensitivity and turn off AI Function Setting List AI Function Selection AI Function Switch ...

Page 28: ... The recording has no audio Please make sure you turn on the audio The dash cam is over temperature When the dash cam is working at 4K 2K 1080P 30fps it s normal to get a little hot around the dash cam and Memory card port Recording files on the memory card can t display on the computer Please change a new video player to display If still unworkable maybe the memory card get damaged please try to ...

Reviews: