


3
Combination Sander
1. Install the machine on a flat, level surface that is sturdy enough to support the weight and
vibrations of the sander.
2. Always wear protective safety glasses or goggles when operating the machine.
3. Do not place workpiece against belt or disc before turning power switch on. Turn on the sander
before and allow the belt or disc to come up to full speed before sanding or grinding.
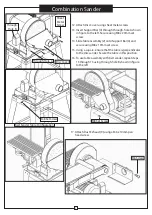
4. Check belt tracking before using belt sander. Turn belt sander on then off to observe, belt should
stay centered on the idler and drive drums. If belt is off center, unlock belt tracking locking knob
and adjust belt tracking nut as needed. Check if belt is centered after adjustment, tighten the
belt tracking locking knob and turn belt sander on and off as before. If belt is still not centered,
unlock again and continue to adjust.
5. Hold workpiece securely with both hands when sanding to sanding to prevent kickback. Keep
fingers away from abrasive to prevent injury.
6. Check all nuts, bolts and screws for tightness regularly. Vibration during operation may cause
hardware to loosen.
7. Do not use the right side of the disc for sanding, the workpiece may kick back.
8. Always maintain a maximum
1/16
" clearance between the table and the sanding disc.
9. Use a dust extractor to remove woodchips and sawdust during operation.
10. Replace abrasives when they have become loaded/glazed, or when they have become frayed or
otherwise damaged.
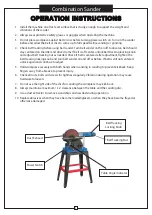
OPERATION INSTRUCTIONS
OPERATION INSTRUCTIONS
Dust Exhaust
Belt Tracking Nut
Belt Tracking
Locking Knob
Power Switch
Table Angle Indicator


