5
Need help or have any questions? Call us at 1-714-963-0329 or send us an Email at [email protected]
SECTION 3: ASSEMBLING YOUR X-TERMINATOR PRO
Step 1: Installing the Clutch Assembly
●
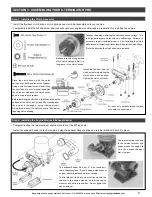
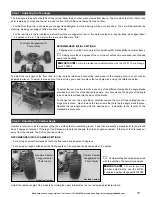
Install the flywheel, clutch shoes, clutch springs and clutch bell assembly onto your engine.
●
Temporarily install the M3 cap screw and lock nuts onto your engine mounting lugs in preparation for installing the engine.
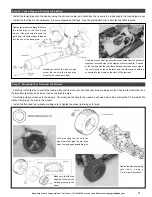
Before installing the clutch bell, lightly sand the inside
surface of the clutch bell, using 600 grit sandpaper ,
then clean it thoroughly, using rubbing alcohol.
Doing this will allow the clutch shoes to "bite" better,
reducing clutch slipping.
For now, only partially thread the lock
nuts onto the cap screws.
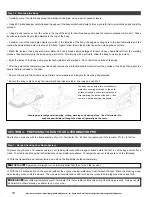
Install the flywheel and the
clutch nut before installing the
clutch shoes and springs.
Tighten the clutch nut firmly.
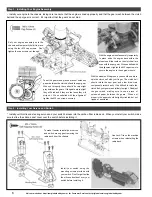
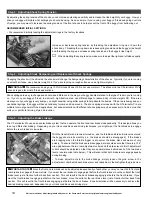
Place the clutch shoes, with the clutch
springs, over the three pins on the flywheel.
Using a small screwdriver as a lever, bend
the short end of each clutch spring behind
the clutch nut and push the clutch shoes
down to snap them into place.
Take your time when installing the clutch shoes and springs. This
is a high-performance clutch with very stiff springs. Patience is
necessary to get it installed properly. After installing the clutch
bell, make sure it spins freely. It should not drag over the clutch shoes.
*Note the direction the clutch shoes are installed.
Make sure that the long portion
of the clutch springs fit firmly in
the groove in the clutch shoes.
Step 2: Installing the Engine Mounts & Exhaust Header
●
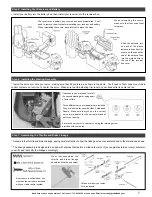
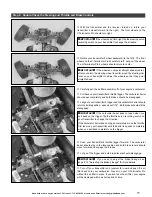
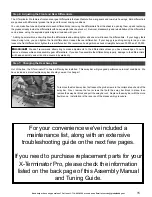
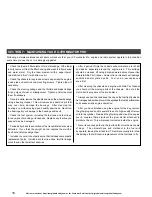
Temporarily slide the two aluminum engine mounts over the M3 lock nuts.
●
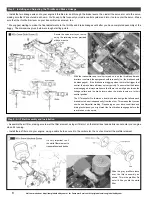
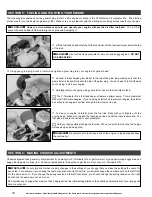
Install the exhaust header onto your engine, using the exhaust hanger spring and retainer bracket to hold it in place.
The retainer spring connects
to the retainer bracket and
wraps around the engine to
hold the exhaust header
firmly in place.
The exhaust header fits most .21 size round-port,
rear exhaust engines. If you're using a side exhaust
engine, after-market headers are available.
The flat sides of the hex nuts must line up with the
channel in the engine mounts, so that the engine
mounts can be slid into position. Do not tighten the
cap screws yet.

