background image

16 


80% charged when shipped from the factory.  The battery is fully charged when the LED 
light on the charger turns green.   

2.


Always charge the battery in a clean, dry location, free of debris.  

3.


Charge the battery frequently.  The battery can be recharged at any time. Do not think 
that you need to fully deplete the battery before recharging it.  In fact, frequent partial 
discharge/charge cycles will prolong the battery life vs. full discharge/charge cycles.   


4.


Fully charge the battery before storing the scooter for extended periods. 

5.


When not in use, periodically recharge the battery once every three months.   

6.


Battery damage due to water, collision, improper storage and other non-normal factors 
is not covered by the limited manufacturer warranty. 
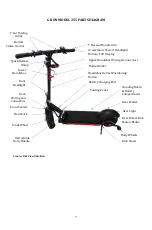


CHARGER: 

1.


When you plug the charger into the wall outlet and before you connect it to the scooter, 
the LED light on the charger shows blue.  The battery is charging the scooter when the 
LED light on the charger is red.  When the battery is 95% full, it will turn green.  It will 
continue to charge with very small current for about 30 minutes after the LED turns 
green.  When battery is 100% full, the charger will stop charging and the charging light 
will remain green. 

2.


The provided charger has a built in overcharge protection to prevent the battery from 
being overcharged.   

3.


Charging time is approximately 5.5 hours for a fully discharged battery. 

4.


Regularly inspect the charger for damage to the cord, plug, enclosure and other parts.  
In the event of such damage, the charger must not be used until it has been repaired or 
replaced. 

5.


Unplug the charger from the wall outlet when not in use.  


6.


Use only the charger supplied with this scooter or a recommended replacement 
specified by Glion. 

7.


Charger supplied by Glion is Model No. HP1202L3(90w), manufactured by High Power 
Technology (KunShan) Inc. Operating temperature is 0

 (32° F) ~ 40

 (104° F)


 WARNING:  Failure to confirm compatibility, properly install, 
operate and maintain any charger, component or accessory can 
result in serious injury or death.  


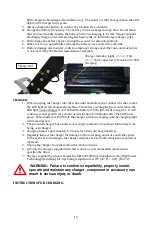
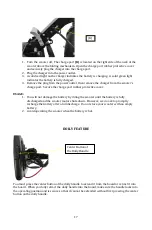
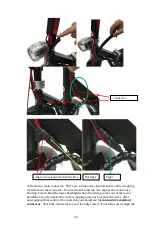
INSTRUCTIONS FOR CHARGING:


Charger Indicator Light.  

Green

=  Full .  

Blue

 =  Not Connected to Scooter 

Red

=Still 

Charging. 

Charge Port 

Summary of Contents for Dolly XL

Page 1: ...12 15 2022 Gl on Dolly XL Electric Scooter User Manual...

Page 2: ...Glion Electric Scooter at www getglion com for warranty coverage Please do not hesitate to contact us if you have any questions support getglion com www getglion com Probity Cell LLC 701 4th Avenue Su...

Page 3: ...FOLD FOLD INSTRUCTIONS 8 OVERVIEW OF YOUR GLION ELECTRIC SCOOTER 11 OPERATING YOUR GLION ELECTRIC SCOOTER 14 BATTERY AND CHARGER 15 DOLLY FEATURE 17 SCOOTER COVER OPTIONAL ACCESSORY 18 GLION ELECTRIC...

Page 4: ...te shoes lace up with rubber soles and bright or reflective clothing while operating this scooter WARNING Failure to wear a helmet while riding may result in serious injury or death 3 SAFE OPERATING C...

Page 5: ...t more than 20 km h 13 mph and be careful to control your speed when descending hills The scooter has a short wheel base and can become unsteady at excessive downhill speeds 14 VISIBILITY Do not ride...

Page 6: ...water rain wet or muddy conditions runs the risk of severely damaging it Do not immerse the scooter in water or directly spray the scooter when cleaning When parked outside where rain is possible cov...

Page 7: ...e Brushless DC Motor Rated Output Power 400W Rated Voltage 36V Charger Input Voltage 100 240V Charging time 2A charger 5 5 hour Top speed and range per charge depends on rider weight wind speed temper...

Page 8: ...al Standing Board Battery Compartment Rear Light Rear Wheel Hub Motor Brake Front Fender Fender Front Wheel Fender Front Fork Fender Battery Charging Port Accelerator Power Headlight Button LCD Displa...

Page 9: ...e bottle holder is included below in step 4 Step 1 Make sure the scooter is turned off The LCD Display on the right handle grip should not be lit If it is lit press the middle power button for 2 secon...

Page 10: ...p 4 Install the bottle holder using the Allan wrench and screws included in the package on the vertical handle bar There are 2 screws and a small collar included in each package Install the long screw...

Page 11: ...hile quick release is locked IF T BAR MOVES DOWN MAKE SURE TO TIGHTEN THE QUICK RELEASE THUMB SCREW MORE AND TIGHTEN THE QUICK RELEASE LEVER AGAIN FOLDING YOUR SCOOTER Step 1 Make sure the scooter is...

Page 12: ...d The folding mechanism should unlock Pushing T bar forward is very important as it unlocks the folding pedal Without pushing T bar forward while stepping on the folding pedal could damage the folding...

Page 13: ...fore the controller releases energy to the motor Also the scooter is rear wheel drive Be sure to have your body weight towards the front of the scooter when engaging the motor to avoid a wheelie Use p...

Page 14: ...ooter comes with both front and rear braking The left hand side is the rear braking and the right hand side is the front braking Always apply the left hand rear braking before applying front braking t...

Page 15: ...torized scooters vehicles bicycles etc you must familiarize yourself with the function handling braking distance performance and safety of this scooter in a safe and controlled environment 3 Always ch...

Page 16: ...distance of the scooter at various speeds before operating near intersections pedestrians and other obstacles WARNING Always ride at speeds you can comfortably and safely control Take the time to fami...

Page 17: ...ery is 95 full it will turn green It will continue to charge with very small current for about 30 minutes after the LED turns green When battery is 100 full the charger will stop charging and the char...

Page 18: ...t rubber protective cover USAGE 1 You will not damage the battery by riding the scooter until the battery is fully discharged and the scooter motor shuts down However we do ask to promptly recharge th...

Page 19: ...The wheelies allow the scooter to roll by your side and also to stand vertically with the wheelies and the T bar as the base SCOOTER COVER OPTIONAL ACCESSORY 1 Cover Installation and Removal Fold you...

Page 20: ...Steps 2 Helmet Pocket and Handlebar Carrying Access The scooter cover has a side pocket allowing rider to store helmet as shown above The scooter cover also has two slits in the side so you can easily...

Page 21: ...and bounce it off the ground Do a quick visual and tactile inspection of the whole scooter Make sure you inspect all visible nuts bolts and structural welds If anything sounds feels or looks loose or...

Page 22: ...e of a lithium ion battery in a fire The battery may explode Do not dispose of a lithium ion battery with your household trash The incineration landfilling or combining a lithium ion battery with your...

Page 23: ...om behind the lower headlight where the wiring comes out of the lower handlebar slowly unwind the curly wrapping material to expose the wires After unwrapping this section of the material you should s...

Page 24: ...th sides and plug them firmly together until tight B Upper handlebar connectors There are five connectors behind the upper headlight If any of them are loose you can see the inside color between two e...

Page 25: ...r and carpet fibers free from axles 3 STORAGE Battery performance is susceptible to temperature Do not store your scooter in direct sunlight or in a high temperature environment like inside of your ca...

Page 26: ...DIRECTLY OR INDIRECTLY IN CONNECTION WITH USE OR INABILITY TO USE THIS PRODUCT IN NO EVENT SHALL PROBITY CELL S LIABILITY FOR BREACH OF WARRANTY BREACH OF CONTRACT NEGLIGENCE OR STRICT LIABILITY EXCEE...

Reviews: