background image

12

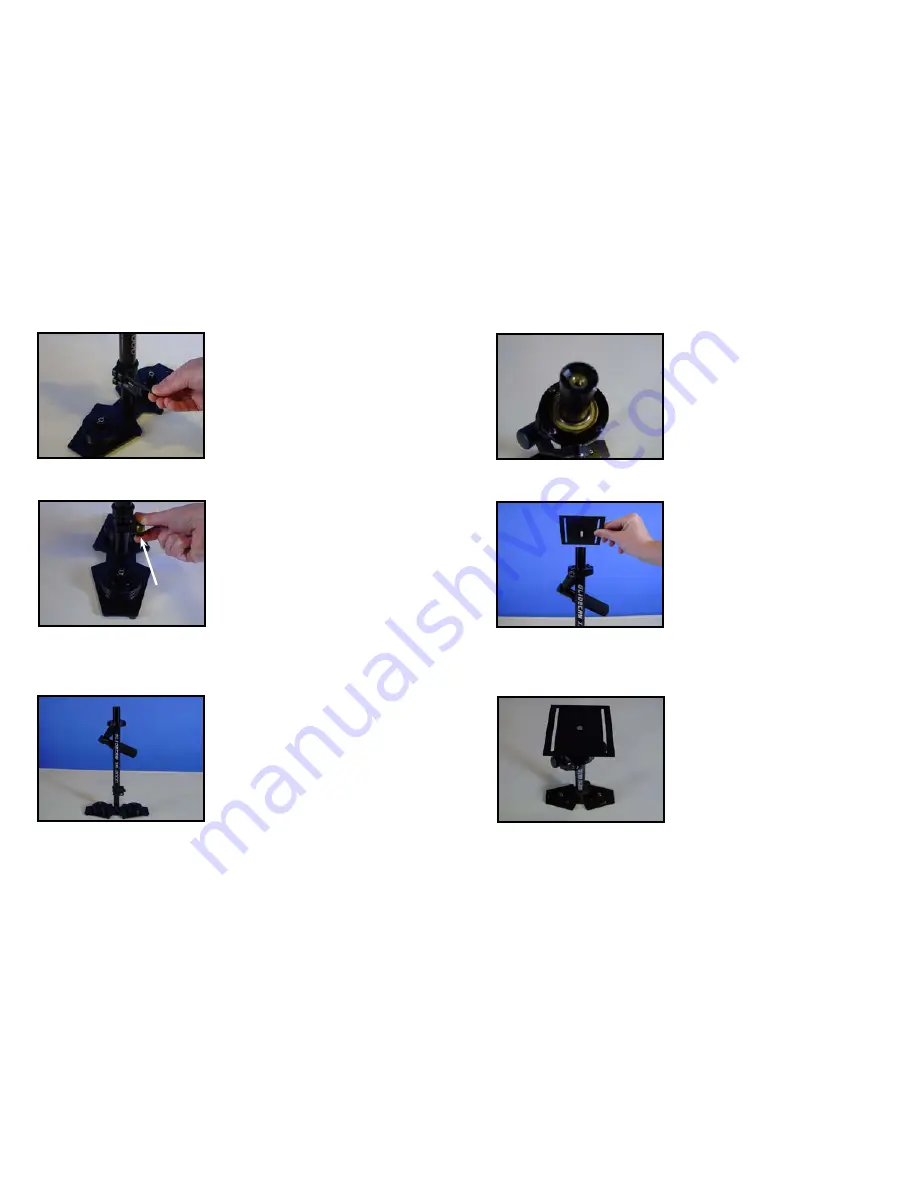
Figure 24

The TELESCOPING CLAMP may have to be re 

aligned on the CENTRAL POST as the factory settings 

may not be lined up. To realign the TELESCOPING

CLAMP use a hex key to loosen the clamp, realign 

and then tighten.

Figure 25

Securely  tighten  the  “Adjustment  Knob”  on  the 

TELESCOPING CLAMP by rotating the Knob 

clockwise as shown in Figure 25.

The “Adjustment Knob” should only be

hand tightened.

WARNING: DO NOT OVERTIGHTEN

THIS KNOB.

Telescoping Clamp’s

“Adjustment Knob”

Shown aligned

correctly.

Figure 26

At this point this is what your XR-SERIES should look 

like Figure 26.  Which is with the CENTRAL POST 

with TELESCOPING POST, BASE PLATFORM, and 

COUNTER WEIGHT DISCS.

13

Figure 27

This is a photo of the insert in the top of the CENTRAL 

POST.

Figure 28

Rotate and screw the BOTTOM PLATE into the insert 

in the top of the CENTRAL POST.

Figure 29

Tighten the BOTTOM PLATE to the top of CENTRAL 

POST to ensure a tight fit.

Summary of Contents for XR-1000

Page 1: ...Glidecam Industries Inc 23 Joseph Street Kingston MA 02364 Customer Service Line 1 781 585 7900 Manufactured in the U S A COPYRIGHT 2015 GLIDECAM INDUSTRIES Inc ALL RIGHTS RESERVED MANUAL GLIDECAM XR SERIES XR 1000 XR 2000 XR 4000 ...

Page 2: ...ts simplicity doesn t lend ease in answering that often asked question how does it work To answer this question completely would require delving into Newtonian Physics We would have to explain center of gravity displacement inertia friction and angular motion reduction etc However a quick answer reveals the Glidecam XRSERIES works by isolating your hand and arm s motions from your camera while you...

Page 3: ...hen shipped Figure 2 This is the Glidecam XR SERIES CENTRAL POST with attached gimbal assembly Warning Do not tighten the factory settings on the gimbal handle and yoke The yoke and handle should remain loose just as it is shipped to you Figure 3 These are the pieces that makeup the head assembly of the XR SERIES 1 HEAD PLATE shown left 2 MID PLATE shown center 3 BOTTOM PLATE shown right Figure 4 ...

Page 4: ...GHT DISKS 4 SMALL COUNTER WEIGHT DISKS shown in bag NOTE The Glidecam XR 1000 has 8 LARGE COUNTER WEIGHT DISKS Figure 10 This is the HARDWARE set shown in bag NOTE The Glidecam XR 1000 and XR 4000 has slightly different HARDWARE The XR 4000 has 2 3 8 CAMERA MOUNTING SCREWS WASHERS 2 Rubber Washers Bolts for Counter Weight Disks Black Thumb Nuts 1 3 4 1 1 2 4 1 2 Washers 2 Camera Mounting Screws 12...

Page 5: ...gure 15 which is with the TELESCOPING POST attached to the BASE PLATFORM Figure 16 Now find a pair of bolts example x 20 x 1 5 and attach RUBBER WASHERS as shown in the photo to the left Other length bolts for more COUNTER WEIGHT DISKS are available and can be used NOTE Different length bolts are provided so you can use the longer bolts for a taller stack of COUNTER WEIGHTS DISKS Figure 17 Now ins...

Page 6: ...EIGHT DISKS with the BLACK THUMB NUTS as shown in this photo and repeat this procedure for the COUNTER WEIGHT DISKS on the other side of the BASE PLATFORM Figure 22 Both COUNTER WEIGHT DISK stacks should now be secured in place with the SMALL COUNTER WEIGHT DISKS and BLACK THUMB NUTS as shown in this photo Figure 23 Now insert the TELESCOPING POST and attached BASE PLATFORM up and into the XR SERI...

Page 7: ...Knob should only be hand tightened WARNING DO NOT OVERTIGHTEN THIS KNOB Telescoping Clamp s Adjustment Knob Shown aligned correctly Figure 26 At this point this is what your XR SERIES should look like Figure 26 Which is with the CENTRAL POST with TELESCOPING POST BASE PLATFORM and COUNTER WEIGHT DISCS 13 Figure 27 This is a photo of the insert in the top of the CENTRAL POST Figure 28 Rotate and sc...

Page 8: ...a to the MID PLATE 4 ATTACHING YOUR CAMERA TO THE GLIDECAM XR SERIES Figure 33 PLEASE NOTE These photographs show the Glidecam 2000 PRO for illustrative purposes Now it s time to attach your camera to the Glidecam XR SERIES Roll camera on pen to find the center of gravity if needed Figure 34 First find the threaded insert on the bottom of your camera THREADED INSERT Figure 35 Remove the HEAD PLATE...

Page 9: ...e CAMERA MOUNTING SCREW you ve just selected 17 Figure 39 The HEAD PLATE should be secured and square with the camera NOTE If you have a Video Camcorder or Film Camera that is larger than the one used in this Manual then you might wish to first find the true front to back center of gravity of your Camera by rolling the base of your Camera on a pen then mark this point on your Camera s side with sm...

Page 10: ...4 The best way of adjusting the horizontal balance is to move the center of gravity of the camera This can be accomplished by either repositioning the camera on the HEAD PLATE or by adjusting the position of the HEAD PLATE either front to back or side to side with the camera on it When checking the horizontal balance you want to make sure that you re picking up the XR SERIES from a flat and level ...

Page 11: ...ve as the XR SERIES progresses towards correct vertical balance see next section Figure 46 Figure 47 NOTE LATER AFTER YOU ADJUST THE VERTICAL BALANCE OF THE XR SERIES YOU WILL HAVE TO GO BACK AND READJUST THE HORIZONTAL BALANCE AGAIN IN ORDER TO OBTAIN A FINE BALANCE OF THE WHOLE SYSTEM BALANCING THE VERTICAL AXIS Now that your XR SERIES is horizontally balanced it s vertical axis can now be teste...

Page 12: ...u have counted the time it takes for it to go from horizontal until it passes vertical once then simply stop the XR SERIES from swinging then either put the XR SERIES down or make adjustments and do the test again 22 23 6 HANDLING YOUR GLIDECAM XR SERIES Figure 50 When handling your Glidecam XR SERIES you will be using one hand to hold onto the handle and the other hand to gently guide the camera ...

Page 13: ...your camcorder We recommend using it or a monitor similar to it so you will achieve optimum results with your Glidecam XR SERIES Figure 53 Figure 54 24 25 Figure 55 You can also attach one of these L C D monitors directly to the BASE PLATFORM of the Glidecam XR SERIES Located at the front edge of the BASE PLATFORM is a 1 4 hole If your camera has a flip out LCD monitor see Figure 42 then you will ...

Page 14: ...l be used for framing purposes Now on the floor leading up to the cross mark on the wall tape a straight line about 20 ft long The idea behind this exercise is to walk the line that you have taped on the floor while keeping the cross mark centered in the viewing monitor of the camera that is attached to the XR SERIES see Figure 59 In other words this exercise helps you practice your framing with t...

Page 15: ...attachment try making and adding a paper cloth or rubber gasket to the HEAD PLATE Try using a piece of a rubber dishwashing glove Simply cut the material to the size of the top of the HEAD PLATE and then create a hole in it to allow the CAMERA MOUNTING BOLT to fit through it and into the base of your Camcorder 12 MAINTENANCE Bearing Maintenance The main bearing on your Glidecam XR SERIES is attach...

Page 16: ...1 800 600 2011 Fax 1 781 585 7903 Website www Glidecam com GLIDECAM INDUSTRIES INC For more information about GLIDECAM products and training please visit GLIDECAM on the web www Glidecam com or Follow us on Facebook com Glidecam Twitter com Glidecam Instagram com glidecam_ industries_inc ...

Reviews: