background image

SECTION 9. SPARE PARTS

TYRES
12

1/2”

x 2

1/4”

Rear Transit Type

22”

Rear Pneumatic

7”

MCP Front Castor Wheel

TUBES
12

1/2”

x 2

1/4”

Thorn Proof

22”

Thorn Proof

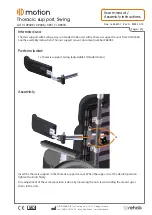
CASTOR PINTLE AXLE ASSEMBLY
1. Dust Cap
2. Circlip
3. Top Nylon Bush
4. Pintle Axle
5. Bottom Bearing Housing
6. Bearing
7. Top & Bottom Castor Fork Retaining Nuts
8. Castor Fork
9. Castor Wheel
10. Bearing Spacer
11. Castor Wheel Bearings
12. Spacer Washers
13. Axle Bolt
14. Nyloc Axle Retaining Nut

Fig 5

For service advice contact your Glide Rehabilitation Products

Agent or Glide Rehabilitation Products direct.

15

Summary of Contents for COMFORT-PLUS DELUXE

Page 1: ...ORT PLUS DELUXE OWNERS MANUAL For your safety and comfort read carefully and understand all of the features prior to using your new Glide Rehabilitation Products chair Maximum Recommended User Weight 100kg ...

Page 2: ...ATURES SECTION 3 OPERATING YOUR WHEELCHAIR SECTION 4 TRANSPORTING YOUR CHAIR SECTION 5 ROUTINE MAINTENANCE SECTION 6 ENVIRONMENT PRECAUTIONS SECTION 7 TRANSFERRING TO AND FROM YOUR WHEELCHAIR SECTION 8 AVAILABLE OPTIONS SECTION 9 SPARE PARTS SECTION 10 WARRANTY 2 ...

Page 3: ...e free mobility Please take the time to familiarise yourself with the functions and features of your chair by reading this owners manual If you have any queries about the functions of the chair you can call Glide Rehabilitation Products or your nearest Glide Rehabilitation Products dealer GLIDE REHABILITATION PRODUCTS 25 LEDGAR RD BALCATTA PERTH WA AUSTRALIA 6021 PH 61 8 9345 3400 FAX 61 8 9345 13...

Page 4: ...1 12 Rear Wheels 2 7 MCP front castor wheels 3 Inner Sprung Deluxe Seat Back Upholstery for Superior Comfort 4 Foot Operated Attendant Brakes 5 Swing Away Legrests 6 Adjustable Arm Pads 7 Push Handle 8 Adjustable Angle Back Rest 9 Fully Adjustable Seat Width and Seat Depth Frame 10 Foot Operated Gas Seat Tilt Adjustment Fig 1 4 ...

Page 5: ...hair When lever is released the footplate will simply swing out and lift off the two locating pins When refitting footrest to chair ensure that it is located on both locating pins Damage may result if only one pin is used HEIGHT ADJUSTMENT OF FOOTPLATE Your footplate will be fitted with one of two types of adjustment styles 1 Clamp Type to adjust height simply loosen clamp bolt move to desired pos...

Page 6: ...oot under foot pedal and lift lever upwards Ensure brake is fully retracted ADJUSTABLE SEAT WIDTH AND DEPTH The Comfort Plus Deluxe wheelchair has an incrementally adjustable seat frame This feature will allow for changes in growth and condition It is recommended that a Glide Rehabilitation Products representative make these adjustments Note When changes are made to either seat width or depth new ...

Page 7: ... attachment screw and move wing to the desired position and replace screw Note you may need to loosen bottom attachment screw in order to move wing Removable legrest padding The Hi Care has two styles of legrest padding single piece and split In either case they are both held in place by the use of Velcro straps that secure the padding around the legrest and footplate as well as Velcro attachment ...

Page 8: ...on the seat Caution Make sure that Pins A B C are located correctly in their respective holes prior to occupant use TRANSPORTING IN A SPECIAL WHEELCHAIR TAXI BUS OR PRIVATE VEHICLE WHILE THE USER IS IN CHAIR To date there is no recognized Australian Standard that covers wheelchairs suitable for vehicle transport while the user is in the chair However the Comfort Plus is suitable for transport prov...

Page 9: ...Unoccupied wheelchairs in vehicles must be safely secured or stored securely outside the passenger compartment Posture Positioning Belts should not be used as vehicle restraint belts NOTE Ensure that your restraint system complies with AS2942 and you fully understand the manufacturer instructions on how your tie down system works and whether it is compatible with the Glide Rehabilitation Products ...

Page 10: ...y of Gas Operated Tilt Recline mechanisms and operation of Pins A B C 3 Check for correct adjustment contact of brakes on tyres When tyres are correctly inflated the brake contact lever should depress tyre by 1cm If they require adjustment simply loosen bolts F in Fig 3 make adjustment retighten bolts firmly For any questions concerning procedures or service contact your nearest Glide Rehabilitati...

Page 11: ...Stains Prompt attention yields more complete removal wipe stain from outside in to avoid spreading With more difficult stains use a proprietary brand vinyl cleaner which is available in large supermarkets and hardware stores Warning Never use furniture polishes abrasive cleaners steel wool or non proprietary cleaners containing solvents as these items can cause damage to the vinyl surface Non colo...

Page 12: ...a guide only the following is a brief list of scenarios that could have an impact on occupant safety When attendant is pushing chair ensure that chair is slightly tilted this will help keep occupant positioned in seat When leaving occupant unattended ensure that Foot Operated Attendant Brakes are applied When parking chair on an incline ensure that Foot Operated Attendant Brakes are applied If the...

Page 13: ... a patient hoist sling 2 If occupant is ambulant or able to do standing transfers removing swing away footplates will allow better placement of feet when standing or conversely closer access to seat when transferring into chair 3 Where possible have someone assist you during the transfer 4 You will need to learn safe transfer techniques from your health professional 5 Always have chair as close as...

Page 14: ...mp Supports refer to Glide Agent not shown 5 Flip Up and Fold Away Tray refer to Glide Agentt not shown 6 Adjustable Arm Support refer to Glide Agent not shown 7 Calf Sling 8 Gas Operated Reclining Backrest 9 Glide Adjustable Angle and Positional Head Rest 10 Foam and Ply Backrest and Seat upholstery Fig 4 14 ...

Page 15: ...BLY 1 Dust Cap 2 Circlip 3 Top Nylon Bush 4 Pintle Axle 5 Bottom Bearing Housing 6 Bearing 7 Top Bottom Castor Fork Retaining Nuts 8 Castor Fork 9 Castor Wheel 10 Bearing Spacer 11 Castor Wheel Bearings 12 Spacer Washers 13 Axle Bolt 14 Nyloc Axle Retaining Nut Fig 5 For service advice contact your Glide Rehabilitation Products Agent or Glide Rehabilitation Products direct 15 ...

Page 16: ...ear warranty Frame will be replaced within the first twelve month period Thereafter Glide will extend the warrant for further two years and will either replace or repair frame Upholstery 6 month warranty This will cover against defects in materials or workmanship Warranty does not cover against normal wear or damage Tyres and Tubes No Warranty Spare Parts All spare parts sold will have a 6 months ...

Page 17: ...s that but for this provision would be conferred upon the purchaser or other persons against Lendal Pty Ltd arising under or as a result of the Trade Practices Act 1974 any other legislation or the general law are excluded and limited to the maximum extent possible and in cases where Lendal Pty Ltd s liability cannot be completely excluded but may be limited the liability of Lendal Pty Ltd is limi...

Page 18: ...NOTES 18 ...

Page 19: ...NOTES 19 ...

Page 20: ...S Glide Rehabilitation Products are manufactured in Australia by Lendal Pty Ltd ACN 009 003 694 25 Ledgar Rd Balcatta Western Australia 6021 Phone 61 8 93453400 Fax 61 8 93451384 Email info glide com au Web www glide com au ...

Reviews: