The Chelsea Collection
Frameless and Framed Illuminated Mirrors
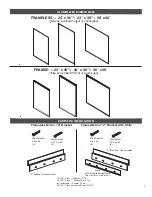
The following instruction sheets include the ALL FRAMLESS & FRAMED 24”, 30” AND 36” MODELS
Unpack all parts carefully and protect
components during installation.
Carefully review all parts and read the
installation instruction before you start.
To insure proper installation in complete compliance with your warranty, we recommend installation by a professional installer.
IMPORTANT SAFETY INSTRUCTIONS
When using the Illuminated Mirrors, basic precautions should
always be followed, including the following:
Read all instructions before using.
BEFORE CLEANING
ALWAYS SWITCH OFF THIS
APPLIANCE.
DANGER
-
To reduce the risk of electric shock:
1. TURN POWER OFF at service panel before working on
wiring or to unmount and disconnect the unit.
2. DO NOT SPRAY LIQUID CLEANERS on the Mirrors.
For cleaning the mirror, we recommend using “ammonia
free” Sprayway brand glass cleaner, which is available at a
variety of retail outlets. To clean, apply Sprayway brand
glass cleaner to a clean cloth. www.spraywayinc.com/
content/glass-cleaner
WARNING:
Any servicing is to be performed by an authorized
service representative.
The unit has no user serviceable parts.
3. Supervision is required when the appliance is used by
children or disabled persons.
4. Use this appliance only for its intended use as described
in these instruction. Do not use or modify in any way not
recommended by the manufacturer.
5. Never operate this appliance if it has a damaged cord; if it
is not working properly; it if has been dropped or damaged;
A. Safety Glasses --
should be worn
at all times
B. Tape Measure
C. Level
D. #2 Phillips Head
Screw Driver
E. Power Screw Drive
r
Tools Required for Installation
GlassCrafters recommends the following tools to
properly and safely install your Illuminated Mirror.
2
USE WITH DIMMER SWITCH.
Glasscrafters’ products work best with these
recommended dimmer switches:
•Maestro® C•L® Dimmer from LUTRON®, MODEL # MACL -153M
http://www.lutron.com/TechnicalDocumentLibrary/369613a.pdf
•DIVA® C•L ® Dimmer fromLUTRON®, MODEL # DVCL -153P
http://www.lutron.com/TechnicalDocumentLibrary/369682.pdf
It is recommended that the dimmer be within reach of your mirror so you can
adjust the brightness.
For on/off (no dimmer) operation, a standard wall switch may be substituted
in place of the the dimmer.
or submerged in water. Return the appliance to a service center
for inspection and repair.
6. Where Applicable: Keep the cord away from heated surfaces.
7. Where Applicable: Never operate the appliance with the air
openings blocked. Keep the air opening free of lint, hair and dust.
Never insert any tool or object into any opening in the appliance.
8. Do not use outdoors.
9. Where Applicable: Do not operate where aerosol (spray)
products are being used or where oxygen is being administered.
WARNING:
All GLASSCRAFTERS Illuminated Mirrors must be wired to a
Class A 120V AC 15-20 Amp GFCI circuit (Ground Fault
Circuit Interrupter) when used in bathrooms and all other
locations required by the National Electr ic Code.
SAVE THESE INSTRUCTIONS
7/14 /2020


