3.
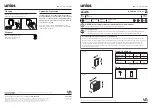
Seat Base
M10 x 70mm hex head screw
M10 x 25mm washer
Anchor sleeve
Tamper - resistant cap
Paving
slab
Paving
slab
1. Place seat in desired position onto the paved area.
Glasdon recommend bridging two paving slabs,
ensuring 110mm minimum distance is maintained from
any edge to the centre of intended fixing points. Mark
fixing positions through both seat ends with drill tip.
2. Remove the seat and drill marked holes through
paving slabs at all four points.
3. Ensure holes are free from any obstructions and
debris caused by drilling.
4. Ensure the washers are in position at the top of the
bolts supplied.
5. Reposition seat so that base holes are aligned with
drilled holes and insert all four fixings. Tap down fixings
using a hammer.
6. Tighten up the nuts with 17mm socket until tight
(maximum recommended torque setting is 40Nm).
7. Place one armouring over each fixing head. Use
cardboard over amouring and tap on with a hammer.
Ensure that a washer is used beneath each nut as
otherwise removal at a later date will be impossible. To
remove, prise armouring off with a screw driver.
IMPORTANT NOTE: ENSURE THAT ALL RELEVANT PERSONNEL READ THESE INSTRUCTIONS PRIOR TO USE
INSTRUCTIONS FOR PAVING FIXING KIT
(INTO PRE-LAID CONCRETE PAVING SLABS)
DISTANCE FROM THE EDGE OF PAVING SLAB TO CENTRE OF GROUND BOLT TO BE
NO LESS THAN 100MM.