background image

Installation Instruction

- 6 -

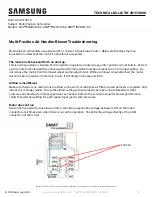
11. How to Connect Enclosure Door and Lock Hook

Open Enclosure Door and attach Plate Hook Lock loosely as 

, push Handle totally to OFF. Doing this, close Door and adjust Locking status. If height "H" is insufficient 

for proper locking of the door, adjust the elevation of the Plate Hook Lock from the door with washers and re-check operation.

12. Flange Handle’s Principal Movements

- ON, OFF(RESET) movements must operate smoothly when Door is locked.
- Flange Handle movement has to be verified during ON, OFF operation by totally pushing the handle as 

- Enclosure Door only opens when Flange Handle is in “OFF” status.
-  Door Open is impossible when Handle is on “ON”. In case of being necessary its opening, you have to unblock Lock equipment with a screwdriver (—) and twisting 

clockwise the Pin Release that is located next to Handle as 

- Do not move Flange Handle to ON if electricity flows at the moment of turning it on. Electric shock might occur.

Summary of Contents for GCB1200

Page 1: ...e a properly voltage sensing device to confirm power is off 5 Replace all devices doors and covers before turning on power to this equipment Failure to follow these instructions will result in death o...

Page 2: ...tension 60 84 128 inch 1524 0 2133 6 3251 2 mm Enclosure Depth D has to be at least 10 5 inch 266 7 mm Maximum Measure of E to Install COM Unit inch mm Installation Enclosure Depth Spot Measure 10 5 1...

Page 3: ...ndle to Enclosure Place Rubber Ring in the slot of Handle Ass y Adhere it to Enclosure s upper part Place Plate Flange Ass y in the slot and attach M6X18 loosely as Tighten M6X18 loosely in the lower...

Page 4: ...on ON status and tighten it to COM using 10 24UNC 4ea Screw There are 2 Handle Holders in the plastic bag that must be connected to COM as The upper part must match with Bail Arm and the lower part m...

Page 5: ...F Handle to check the operation 4 Fine adjustment can be made with the position of M14 Nut and Holder Handle After the adjustment connect with designated torque 10 How to assemble Return Spring Check...

Page 6: ...dle s Principal Movements ON OFF RESET movements must operate smoothly when Door is locked Flange Handle movement has to be verified during ON OFF operation by totally pushing the handle as Enclosure...

Page 7: ...etector de tensi n nominal adecuado para confirmar la desenergizaci n del equipo 5 Vuelva a colocar todos los dispositivos las puertas y las cubiertas antes de energizar este equipo El incumplimiento...

Page 8: ...nsion Cable Extension 60 84 128 pulg 1524 0 2133 6 3251 2 mm Enclosure Depth D debe ser m nimo 10 5 pulg 266 7 mm Medida m xima de E para instalar COM Unidad pulg mm Medida del lugar Enclosure Depth d...

Page 9: ...dle a Enclosure Ponga Rubber Ring en la muesca de Handle Ass y Adhi ralo en la parte superior de Enclosure Ponga Plate Flange Ass y en la muesca y fije M6X18 flojamente como Apriete M6x18 como en la p...

Page 10: ...y adhi ralo a COM usando 10 24UNC 4ea Screw Hay 2 Handle Holder en la bolsa pl stica que debe ser conectado a COM como La parte superior debe coincidir con Bail Arm y la parte inferior debe sobresalt...

Page 11: ...evisar la operaci n 4 Se puede hacer ajustes finos con la posici n de M14 Nut y Holder Handle Despu s del ajuste conecte con par de torsi n designado 10 Manera de montar Return Spring Revise que todas...

Page 12: ...l en operaci n ON OFF como El Door de Enclosure solamente se abre cuando Flange Handle se encuentra en estado OFF Es imposible abrir la puerta cuando Handle se encuentra en ON En caso de que sea neces...

Reviews: