Glacier bay 1005024391 Installation And Care Manual Download Page 2


2

Table of Contents

Important Information


..............................2

Warranty ...................................................2
Pre-Installation .........................................2

Planning Installation ..............................2
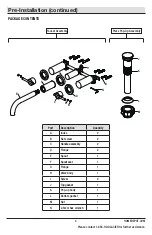
P

ackage Contents

 ..................................3

Installation ................................................4

Care and Cleaning ....................................8
Troubleshooting  

........................................8

Service Parts ...........................................9

Important Information

□ 

Observe all local plumbing and building codes.

□ 

Cover the sink drain to avoid losing any parts.

□ 

Review the care and cleaning section included in this guide.

Pre-Installation

PLANNING INSTALLATION

Before beginning the installation of this product, ensure all parts are present. Compare parts with the Package 
Contents list. If any part is missing or damaged, do not attempt to install the product. Contact Customer Service 
for replacement parts.

TOOLS AND HARDWARE REQUIRED

Adjustable 
wrench

Safety 
goggles

SILICONE

Silicone 
sealant

Tools and Hardware Required


...............2

Operation...................................................8

Warranty

LIMITED LIFETIME WARRANTY

Glacier Bay products are manufactured with superior quality standards and workmanship and are backed by our 
limited lifetime warranty. Glacier Bay products are warranted to the original consumer purchaser to be free of 
defects in materials or workmanship. We will replace FREE OF CHARGE any product or parts that proves defective. 
Simply, return the product / part to any of The Home Depot retail locations or call 1-855-HD-GLACIER (1-855-434-
5224) to receive the replacement item. Proof of purchase (original sales receipt) from the original consumer 
purchaser must be made available for all Glacier Bay warranty claims.

This warranty excludes incidental/inconsequential damages and failures due to misuse, abuse or normal wear and 
tear. This warranty excludes all industrial, commercial and business usage, whose purchasers are hereby extended 
a five year limited warranty from the date of purchase, with all other terms of this warranty applying except the 
duration of warranty.

Some states and provinces do not allow the exclusion or limitation of incidental or consequential damages, so the 
above limitations may not apply to you. This warranty gives you specific legal rights and you may also have other 
rights that vary from state to state and province to province. Please see a store or contact 1-855-HD-GLACIER for 
more details.
Contact the Customer Service Team at 1-855-434-5224 or visit www.HomeDepot.com.

Channel 
lock pliers

Thread 
sealant tape 

Phillips 
screwdriver 

Summary of Contents for 1005024391

Page 1: ...CET We appreciate the trust and confidence you have placed in Glacier Bay through the purchase of this lavatory faucet We strive to continually create quality products designed to enhance your home Vi...

Page 2: ...cts in materials or workmanship We will replace FREE OF CHARGE any product or parts that proves defective Simply return the product part to any of The Home Depot retail locations or call 1 855 HD GLAC...

Page 3: ...her assistance Faucet Assembly Press Pop Up Assembly Part Description Quantity A 2 Index B 2 Set screw C 2 Handle assembly D 2 Flange E 1 Spout F 1 Spout seat G 1 Flange H 1 Valve body I 4 Screw J 1 T...

Page 4: ...he water supply Remove the old faucet Clean the mounting surface Before installation drill three holes on the wall The valve access hole should be 1 1 2 in to 1 3 4 in diameter The recommended valve d...

Page 5: ...in a counterclockwise direction as shown Thread the supply line 1 to valve body H and tighten with a wrench 4 Removing the protective caps Remove the protective caps 1 2 from the valve body H 5 Placin...

Page 6: ...ew 1 with the Hex wrench Hex 2 5mm N to secure the spout to the valve body Slide the spout seat F and flange G over the spout until it is flush with the wall 7 Installing the handle assembly Slide the...

Page 7: ...p body Insert the pop up body K into the sink Ensure that the top gasket J rests securely between the top of the sink and the top of the pop up body K 10 Securing the pop up body From underneath the s...

Page 8: ...al for a detailed drawing showing the location of the parts listed below There is leaking from the sink drain at the base of the sink The sink has a rough or irregular surface Apply additional silicon...

Page 9: ...mber 1 RP30187 2 Handle assembly RP13707 5 Flange RP80421 Aerator 16 O ring RP60085 18 Press pop up assembly RP40269 Part Description Part Number 17 O ring RP60021 11 O ring RP60104 12 Screw Anchor RP...

Page 10: ...ms missing parts Before returning to the store call Glacier Bay Customer Service 8 a m 7 p m EST Monday Friday 9 a m 6 p m EST Saturday 1 855 HD GLACIER 1 855 434 5224 HOMEDEPOT COM Retain this manual...

Page 11: ...MONTAJE EN PARED DE DOS LLAVES Agradecemos la confianza que has depositado en Glacier Bay al comprar este grifo de instalaci n en pared Nos esforzamos por crear continuamente productos de calidad dis...

Page 12: ...en materiales o mano de obra Reemplazaremos LIBRE DE CARGOS cualquier producto o pieza que se demuestre est defectuosa S mplemente devuelva el producto a cualquiera de las ubicaciones de venta al deta...

Page 13: ...HD GLACIER Press Pop Up Assembly Pieza Descripci n Cantidad A 2 ndice B 2 Tornillo de fijaci n C 2 Ensamblaje de la llave D 2 Brida E 1 Ca o F 1 Base del ca o G 1 Brida H 1 Cuerpo de la v lvula I 4 To...

Page 14: ...el suministro de agua est completamente cerrado 2 C mo asegurar el cuerpo de la v lvula Asegura el cuerpo de la v lvula H con tornillos I Usa un desarmador Phillips para apretarlos I Antes de instalar...

Page 15: ...uber a de agua 1 al cuerpo de la v lvula H y ajusta con una llave 4 C mo quitar las tapas protectoras Quita las tapas protectoras 1 y 2 del cuerpo de la v lvula H 3 C mo realizar las conexiones de sum...

Page 16: ...H hasta el frente de la pared Coloca la ensamblaje de la llave C en el cuerpo de la v lvula H Coloca el tornillo de fijaci n B dentro de la llave C y apri talo con la llave hexagonal Hex 2 5 mm N Inse...

Page 17: ...vamanos Aseg rate de que la junta superior J descansa de manera segura entre la parte superior del lavamanos y la parte superior del cuerpo emergente K 10 C mo asegurar el cuerpo emergente Desde la pa...

Page 18: ...limpiadores abrasivos esponjas de alambre o productos qu micos fuertes para limpiar esta mezcladora pues ello anular la garant a Soluci n de problemas Problema Posible causa Soluci n Hay filtraci n p...

Page 19: ...llave RP13707 5 Brida RP80421 Aireador 16 Aro t rico RP60085 18 Presiona el ensamblaje emergente RP40269 17 Aro t rico RP60021 11 Aro t rico RP60104 12 Tornillo y Anclaje RP50175 13 Tornillo de fijaci...

Page 20: ...de regresar a la tienda llama al servicio al cliente de Glacier Bay de lunes a viernes entre 8 a m y 7 p m y los s bados entre 9 a m y 6 p m hora est ndar del Este 1 855 HD GLACIER 1 855 434 5224 HOME...

Reviews: