background image

Gira smart home app 

26

Settings in the system menu

2.1.4

Connecting to Gira X1 via OpenVPN

Requirements: You need a PC located in the same network as your Gira X1.

1 Open an internet browser on the PC (e.g. Google Chrome or Mozilla Firefox) 

and enter the IP address of the Gira X1 in the address bar.

The diagnostic page of the Gira X1 opens.

2 Scroll to the bottom of the diagnostic page: Click on the [Download user cli

-

ent config] button. The downloaded file (user.ovpn) contains all information 
required for VPN operation.

3 E-mail the downloaded file (user.ovpn) to the user's mobile phone.

On the user's mobile phone

Requirements: The "OpenVPN Connect" app from OpenVPN Technologies and 
the Gira X1 app must be installed on the mobile phone.

1 Open the e-mail that you have just sent and tap the attached file.
2 In the selection that opens, select [Copy to OpenVPN].

The "OpenVPN Connect" app opens.

3 Tap the plus sign in the app.

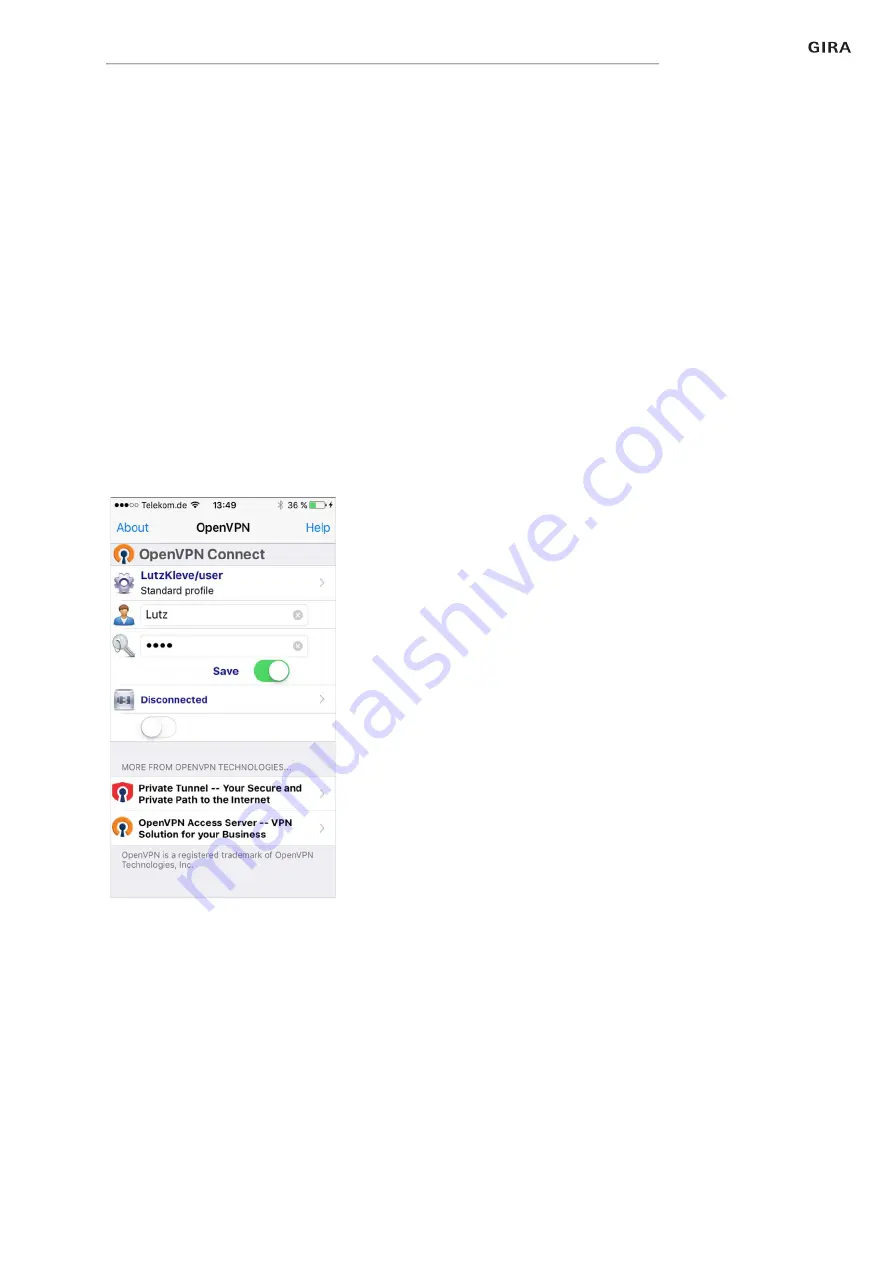
4 Enter the user ID and password. The access details for the user created in the 

GPA are entered here.

5 Save the settings by sliding the switch to [Save].
6 Open the Gira X1 app and switch to the system menu [System] - [Connection 

to Gira X1].

7 Enter the local IP address for the Gira X1.
8 Once the connection to the Gira X1 has been established, enter the user name 

and password from the GPA user management into the corresponding fields.

9 Tap [OK].

Fig. 26

OpenVPNConnect

Summary of Contents for 2096 00

Page 1: ...Gira X1 2096 00 Operating instructions for the Gira Smart Home App...

Page 2: ...e p 25 2 1 3 Configuring remote access p 25 2 1 4 Connecting to Gira X1 via OpenVPN p 26 2 1 5 Changing password p 27 2 2 PIN protection p 28 2 3 View configuration p 29 2 3 1 Selecting Home p 30 2 3...

Page 3: ...3 Appendix p 46 4 Warranty p 47...

Page 4: ...ordingly this document makes reference only to the basic functions The user interface is divided into four areas 1 Status bar see 1 2 2 Navigation bar see 1 3 3 Action area see 1 4 4 Orientation guide...

Page 5: ...llowing functions 1 Back opens the previously opened page 2 Home opens the home page of the action area 3 System opens the Settings view 4 Change view switches between tile and detail view 1 4 Action...

Page 6: ...perature Shading etc Functions marked as favourites will be displayed directly in tile view In tile view you can display up to six small tiles per page Operation in tile view Central functions such as...

Page 7: ...such as the blind control distin guishing between a short and long press of the button The following sections deal with some special features of operation Horizontal swiping You can switch from one f...

Page 8: ...in the detail view To move blinds or shutters up or down or adjust the slats slide the controller to the desired position Stop button When you tap the STOP button you can directly stop active movement...

Page 9: ...times Blind Step Move with 10 switching times Blind positioning with 10 switching times Shutter positioning with 10 switching times Scene auxiliary unit with 10 switching times Room temperature contro...

Page 10: ...Gira smart home app 9 User interface Time Configure a time when the action should be performed Fig 8 Set time...

Page 11: ...mit under Set earliest latest Earliest activates the switching time at sunrise but not before the time that you entered Latest activates the switching time at sunrise or before the time that you enter...

Page 12: ...mit under Set earliest latest Earliest activates the switching time at sunset but not before the time that you entered Latest activates the switching time at sunset or before the time that you en tere...

Page 13: ...can be selected here depends on the function to be set up 7 Tap the OK button The timer is set 1 4 2 3 Deleting a switching time 1 Open the Timer overview page 2 Tap the Edit button 3 Mark the switch...

Page 14: ...Tap the OK button The function from which you switched to the Timer overview page opens All switching times for this function are activated or deactivated Tip Temporarily deactivating switching times...

Page 15: ...a standby value enabling heating or cooling energy to be saved Night Activate night mode during night hours or during a long absence This adjusts the room temperature to cooler temperatures in heatin...

Page 16: ...Information opens the list of active messages 2 Important shows that messages are active 3 Status shows that the security area is not ready for activation 1 Internal activation not possible 2 External...

Page 17: ...tton 3 Enter your user PIN in the window which opens up The exit delay time starts and is displayed in the app The radio operating unit also signals the remaining exit delay time 4 Now leave the secur...

Page 18: ...the security area that you wish to activate in ternally The security area view opens and displays the switching condition 2 Tap on the Activate internally button 3 Enter your user PIN in the window w...

Page 19: ...te a security area internally 1 Tap on the Deactivate button on the security area view 2 Enter your user PIN in the window which opens up The security area is deactivated Fig 18 Deactivated state Oper...

Page 20: ...ity area view A list will open containing active alarms and messages 2 Tap on the Confirm button 3 Enter your user PIN in the window which opens up The message will be deleted if the correct PIN is en...

Page 21: ...ote access in detail view see 1 6 1 Remote access in tile view see 1 6 2 Prerequisite The S1 has been situated in the building structure in the Gira Project Assis tant The Remote access function has b...

Page 22: ...Remote access in tile view 1 Display in which part of the building the Remote Access function was con figured 2 Display whether remote access is in progress 3 Sliding switch to enable disable remote...

Page 23: ...nav igation bar The following functions are available in the system menu System see 2 1 PIN protection see 2 2 View configuration see 2 3 Occupancy simulation see 2 4 Manage rooms see 2 5 Manage func...

Page 24: ...ings in the system menu 2 1 System 1 Tap the System button in the system menu The System page opens The following menu items are available Connection to the Gira device see 2 1 1 Start demo mode see 2...

Page 25: ...The data is saved The connection to Gira X1 is created Note Connecting via VPN If you want to connect to Gira X1 through a VPN the automatic entry of the IP address through the Find Gira X1 button do...

Page 26: ...re remote access in this view Prerequisite The Gira S1 has already been configured and has a connection to the Gira de vice portal An activation code for the Gira Smart Home App has been created in th...

Page 27: ...e user s mobile phone Requirements The OpenVPN Connect app from OpenVPN Technologies and the Gira X1 app must be installed on the mobile phone 1 Open the e mail that you have just sent and tap the att...

Page 28: ...hanging password You can change the user password assigned during configuration Proceed as follows 1 Enter the old password 2 Enter a new password 3 Repeat the new password 4 Confirm your entries with...

Page 29: ...unwanted changes To activate PIN protection proceed as follows 1 Tap the PIN protection button The PIN protection page opens 2 Slide the Activate PIN protection switch to the right 3 Enter a PIN in th...

Page 30: ...e functions displayed and the order of the func tions for the action area 1 Tap the View configuration button The View configuration page opens The following menu items are available Select Home see 2...

Page 31: ...detail view when the Home button is tapped 1 Select the desired view for the Home view 2 Tap the OK button 2 3 2 Favourites Here you can define and sort your favourites The following menu items are a...

Page 32: ...ant to display as a favourite The Define favourites function folder page opens 3 Activate functions that you wish to import as favourites 4 Tap OK The Define favourites page opens 5 Define additional...

Page 33: ...re finished tap OK The View configuration page opens 6 Close and save your settings Tap OK A message informs you that changes have been made 7 Confirm this by tapping OK The favourites then appear in...

Page 34: ...Slide the slider switch to the right Your favourites will be displayed in front of the configured functions in the home view 2 3 4 Display trades This is where you can determine whether the Trades til...

Page 35: ...e later simulation These functions should of course be visible from the outside e g light func tions or moving blinds or shutters if these are not controlled by timers 4 Confirm the selected functions...

Page 36: ...on the room that you wish to manage You now have the option to rename the selected room and change the room s symbol 2 6 Manage functions 1 Tap on the Manage functions button in the system menu The M...

Page 37: ...tion 1 Tap the button 2 Tap on the function that you wish to add 2 6 2 Manage function 1 Tap on the function that you wish to manage You now have the option to rename the selected function and change...

Page 38: ...your finger on the three horizontal lines in front of the function and drag them into the desired order Press to confirm your entry Finish 2 8 Manage subsections 1 Tap on the Manage subsections butto...

Page 39: ...e the option to issue or withdraw authorisation for functions to or from individual users 1 Tap on the Manage users button in the system menu The following menu items are available Select functions yo...

Page 40: ...k after Authorise everything If the check mark is removed all the functions for the building section or trade are blocked for the user concerned 2 Tap on the horizontal arrow after the room or trade c...

Page 41: ...y functions You have the option to apply other user s authorisation settings 1 Tap on the user whose authorisation settings you wish to apply 2 Tap on OK in the confirmation dialogue The selected user...

Page 42: ...via the Gira Smart Home App using the Sonos audio function The following functions are available Play pause track change volume mute switch between tracks previous and next track display track artist...

Page 43: ...functions button in the system menu The Manage functions page opens 2 Tap the button The Create new function page opens 3 Tap on Add Sonos audio control 4 Select the Sonos device you wish to use for...

Page 44: ...page will open 2 Tap on Change Sonos loudspeaker 3 Select the Sonos device you wish to use for playback Note Number of Sonos devices You can configure a maximum of eight Sonos devices on the Gira Sma...

Page 45: ...he login You can log in with one of the four user accounts Device Administrator Electrician or User To log in click on the required button and enter the corresponding access data If you click on Devic...

Page 46: ...the assignment of a Sonos favourite to a KNX touch sensor is not changed inadvertently by adding a favourite in the Sonos app for example If you need to add a favourite from the Sonos app to the saved...

Page 47: ...nformation is transmitted firmwareVersion 2 3 58 0 model GIGSRVKX02 uuid 33d186b0 cd33 4ed0 b9a6 f918294aa7e4 version 1 The data transferred is transmitted anonymously in encrypted format ensur ing pr...

Page 48: ...cordance with statutory requirements via the re tailer Please submit or send faulty devices postage paid and with an error de scription to your sales representative retailer installation company elect...

Reviews: