background image

4

Skin Scanner Set-up

Opening the Skin Scanner

1.

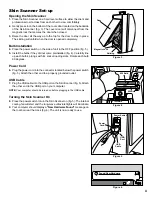
  Place the Skin Scanner on a hard level surface to allow the client and 

professional to sit across from each other to view comfortably.

2.

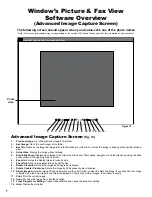
  Gently press in on the bottom of the cover door located on the backside 

of the Skin Scanner (fig. 3). The cover door will disconnect from the 

magnetic lock that secures the door when closed. 

3.

  Raise the door all the way up to the top for the door to stay in place. 

The skirting will unfold when the door is opened completely.

Bulb Installation

4.

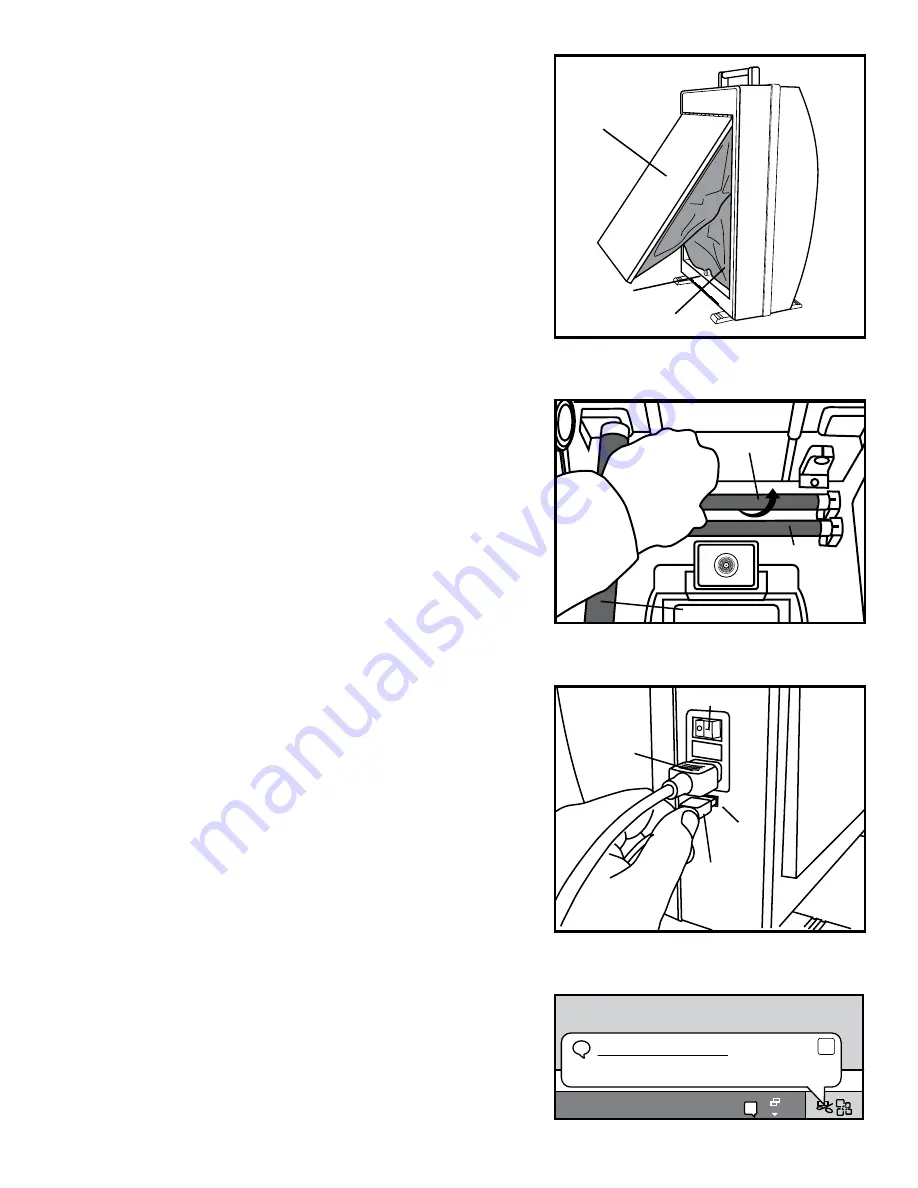
  Place the power switch on the side of unit in the OFF position (fig. 5).

5.

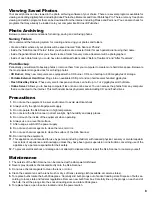
  Install the bulbs if they did not come preinstalled (fig. 4). Carefully line 

up each bulb’s prongs with it’s socket loading slots. Rotate each bulb 

90 degrees.

Power Cord

6.

  Plug the power cord into the connector located below the power switch 

(fig. 5). Attach the other end to a properly grounded outlet.

USB Cable

7.

  Plug the USB cable into the USB port on the Skin Scanner (fig. 5). Attach 

the other end to the USB port on your computer. 

NOTE:

 Your computer should be turned on before plugging in the USB cable.

Turning the Skin Scanner On


8.

  Press the power switch to turn the Skin Scanner on (fig. 5). The internal 

cooling fan will start and the long-wave ultraviolet lights will illuminate. 

9.

  Your computer should display a 

“New Hardware Found”

 message on 

the tool bar near the clock (fig. 6). The unit is now ready to use.

Figure 6

Found New Hardware

i

x

?

Figure 5

Power 

Cord

USB

Port 

USB 

Cable

Power Switch


Figure 3

Door


Magnetic Lock

Skirting

Figure 4

1.

M

eg

a P

ixels . Fov=

56


 E

ffl=

4.5

m

m   

F/N

o=2

.5 

6W Bulb

6W Bulb

10WBulb

Summary of Contents for #GP-DV-C

Page 1: ...Skin Scanner Operator Owner s Manual Model GP DV C with Internal Camera ...

Page 2: ...r equipment will earn your trust Sincerely Joanne Bianchini President Skin Scanner Parts 2 Specifications 2 Skin Scanner Features 3 Skin Scanner Set up 4 Skin Scanner Operation 5 Camera Operation 5 Skin Scanner Shutdown 5 Microsoft Picture Fax View Software Overview 6 7 Viewing Photos 8 Photo Archiving 8 Precautions 8 Maintenance 8 Troubleshooting and Technical Service 9 Warranty 10 Table of Conte...

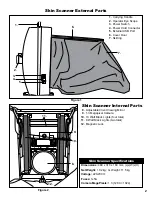
Page 3: ... Watt Black Lights four total 11 6 Watt Black Lights two total 12 Magnetic Lock 1 Carrying Handle 2 Operator Eye Scope 3 Power Switch 4 Power Cord Connector 5 External USB Port 6 Cover Door 7 Skirting Dimensions 480 x 310 x 160 mm L x W x H Net Weight 10 2 kg G Weight 11 5 kg Voltage 220 230V Fuses 1x5A Camera MegaPixels 1 3 1280 1024 4 11 Figure 1 Figure 2 Skin Scanner Specifications 2 12 ...

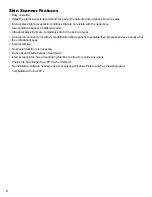
Page 4: ... safe for the skin and eyes An internal concave mirror with 2x magnification allows patient to evaluate their progress and see exactly what the professional sees Internal camera No special darkroom is necessary Track patient results between treatments Internal cooling fan has a deodorizing function to allow for continuous usage Photos are downloaded to a PC via the USB port No installation softwar...

Page 5: ...s socket loading slots Rotate each bulb 90 degrees Power Cord 6 Plug the power cord into the connector located below the power switch fig 5 Attach the other end to a properly grounded outlet USB Cable 7 Plug the USB cable into the USB port on the Skin Scanner fig 5 Attach the other end to the USB port on your computer NOTE Your computer should be turned on before plugging in the USB cable Turning ...

Page 6: ...layed in the Photo Area fig 9 5 The photo file names will display below the Photo Area fig 10 6 Double click the a photo file name for additional tools fig 10 Skin Scanner Shut Down 1 Turn off the Skin Scanner between exams and when not in use 2 Push the cover door down fig 11 The operator may need to adjust the skirting if it does not completely store inside of the Skin Scanner NOTE Closing the d...

Page 7: ...mage Capture Screen 1 Figure 12 Photo Area The following screen should appear when you launch the software program Note Your screen and software may vary depending on the version of Windows Picture and Fax Viewer installed on your computer 1 Image Capture Screen fig 12 1 Take a New Picture Click this icon to take a snapshot of the live image shown in the photo area 2 Delete All Pictures on Camera ...

Page 8: ... 5 Start Slide Show Displays each image in the folder in a slide show Start pause navigate or end the slide show using the slide show toolbar in the upper right hand corner 6 Zoom In Enlarge the display image to twice its size 7 Zoom Out Reduce the display image by half its size 8 Rotate Clockwise Rotate the image by 90 degrees clockwise 9 Rotate Counter Clockwise Rotate the image by 90 degrees co...

Page 9: ...sever You can access the photos from any computer that is connected to the internet This method eliminates physical media including CD s and flash drives Precautions 1 Do not use the equipment in a wet environment to avoid electrical shock 2 Always verify the right voltage power supply 3 Do not operate the Skin Scanner in high temperature 4 Do not store the Skin Scanner in direct sunlight high hum...

Page 10: ...caught in door Adjust skirting until door can be closed Picture not clear or blurry when photographing Lens not focused Turn the ring on the edge of the lens until picture is focused Gently clean camera lens with lens brush or dry soft lens cleaning cloth available at camera stores Patient moved while taking photo Have patient sit still Power switch off Power cord not connected Turn on power switc...

Page 11: ...the date of shipment As a condition of this limited warranty upon discovery all defects must be reported to Gio Pelle Inc by phone and also in writing when requested Gio Pelle Inc will determine the method of providing remedial service through telephone support a visit by our representative or product return All defects shall be subject to verification and determination by Gio Pelle Inc to its rea...

Page 12: ...Operator Owner s Manual Model GP DV C Skin Scanner with Internal Camera 7740 Records Street Indianapolis IN 46226 317 545 6196 800 428 1610 Fax 317 543 3289 www giopelle com LGMNSSWC03 01 09 ...

Reviews: