


indicated in the recipe or cooking chart. When cooking is complete, remove
pressure cooker from burner and allow it to cool.
Handy Tip: If the pressure regulator is allowed to rock vigorously, excess steam
will escape, too much liquid will evaporate, and the food will burn.
10. Pressure should be reduced in accordance with the recipe or the cooking chart
instructions. If the receipe or chart requires that the cooker cool naturally, then set
the pressure cooker aside. You will know this has occurred when the safety lock has
dropped below the top of the handle.
11. After pressure has been completely reduced, remove the pressure regulator.
Always remove the regulator before opening the cover.
12. To open the cover, turn it counter clockwise until the arrow on the body handle
aligns with the “
V
” on the cover. Then lift the cover toward yourself to keep any
steam away from you. If you have difficulty in rotating the cover, there is still some
pressure in the unit. Do not force the cover off. Continue to cool the cooker until
the safety lock has dropped, and cover will turn easily.
13. This appliance cooks under pressure. Improper use may result in scalding injury.
Make certain unit is properly closed before operation.
14. Do not open the pressure cooker until the unit has cooled and all internal
pressure has been released. If the handles are difficult to push apart, this indicates
that the cooker is still pressurized do not force open. Any pressure in the cooker can
be hazardous.
16.
Food is ready to serve.
HOW TO CLEAN YOUR PRESSURE COOKER
1.
Your pressure cooker and all of its components are fully submersible for easy
cleanup. Always remove the sealing ring to ensure thorough cleaning of the
inside rim of the lid. The sealing ring should be washed with hot, soapy water
after each use. Remove the safety valve in the pressure cooker cover handle for
cleaning. To remove the safety valve, turn the lid over and unscrew the cover
handle with a small brush. After cleaning, rinse the spring and metal shaft of
the safety valve and thread gently into place. Be careful nott to over torque the
valve.
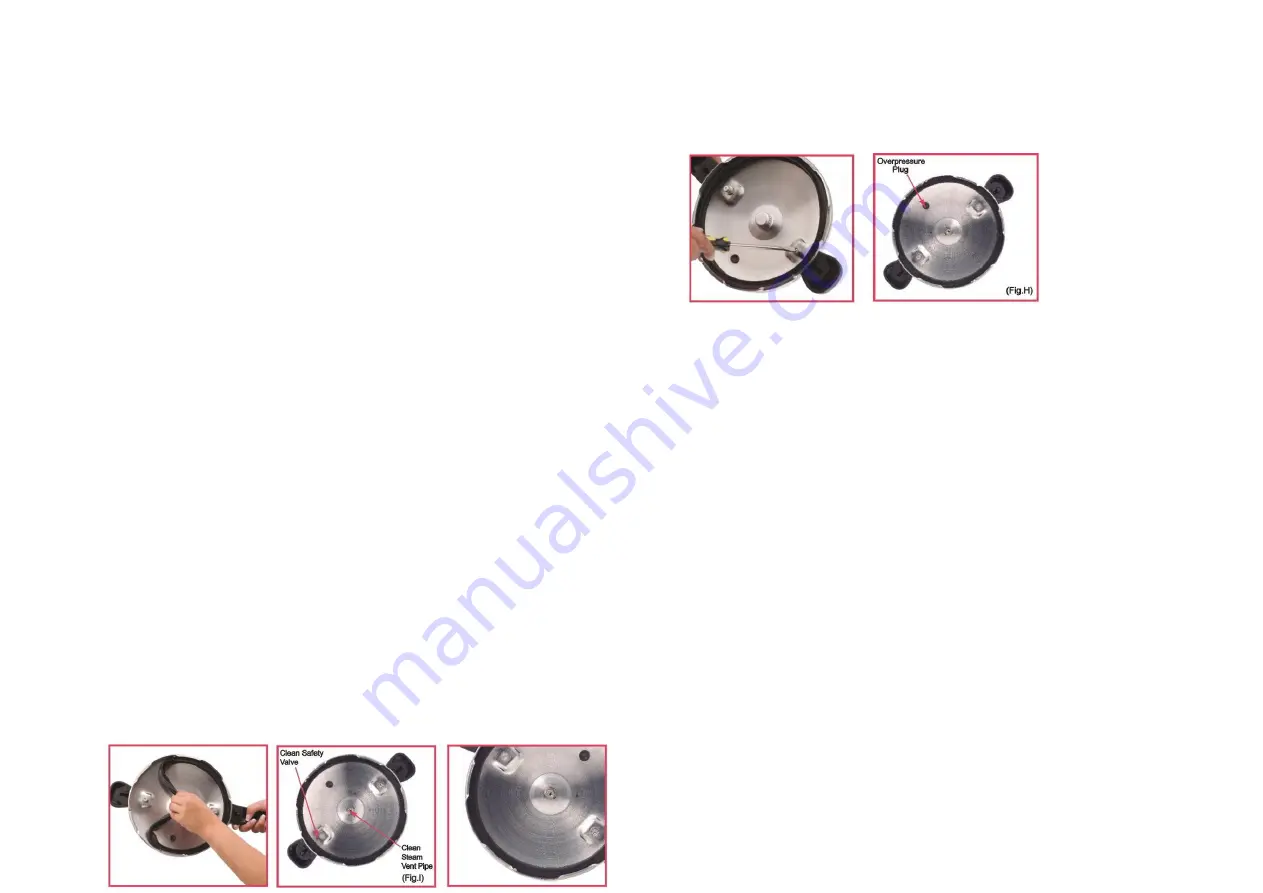
2. The overpressure plug can also be removed for cleaning by pushing it out of its
opening from the top of the cover. After cleaning, reinsert it by pushing the domed
side of the plug into the opening from the underside of the cover, until the bottom
edge is fully and evenly seated against the underside of the cover (Fig.H).
3.
Clean the steam vent pipe with a small brush or pipe cleaner (Fig I). To clean
the vent pipe, unscrew the pressure regulator (Fig. A#1) on the top of the lid.
4.
Minerals in water and foods may darken the inside of your cooker. This
discoloration will not affect the food cooked in the unit. Mineral stains can be
removed by using a solution of water and cream of tartar. Use a tablespoon of
cream of tartar for each quart of water. Dissolve the cream of tartar in the water
and pour enough solution into the cooker to cover the discoloration (do not fill
over 2/3 full). Lock the lid in place, put the pressure regulator on the vent pipe,
and heat unil the presure regulator rocks gently. Remove the cooker from the
heat and allow it to stand form tow to three hours. Remove the pressure
regulator and discard the contents. Scour thoroughtly with a scrubbing pad;
wash, rinse, and dry.
5.
Hand wash only a mild detergent. If food residue adheres to the body of the
pressure cooker, use a non-metal bristled brush for removal.
6.
When not in use, store your pressure cooker in a dry place with the cover
inverted on the body. If the cover is locked on, the sealing ring could be
damaged.
7.
Avoid striking the rim of the pressure cooker body with metal cooking utensils,
as this could cause nicks in the rim and prevent the pressure cooker lid from
forming a proper seal.
8.
If the handles loosen, tighten them with a screwdriver, but do not over tighten
the screws.
9.
Leakage between the cover and body is usually cause by shrinkage of the
sealing ring after prolonged use. Replace the overpressure plug as well. Do not
apply cooking oil to sealing ring.


