background image

2-5 Settings


ƒ

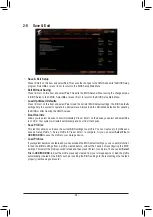
Platform Power


&

AC BACK


Determines the state of the system after the return of power from an AC power loss.


Memory 


The system returns to its last known awake state upon the return of the AC power.


Always On   

The system is turned on upon the return of the AC power.


Always Off   

 The system stays off upon the return of the AC power. (Default)


&

ErP


Determines whether to let the system consume least power in S5 (shutdown) state. (Default: Disabled)


Note: When this item is set to 

Enabled

, the following functions will become unavailable: Resume by Alarm, 

power on by mouse, and power on by keyboard.


&

Soft-Off by PWR-BTTN


Configures the way to turn off the computer in MS-DOS mode using the power button.


Instant-Off   

Press the power button and then the system will be turned off instantly. (Default)


Delay 4 Sec. 

 Press and hold the power button for 4 seconds to turn off the system. If the power 
button is pressed for less than 4 seconds, the system will enter suspend mode.


&

Power Loading


Enables or disables dummy load. When the power supply is at low load, a self-protection will activate causing 
it to shutdown or fail. If this occurs, please set to 

Enabled

Auto

 lets the BIOS automatically configure this 

setting. (Default: Auto)


&

Resume by Alarm


Determines whether to power on the system at a desired time. (Default: Disabled)


If enabled, set the date and time as following:


Wake up day: Turn on the system at a specific time on each day or on a specific day in a month.


Wake up hour/minute/second: Set the time at which the system will be powered on automatically.


Note: When using this function, avoid inadequate shutdown from the operating system or removal of the 
AC power, or the settings may not be effective.


&

Wake on LAN


Enables or disables the wake on LAN function. (Default: Enabled)

- 30 -

Summary of Contents for TRX40 AORUS PRO WIFI

Page 1: ...ng the packaging materials of this product are recyclable and reusable GIGABYTE works with you to protect the environment For more product details please visit GIGABYTE s website TRX40AORUSPROWIFI User s Manual Rev 1001 12ME TR4APRW 1001R ...

Page 2: ...Wireless Module Country Approvals Oct 25 2019 Motherboard TRX40 AORUS PRO WIFI Oct 25 2019 Motherboard TRX40 AORUS PRO WIFI ...

Page 3: ...ed or published in any form or by any means without GIGABYTE s prior written permission For quick set up of the product read the Quick Installation Guide included with the product In order to assist in the use of this product carefully read the User s Manual For product related information check on our website at https www gigabyte com Identifying Your Motherboard Revision The revision number on y...

Page 4: ...the Memory 12 1 5 Installing an Expansion Card 12 1 6 Setting up AMD CrossFire NVIDIA SLI Configuration 13 1 7 Back Panel Connectors 14 1 8 Internal Connectors 16 Chapter 2 BIOS Setup 25 2 1 Startup Screen 25 2 2 The Main Menu 26 2 3 Favorites F11 27 2 4 Tweaker 28 2 5 Settings 30 2 6 System Info 35 2 7 Boot 36 2 8 Save Exit 39 Chapter 3 Appendix 40 3 1 Configuring a RAID Set 40 3 2 Drivers Instal...

Page 5: ... contents are subject to change without notice USB1 U32G2C U32G2_2 AMD Socket sTRX4 AUDIO QFLASH_PLUS QFLED BAT AMD TRX40 CLR_CMOS THB_C M_BIOS B_BIOS PCIEX16_1 PCIEX8_1 M2M 60 80 110 TRX40 AORUS PRO WIFI F_PANEL F_USB1 SYS_FAN5A_PUMP SYS_FAN2 F_U32_1 SYS_FAN6A_PUMP SYS_FAN6B_PUMP F_U32_2 TPM CPU_FAN iTE Super I O SATA3 6 4 2 0 7 5 3 1 U32G2_LAN USB2 LED_C2 F_U32C M2P 80 EC_TEMP1 EC_TEMP2 F_USB2 U...

Page 6: ... x PCI Express x16 PCI Express 4 0 Bus TPM USB 2 0 Hub USB 2 0 Hub 2 USB 3 2 Gen 2 Type A Center Subwoofer Speaker Out Line Out MIC Line In S PDIF Out Rear Speaker Out Realtek ALC4050H Realtek ALC1220 VB 4 USB 3 2 Gen 1 M 2 WiFi Module x1 x8 2 PCI Express x8 3 USB 3 2 Gen 2 Type A 1 M 2 Socket 3 M2M 1 M 2 Socket 3 M2Q 1 USB Type C with USB 3 2 Gen 2 support Dual BIOS SPI Bus iTE Super I O 1 PCI Ex...

Page 7: ...a metal object to eliminate static electricity Prior to installing the motherboard please have it on top of an antistatic pad or within an electrostatic shielding container Before connecting or unplugging the power supply cable from the motherboard make sure the power supply has been turned off Before turning on the power make sure the power supply voltage has been set according to the local volta...

Page 8: ... Wireless Communication Module Intel Wi Fi 6 AX200 Wi Fi 802 11a b g n ac ax supporting 2 4 5 GHz Dual Band BLUETOOTH 5 0 Support for 11ax 160MHz wireless standard and up to 2 4 Gbps data rate Actual data rate may vary depending on environment and equipment Expansion Slots 2 x PCI Express x16 slots running at x16 PCIEX16_1 PCIEX16_2 2 x PCI Express x16 slots running at x8 PCIEX8_1 PCIEX8_2 1 x PCI...

Page 9: ... water cooling CPU fan header 2 x system fan headers 4 x system fan water cooling pump headers 2 x addressable LED strip headers 2 x RGB LED strip headers 3 x M 2 Socket 3 connectors 8 x SATA 6Gb s connectors 1 x front panel header 1 x front panel audio header 1 x USB Type C header with USB 3 2 Gen 1 Gen 2 support 2 x USB 3 2 Gen 1 headers 2 x USB 2 0 1 1 headers 1 x GIGABYTE add in card connector...

Page 10: ...ications BIOS AutoGreen Cloud Station EasyTune Fast Boot Game Boost ON OFF Charge RGB Fusion Smart Backup Smart Keyboard Smart Survey System Information Viewer USB Blocker Support for Q Flash Plus Support for Q Flash Support for Xpress Install Bundled Software Norton Internet Security OEM version XSplit Gamecaster Broadcaster 12 months license cFosSpeed Operating System Support for Windows 10 64 b...

Page 11: ...rheating and damage of the CPU may occur Set the CPU host frequency in accordance with the CPU specifications It is not recommended that the system bus frequency be set beyond hardware specifications since it does not meet the standard requirements for the peripherals If you wish to set the frequency beyond the standard specifications please do so according to your hardware specifications includin...

Page 12: ...s are divided into four channels and each channel has two memory sockets as following Channel A DDR4_A1 DDR4_A2 Channel B DDR4_B1 DDR4_B2 Channel C DDR4_C1 DDR4_C2 Channel D DDR4_D1 DDR4_D2 1 5 Installing an Expansion Card Read the following guidelines before you begin to install an expansion card Make sure the motherboard supports the expansion card Carefully read the manual that came with your e...

Page 13: ...uration A System Requirements Windows 10 64 bit operating system A CrossFire SLI supported motherboard with two or more PCI Express x16 slots and correct driver CrossFire SLI ready graphics cards of identical brand and chip and correct driver For the latest GPUs that support the 3 way CrossFire SLI technology please refer to the AMD NVIDIA website Note 1 CrossFire Note 2 SLI bridge connectors A po...

Page 14: ...1 and USB 2 0 specification Use this port for USB devices RJ 45 LAN Port The Gigabit Ethernet LAN port provides Internet connection at up to 1 Gbps data rate The following describes the states of the LAN port LEDs SMA Antenna Connectors 2T2R Use this connector to connect an antenna Activity LED Connection Speed LED LAN Port Activity LED Connection Speed LED State Description Orange 1 Gbps data rat...

Page 15: ...r Out a a a a Mic In a Center Subwoofer Speaker Out Use this audio jack to connect center subwoofer speakers Rear Speaker Out Use this audio jack to connect rear speakers Optical S PDIF Out Connector This connector provides digital audio out to an external audio system that supports digital optical audio Before using this feature ensure that your audio system provides an optical digital audio in c...

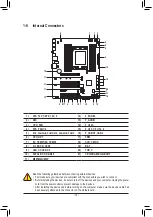
Page 16: ... installing the device and before turning on the computer make sure the device cable has been securely attached to the connector on the motherboard 1 ATX_12V_1 ATX_12V_2 2 ATX 3 CPU_FAN 4 SYS_FAN1 2 5 SYS_FAN5A B_PUMP SYS_FAN6A B_PUMP 6 CPU_OPT 7 EC_TEMP1 EC_TEMP2 8 D_LED1 D_LED2 9 LED_C1 LED_C2 10 SATA3 0 1 2 3 4 5 6 7 11 M2M M2Q M2P 12 F_PANEL 13 F_AUDIO 14 F_U32C 15 F_U32_1 F_U32_2 16 F_USB1 F_...

Page 17: ... requirements it is recommended that a power supply that can withstand high power consumption be used 500W or greater If a power supply is used that does not provide the required power the result can lead to an unstable or unbootable system ATX Pin No Definition Pin No Definition 1 3 3V 13 3 3V 2 3 3V 14 12V 3 GND 15 GND 4 5V 16 PS_ON soft On Off 5 GND 17 GND 6 5V 18 GND 7 GND 19 GND 8 Power Good ...

Page 18: ... the ground wire The speed control function requires the use of a fan with fan speed control design 1 Pin No Definition 1 GND 2 Voltage Speed Control 3 Sense 4 PWM Speed Control Pin No Definition 1 GND 2 Voltage Speed Control 3 Sense 4 PWM Speed Control 3 4 CPU_FAN SYS_FAN1 2 Fan Headers All fan headers on this motherboard are 4 pin Most fan headers possess a foolproof insertion design When connec...

Page 19: ... your computer Unplug the power cord from the power outlet to prevent damage to the devices 9 LED_C1 LED_C2 RGB LED Strip Headers The headers can be used to connect a standard 5050 RGB LED strip 12V G R B with maximum power rating of 2A 12V and maximum length of 2m Pin No Definition 1 12V 2 G 3 R 4 B 1 Connect one end of the RGB LED strip extension cable to the header and the other end to your RGB...

Page 20: ...ions on configuring a RAID array _3 U 80 110 60 80 Follow the steps below to correctly install an M 2 SSD in the M 2 connector Step 1 Get a screw and a standoff from the included M 2 screw and standoff packs Locate the M 2 connector where you will install the M 2 SSD use a screwdriver to unfasten the screw on the heatsink and then remove the heatsink Step 2 Locate the proper mounting hole for the ...

Page 21: ..._LED Power LED Connects to the power status indicator on the chassis front panel The LED is on when the system is operating The LED is off when the system is in S3 S4 sleep state or powered off S5 HD Hard Drive Activity LED Connects to the hard drive activity LED on the chassis front panel The LED is on when the hard drive is reading or writing data RES Reset Switch Connects to the reset switch on...

Page 22: ...onal USB bracket For purchasing the optional USB bracket please contact the local dealer Pin No Definition Pin No Definition 1 Power 5V 6 USB DY 2 Power 5V 7 GND 3 USB DX 8 GND 4 USB DY 9 No Pin 5 USB DX 10 NC Do not plug the IEEE 1394 bracket 2x5 pin cable into the USB 2 0 1 1 header Prior to installing the USB bracket be sure to turn off your computer and unplug the power cord from the power out...

Page 23: ...OS when the computer is turned off Replace the battery when the battery voltage drops to a low level or the CMOS values may not be accurate or may be lost You may clear the CMOS values by removing the battery 1 Turn off your computer and unplug the power cord 2 Gently remove the battery from the battery holder and wait for one minute Or use a metal object like a screwdriver to touch the positive a...

Page 24: ...PU DRAM VGA LED is on that means the corresponding device is not working normally if the BOOT LED is on that means you haven t entered the operating system yet CPU CPU status LED DRAM Memory status LED VGA Graphics card status LED BOOT Operating system status LED CPU DRAM VGA BOOT 20 THB_C GIGABYTE Add in Card Connector This connector is for a GIGABYTE add in card 1 ...

Page 25: ...dequate BIOS flashing may result in system malfunction It is recommended that you not alter the default settings unless you need to to prevent system instability or other unexpected results Inadequately altering the settings may result in system s failure to boot If this occurs try to clear the CMOS values and reset the board to default values Refer to the Load Optimized Defaults section in this c...

Page 26: ...us BIOS settings for the current submenus F6 Display the Smart Fan 5 screen F7 Load the Optimized BIOS default settings for the current submenus F8 Access the Q Flash utility F10 Save all the changes and exit the BIOS Setup program F11 Switch to the Favorites submenu F12 Capture the current screen as an image and save it to your USB drive Insert Add or remove a favorite option Ctrl S Display infor...

Page 27: ... favorites and use the F11 key to quickly switch to the page where all of your favorite options are located To add or remove a favorite option go to its original page and press Insert on the option The option is marked with a star sign if set as a favorite 27 ...

Page 28: ...CPU PCIe Spread Spectrum Default Auto CPU Clock Ratio Allows you to alter the clock ratio for the installed CPU The adjustable range is dependent on the CPU being installed Advanced CPU Settings Core Performance Boost Allows you to determine whether to enable the Core Performance Boost CPB technology a CPU performance boost technology Default Auto SVM Mode Virtualization enhanced by Virtualization...

Page 29: ...t the system memory multiplier Auto sets memory multiplier according to memory SPD data Default Auto Advanced Memory Settings Memory Subtimings d Standard Timing Control Advanced Timing Control CAD Bus Setup Timing CAD Bus Drive Strength Data Bus Configuration These sections provide memory timing settings Note Your system may become unstable or fail to boot after you make changes on the memory tim...

Page 30: ...Default Delay 4 Sec Press and hold the power button for 4 seconds to turn off the system If the power button is pressed for less than 4 seconds the system will enter suspend mode Power Loading Enables or disables dummy load When the power supply is at low load a self protection will activate causing it to shutdown or fail If this occurs please set to Enabled Auto lets the BIOS automatically config...

Page 31: ...bles 64 bit capable devices to be decoded in above 4 GB address space only if your system supports 64 bit PCI decoding Set to Enabled if more than one advanced graphics card are installed and their drivers are not able to be launched when entering the operating system because of the limited 4 GB memory address space Default Disabled F_U32C Gen Speed Allows you to set the operation mode of the F_U3...

Page 32: ... SATA Port 0 1 2 3 4 5 6 7 Displays the information of the connected SATA device s Network Stack Configuration Network Stack Disables or enables booting from the network to install a GPT format OS such as installing the OS from the Windows Deployment Services server Default Disabled Ipv4 PXE Support Enables or disables IPv4 PXE Support This item is configurable only when Network Stack is enabled I...

Page 33: ...r to enhance some legacy benchmark performance Default Disabled IOMMU Enables or disables AMD IOMMU support Default Auto AMD CPU fTPM Enables or disables the TPM 2 0 function integrated in the AMD CPU Default Disabled Trusted Computing Enables or disables Trusted Platform Module TPM AMD CBS This sub menu provides AMD CBS related configuration options PC Health Reset Case Open Status Disabled Keeps...

Page 34: ...de is recommended for a 3 pin fan pump PWM PWM mode is recommended for a 4 pin fan pump Fan Pump Stop Enables or disables the fan pump stop function You can set the temperature limit using the temperature curve The fan or pump stops operation when the temperature is lower than the limit Default Disabled Temperature Displays the current temperature of the selected target area Fan Speed Displays cur...

Page 35: ...is hour minute and second For example 1 p m is 13 00 00 Use Enter to switch between the Hour Minute and Second fields and use the Page Up or Page Down key to set the desired value Access Level Displays the current access level depending on the type of password protection used If no password is set the default will display as Administrator The Administrator level allows you to make changes to all B...

Page 36: ... under the Administrator Password User Password item Setup A password is only required for entering the BIOS Setup program System A password is required for booting the system and for entering the BIOS Setup program Default Full Screen LOGO Show Allows you to determine whether to display the GIGABYTE Logo at system startup Disabled skips the GIGABYTE Logo when the system starts up Default Enabled ...

Page 37: ...ct whether to enable the legacy option ROM for the LAN controller Default Disabled This item is configurable only when CSM Support is set to Enabled Storage Boot Option Control Allows you to select whether to enable the UEFI or legacy option ROM for the storage device controller Disabled Disables option ROM UEFI Only Enables UEFI option ROM only Default Legacy Only Enables legacy option ROM only T...

Page 38: ...ess Enter on the password item and when requested for the password enter the correct one first When prompted for a new password press Enter without entering any password Press Enter again when prompted to confirm NOTE Before setting the User Password be sure to set the Administrator Password first Secure Boot Allows you to enable or disable Secure Boot and configure related settings This item is c...

Page 39: ...the device you select and select Yes to confirm Your system will restart automatically and boot from that device Save Profiles This function allows you to save the current BIOS settings to a profile You can create up to 8 profiles and save as Setup Profile 1 Setup Profile 8 Press Enter to complete Or you can select Select File in HDD FDD USB to save the profile to your storage device Load Profiles...

Page 40: ...igure the SATA controller mode correctly in system BIOS Setup Steps Turn on your computer and press Delete to enter BIOS Setup during the POST Power On Self Test Under Settings IO Ports set SATA Configuration SATA Mode to RAID Then save the settings and restart your computer If you want to use NVMe PCIe SSDs to configure RAID make sure to set NVMe RAID mode to Enabled Then set how the bandwidth of...

Page 41: ...vice first and click Next to load the driver Then select AMD RAID Controller and click Next to load the driver Finally continue the OS installation C UEFI RAID Configuration Steps 1 In BIOS Setup go to Boot and set CSM Support to Disabled Save the changes and exit BIOS Setup 2 After the system reboot enter BIOS Setup again Then enter the Settings IO Ports RAIDXpert2 Configuration Utility sub menu ...

Page 42: ...r double click the optical drive and execute the Run exe program Xpress Install will automatically scan your system and then list all of the drivers that are recommended to install You can click the Xpress Install button and Xpress Install will install all of the selected drivers Or click the arrow icon to individually install the drivers you need 3 2 Drivers Installation Please visit GIGABYTE s w...

Page 43: ... disposed of properly WEEE Symbol Statement The symbol shown below is on the product or on its packaging which indicates that this product must not be disposed of with other waste Instead the device should be taken to the waste collection centers for activation of the treatment collection recycling and disposal procedure The separate collection and recycling of your waste equipment at the time of ...

Page 44: ...ntenna Increase the separation between the equipment and receiver Connect the equipment into an outlet on a circuit different from that to which the receiver is connected Consult a dealer or experienced TV radio technician for help The user may find the following booklet prepared by the Federal Communications Commission helpful The Interference Handbook This booklet is available from the U S Gover...

Page 45: ...50 MHz and 5650 5850 MHz and that these radars could cause interference and or damage to LE LAN devices Avertissement Le guide d utilisation des dispositifs pour réseaux locaux doit inclure des instructions précises sur les restrictions susmentionnées notamment i les dispositifs fonctionnant dans la bande 5 150 5 250 MHz sont réservés uniquement pour une utilisation à l intérieur afin de réduire l...

Page 46: ...ctivity subject to general authorization for outdoor use and article 105 free use for indoor use in both cases for private use 2 D M 28 5 03 for supply to public of RLAN access to networks and telecom services L uso degli apparati è regolamentato da 1 D L gs 1 8 2003 n 259 articoli 104 attività soggette ad autorizzazione generale se utilizzati al di fuori del proprio fondo e 105 libero uso se util...

Page 47: ... 47 ...

Page 48: ...8912 4000 FAX 886 2 8912 4005 Tech and Non Tech Support Sales Marketing https esupport gigabyte com WEB address English https www gigabyte com WEB address Chinese https www gigabyte com tw GIGABYTE eSupport To submit a technical or non technical Sales Marketing question please link to https esupport gigabyte com 48 ...

Reviews: