11
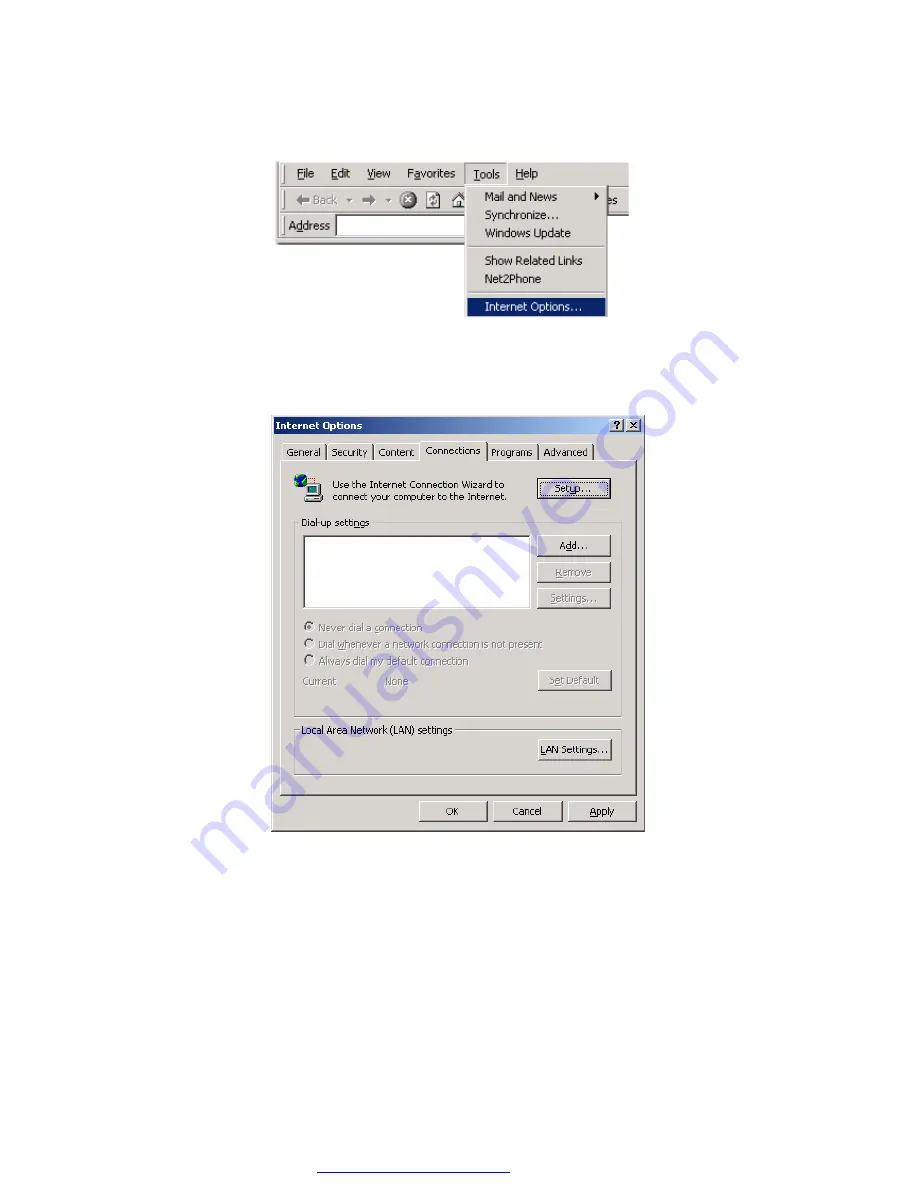
Step11. In your
”
IE Browser
„
select
Internet Options
under
Tools
.
Step 12. In this dialogue box, please click
Connections
in the
LAN Settings
• PDF • • • • • • • • • • PDF
http://www.fineprint.com
Page 1: ...ernet User 2 4 Connection for USB Port User 3 Configuration 3 1 Preparation 3 2 Setup at your PC End 3 3 Setting the Broadband Router 3 4 Logout 4 Status 5 Change Password 6 Change MAC address 7 Firmw...
Page 2: ...D Status Indication Power Lit Green Light Power on Status Blinking Red Light and Then Going Out The blinking red light indicates that the GN BR401 is being initialized When the blinking red light goes...
Page 3: ...needs to have ADSL Cable Modem with RJ 45 connectors 2 2 PC Hardware Requirement at the PC End It needs a PC with Ethernet card connection or PC with USB Port The Diagram Showing the Ways of Installi...
Page 4: ...area network LAN1 2 3 4 of the GN BR401 to your PC Step 5 Connect the adapter to the power connection slot of the GN BR401 Step 6 Insert the adapter to the power socket Step 7 The connection procedur...
Page 5: ...y to use web page setup interface is designed on the GN BR401 and the user can perform the setup by the browser The Gigabyte GN BR401 Broadband Router presets the IP address as 192 168 1 254 and prese...
Page 6: ...Settings Under Windows2000 Step 1 Click Start in the desktop of the Windows to select Settings and then click Control Panel Step 2 Double click the Network and Dial up Connections PDF PDFhttp www fin...
Page 7: ...7 Step 3 Double click the LAN CONNECTION Step 4 Click Properties in the box under LAN CONNECTION Status PDF PDFhttp www fineprint com...
Page 8: ...8 Step 5 Double click Internet Protocol TCP IP Step 6 Please select Obtain an IP address automatically and Obtain DNS server address automatically and then enter OK PDF PDFhttp www fineprint com...
Page 9: ...p 7 Click Start at the desktop of the Windows and then Program Accessories and Command Prompt in sequence Step 8 Key in the command ipconfig release in DOS mode and then enter PDF PDFhttp www fineprin...
Page 10: ...10 Step 9 Key in the command ipconfig renew and then enter Step 10 Key in exit and then enter PDF PDFhttp www fineprint com...
Page 11: ...11 Step11 In your IE Browser select Internet Options under Tools Step 12 In this dialogue box please click Connections in the LAN Settings PDF PDFhttp www fineprint com...
Page 12: ...ing with the setup and refer to Section 3 3 for setup of broadband router Note If your ISP Company has a designated Proxy setting key in the setting after you complete the GN BR401 configuration Pleas...
Page 13: ...13 3 2 2 Setup Under the Windows 95 98 Me Step 1 Click Start at the desktop of the Windows and select Settings and then the Control Panel Step 2 Double click Network PDF PDFhttp www fineprint com...
Page 14: ...n and choose your appropriate setting TCP IP and your network card below Step 4 Select IP Address Please select Obtain an IP address automatically and then press OK Please choose the TCP IP and the na...
Page 15: ...ndow of Gateway please clear all installed gateways and do not fill any of the blanks and then press OK Step 6 In the window of DNS Configuration please select Disable DNS and then press OK PDF PDFhtt...
Page 16: ...6 Step 7 Please press Yes and reset the computer screen as follows Step 8 After booting the computer please click Start and choose Run Step 9 Key in winipcfg and press OK PDF PDFhttp www fineprint com...
Page 17: ...10 In the pulled down menu select your network card press Release All then press Renew All and then press OK Step11 Please select Internet Options under Tools of your IE Browser PDF PDFhttp www finepr...
Page 18: ...selection boxes Press OK after finishing with the setup and refer to Section 3 3 for setup of broadband router Note If your ISP Company has a designated Proxy setting key in the setting after you com...
Page 19: ...19 3 2 3 Set Up Under Windows Xp Step 1 Click the Start at the desktop of the Windows and select the Control Panel Step 2 Double click the Network and Dial up Connections PDF PDFhttp www fineprint com...
Page 20: ...20 Step 3 Double click the LAN CONNECTION Step 4 Click the Properties in the box under LAN CONNECTION PDF PDFhttp www fineprint com...
Page 21: ...Step 5 Double click the Internet Protocol TCP IP Step 6 Please select the Obtain an IP address automatically and Obtain DNS server address automatically and then press OK PDF PDFhttp www fineprint co...
Page 22: ...Click the Start at the desktop of the Windows and then the Accessories and then the Command Prompt Step 8 Input the ipconfig release in the box of Command Prompt and then press OK PDF PDFhttp www fine...
Page 23: ...23 Step 9 Input ipconfig renew and then press OK Step 10 Input exit and then press Enter Step 11 Please select Internet Options under Tools of your IE Browser PDF PDFhttp www fineprint com...
Page 24: ...ease DO NOT tick all of the selection boxes Press OK after finishing with the setup Note If your ISP Company has a designated Proxy setting key in the setting after you complete the GN BR401 configura...
Page 25: ...4 in the address column in the browser and then press enter Step 2 The dialogue box will appear as shown in the following diagram and key in the default user name admin for the wideband network GN BR4...
Page 26: ...ge of the GN BR401 will appear as shown below and click the Setup Wizard on the screen and such Setup Wizard will guide you to complete the necessary steps for the setup on screen as follows PDF PDFht...
Page 27: ...ber on your own disable indicates that all IP addresses of all the computers connected to the LAN end of the GN BR401 LAN It is not necessary to configure the DHCP starting address and the DHCP alloca...
Page 28: ...deband fixed connection of ADSL Cable Modem but do not have a static IP please select this item Note Dynamic IP Please jump to Step 10 Static IPAddress If you use the wideband fixed connection of ADSL...
Page 29: ...t step Note The Idle Time means after this time period if you do not use the Internet for a while the time expired and the WAN connection will be auto disconnected The on line charge will be stopped I...
Page 30: ...tep 8 Please wait a moment Step 9 The IE browser will be automatically connected to the main menu and your setup has completed by then Please use your IE connect to Internet PDF PDFhttp www fineprint...
Page 31: ...31 Step 10 If you select the Dynamic IP Address in the WAN TYPE SELECT the following screen will appear Step 11 After Reboot is pressed it proceeds with the next step PDF PDFhttp www fineprint com...
Page 32: ...tep 12 Please wait a moment Step 13 The IE browser will be automatically connected to the main menu and the setup is completed by then Please use your IE connect to Internet PDF PDFhttp www fineprint...
Page 33: ...If your wideband company gives you more than one IP address then select one of them to fill in the column in the above figure and refer to Appendix A for the use of other IP addresses b Static IP Set...
Page 34: ...ease wait for a moment Step 17 The IE browser will be automatically connected to the main menu and the setup at the PC end is completed by then Please use your IE connect to Internet PDF PDFhttp www f...
Page 35: ...35 3 4 Logout After you finish GN BR401 setup please choose Logout Note After 5 minutes idle time the system will be automatically logout PDF PDFhttp www fineprint com...
Page 36: ...screen shows as follows Note your network service provider automatically obtains each of the above IP address at the WAN end Status 2 If you select Dynamic IP Address in the WAN TYPE SELECT press Sta...
Page 37: ...37 Status 3 If you select Static IP Address in the WAN TYPE SELECT press Status and the screen shows as follows PDF PDFhttp www fineprint com...
Page 38: ...e Password Key in your old password and key in your new password After your confirmation key in your new password once again and the procedure will complete after you press Submit PDF PDFhttp www fine...
Page 39: ...original MAC address You can enter your MAC address at this place PS MAC address is from your NIC that you registered with your ISP Company If you want to restore to the factory default please use re...
Page 40: ...ware version and press upgrade Note you can download the upgraded firmware version from Gigabyte website Please wait a moment and the IE browser will be automatically connected to the main menu and th...
Page 41: ...00 Enable enable 1 Application Key in the desired software name such as AOK Age of Kings it only needs an input for this field and its value will not affect the operation of the BR401 2 Trigger Port A...
Page 42: ...ned the PC at the LAN terminal can be used to input to the field of DMZ Taking NetMeeting for example if you just want to call an external computer from the computer at the LAN terminal it does not ne...
Page 43: ...up 2 To let a PC at the WAN end call a PC at the LAN end set the virtual IP Address such as 192 168 1 1 of the PC at the LAN end to the DMZ field in the Special Application as shown in the following f...
Page 44: ...Port 21 Virtual Server IP 192 168 1 1 Enable enable The PC at the WAN end can connect to the internal FTP server at the IP address 192 168 1 1 via the WAN end of the IP Address of the FTP BR401 At th...
Page 45: ...connect to Internet n Please confirm whether or not the power cord is properly connected and the power indicating light of the GN BR401 is normal n Please confirm whether or not all of the settings de...
Page 46: ...ch Hub ADSL Cable Modem Power Socket If your wideband company provides other 3 sets of static IP addresses please set them to PC5 6 and 7 GN BR401automatically provides the IP address of DHCP PC2 PC3...
Page 47: ...ranges from 192 168 2 1 to 92 168 2 252 Subnet Mask 255 255 255 0 Default Gateway 192 168 2 253 2 Follow the Found New Hardware Wizard to complete the GN BR401 USB Driver Installation Steps Please con...
Page 48: ...choose Search for a suitable driver for my device recommended and then press Next for next step Please choose the location where you place the GN BR401 Driver CD and then press OK PDF PDFhttp www fine...
Page 49: ...49 Please double click the ETHERNET_OVER_USB_DRIVER Please click OK to perform next step Please click GNUSB PDF PDFhttp www fineprint com...
Page 50: ...50 Please click Next for next step Please click Yes for next step PDF PDFhttp www fineprint com...
Page 51: ...51 Please click Finish for next step Please click Yes NOW YOU HAVE COMPLETED THE USB DRIVER INSTALLATION PDF PDFhttp www fineprint com...
Page 52: ...isk of fire use only No 26 AWG or larger telecommunication line cord Do not plug a modem or telephone cable into the network interface controller NIC receptacle Disconnect the modem cable before openi...