background image

- 10 -

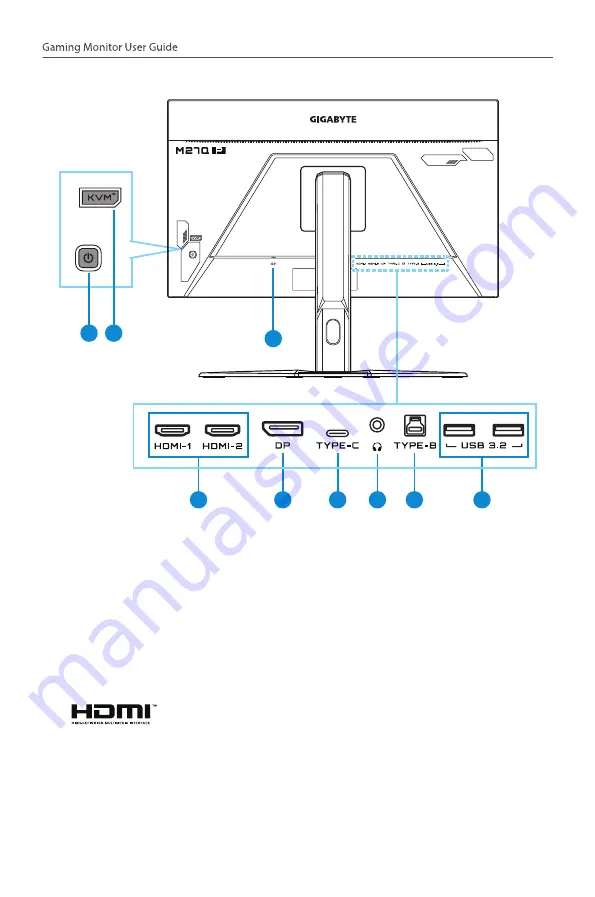
Rear view

7

5

6

8

9

4

1 2

3

   1


Control button   


6


USB Type-C port

   2


KVM button 


7


Headphone jack

   3


AC Power in 


8


USB upstream port

   4


HDMI ports (x2)  


9


USB 3.2 ports (x2)

   5


DisplayPort


Note: 


  HDMI, the HDMI logo and High-Definition Multimedia 

Interface are trademarks or registered trademarks of 
HDMI Licensing LLC.

Summary of Contents for M27Q P

Page 1: ......

Page 2: ...TE without prior notice No part of this manual may be reproduced copied translated transmitted or published in any form or by any means without GIGABYTE s prior written permission In order to assist in the use of this monitor carefully read the User Guide For more information check on our website at https www gigabyte com 2021 10 Rev A00 The terms HDMI and HDMI High Definition Multimedia Interface...

Page 3: ...able and well ventilated place Do not place the monitor near any heat sources such as electric radiators or direct sunlight The holes or openings on the monitor are for ventilation Do not cover or block the ventilation holes with any objects Do not use the monitor near water drinks or all types of liquids Failure to do so may result in electric shock or damage to the monitor Make sure to unplug th...

Page 4: ...cables connected to your product so they cannot be tripped over pulled or grabbed NEVER place a product in an unstable location NEVER place the product on tall furniture for example cupboards or bookcases without anchoring both the furniture and the product to a suitable support NEVER place the product on cloth or other materials that may be located between the product and supporting furniture NEV...

Page 5: ...wing Angle 13 Installing a Wall Mount Bracket Optional 14 Making Connections 15 USING THE DEVICE 16 Turning the Power On Off 16 User Comfort Recommendations 17 Selecting the Input Source 17 OPERATIONS 18 Quick Menu 18 Configure the Device Settings 27 APPENDICES 37 Specifications 37 Supported Timing List 38 Troubleshooting 39 Basic Care 40 Notes on USB Charging 40 GIGABYTE Service Information 40 Re...

Page 6: ...x Then observe the unpacking label attached on the inner cover 2 Making sure the box is in the correct orientation carefully lay the box on the stable surface UP 3 Open the inner cover Openings 4 Grab the EPS foam assembly through the openings to pull it out of the box ...

Page 7: ... 7 5 Remove the transparent wrapper securing the EPS foams Then remove the items from the upper EPS foam 6 Remove the upper EPS foam Then you can remove the monitor from the lower EPS foam ...

Page 8: ... missing please contact your local dealer Monitor Monitor Base Power Cable HDMI Cable USB Cable DP Cable Multilingual Installation Guide M27Q P Warranty Card Quick Start Guide Warranty Card Note Please keep the packaging box and packing materials for future transportation of the monitor ...

Page 9: ... 9 Product Overview Front view 1 1 Power LED ...

Page 10: ...SB Type C port 2 KVM button 7 Headphone jack 3 AC Power in 8 USB upstream port 4 HDMI ports x2 9 USB 3 2 ports x2 5 DisplayPort Note HDMI the HDMI logo and High Definition Multimedia Interface are trademarks or registered trademarks of HDMI Licensing LLC ...

Page 11: ...1 Place the monitor on the lower EPS foam with the screen facing down 2 Align the monitor base with the standoff underneath the stand Then attach the base onto the stand 3 Lift the screw ring and turn it clockwise to secure the monitor base in place ...

Page 12: ...nd place it on a table 5 Remove the small block of EPS foam located in between the rear of the screen and the stand Then remove the safety plate from its slot Note By removing the safety plate you can now adjust the screen to the desired height 1 2 ...

Page 13: ...so that the screen does not topple when you make the adjustment Adjusting the Tilt Angle Tilt the screen forward or backward to the desired viewing angle 5 to 20 5 20 Adjusting the Screen Height Lower or raise the screen to the desired height 0 to 130 mm 130 mm ...

Page 14: ...the release button upwards to disengage the stand from the monitor Then remove the stand 3 Attach the mounting bracket to the mounting holes at the rear of the monitor Then use the screws to secure the bracket in place Note To mount the monitor on the wall refer to the installation guide that is included in the wall mount bracket kit VESA mounting screw size M4 x 20mm minimum ...

Page 15: ... 15 Making Connections 4 1 3 2 5 6 1 HDMI cable 4 Headphone cable 2 DisplayPort cable 5 USB A Male to B Male cable 3 USB Type C cable 6 USB cable ...

Page 16: ...dy to use Note If no signal the monitor will show No Signal notification for a while Then the monitor will go to power saving mode and the Power LED lights white and starts blinking with a period of one second Power Off Press the Control button for 2 seconds to turn off the monitor Note When the Main menu appears on the screen you can also turn off the monitor by moving the Control button down Ref...

Page 17: ...he type of work you are performing Take regular and frequent breaks at least for 10 minutes every half hour Be sure to periodically look away from your monitor screen and focus on a far object for at least 20 seconds during the breaks Eye exercise can help reduce eye strain Repeat these exercises frequently 1 look up and down 2 slowly roll your eye 3 move your eyes diagonally Selecting the Input S...

Page 18: ...n Note To change the preset hot key function refer to the Quick Switch section on page 34 To access the hot key function do the following Move the Control button up to enter the Black Equalizer menu Move the Control button up down to adjust Black Equalizer the setting and press the Control button to confirm ...

Page 19: ...n left to enter the the Input menu Refer to the Selecting the Input Source section Note To close the menu move the Control button left Move the Control button up down o adjust the headphone volume level and press the Control button to confirm Move the Control button up down to select the desired option and press the Control button to confirm ...

Page 20: ...ngs KVM When the Main menu appears on the screen move the Control button left to enter the KVM menu KVM Switch Switch the input source that has been assigned to USB B or Type C connection in the KVM Wizard settings When there are several input signals connected to the device a message box will appear on the screen once the system detected USB Type C input signal ...

Page 21: ...ource Note This option will be disabled if the KVM button function is disabled KVM OFF KVM Wizard Configure the KVM related settings Set the input source to be bound with USB Type B connection first and then following with USB Type C connection Note If you set the USB B Display setting to Type C the TYPE C Display menu option will automatically be disabled You will then see the KVM status in the K...

Page 22: ... Type C input source Note When the KVM button function is enabled the KVM ON will be displayed on the left panel Select OFF to disable the KVM button function Note When the KVM button function is disabled the KVM OFF will be displayed on the left panel KVM Reset Restore the KVM default settings HDMI 1 input source is bound with USB Type B connection USB Type C input source is bound with USB Type C...

Page 23: ...PS First Person Shooting game related settings Select Gaming Timer to select countdown timer mode To disable this function set the setting to OFF Select Gaming Counter or Refresh Rate to enable disable the gaming counter or real time refresh rate setting Select Info Location to specify the location of the information to be shown on the screen ...

Page 24: ... 24 Crosshair Select the desired crosshair type to suit your gaming environment It makes aiming much easier ...

Page 25: ...hown on the screen OFF Disable the function Dashboard Location Specify the location of the Dashboard information to be shown on the screen Once the Dashboard configuration is complete it will transfer the system data to the SOC through the USB port and display the value of the selected function s on the screen ...

Page 26: ...d to the USB upstream port of the monitor and the USB port of your computer Display Alignment When the function is enabled it displays the alignment lines on the four sides of the screen providing handy tool for you to line up multiple monitors perfectly ...

Page 27: ...nu and make adjustments Gaming Configure the game related settings Item Description Aim Stabilizer sync When this function is enabled it reduces the motion blur in a fast moving games Note This function is not available under the following conditions when the frequency setting is lower than 100Hz when the current source is HDR Black Equalizer Adjust the brightness of the black areas ...

Page 28: ... as if on a 22 W monitor of 16 10 aspect ratio 23 W 16 9 Display the input image as if on a 23 W monitor of 16 9 aspect ratio 23 6 W 16 9 Display the input image as if on a 23 6 W monitor of 16 9 aspect ratio 24 W 16 9 Display the input image as if on a 24 W monitor of 16 9 aspect ratio Note 1 1 22 W 16 10 23 W 16 9 23 6 W 16 9 and 24 W 16 9 options will be disabled when the AMD FreeSync Premium f...

Page 29: ...hotos and graphics on the computer Custom 1 Customized picture mode settings Custom 2 Customized picture mode settings Custom 3 Customized picture mode settings Then you can configure the following image settings Item Description Brightness Adjust the brightness of the image Contrast Adjust the contrast of the image 6 axis Color An advanced color adjustment that user can individually customize hue...

Page 30: ...ing to your preference Low Blue Light Reduce the amount of blue light exposure from the screen Level 0 No change Level 1 10 The higher the level the more blue light will be reduced Note Level 10 is optimized setting It is compliance with TUV Low Blue Light Certification DCR Adjust the black level of the image to achieve the optimum contrast Reset Picture Reset all Picture settings to the default s...

Page 31: ...detect it automatically Note This option is only available for HDMI input Overscan When this function is enabled it slightly enlarges the input image to hide the outermost edges of the image Note This option is only available for HDMI input Apply Picture Model When this function is selected if change any one of the settings related Picture options such as Brightness Contrast etc could be applied t...

Page 32: ...on Display Switch Swap the two windows Audio Switch Select which audio source you want to hear the sound from Note PIPwouldonlysupportwhenverticalfrequency is over 100Hz PBP Display 1x1 split screen left and right windows Source Change the input source for the right window PBP Mode Adjust the aspect ratio of window Display Switch Swap the two windows Audio Switch Select which audio source you want...

Page 33: ...Settings Configure the on screen display OSD menu related settings Display Time Set the length of time the OSD menu remains on the screen OSD Transparency Adjust the OSD menu transparency OSD Lock When this function is enabled no OSD adjustment is allowed Note To disable the OSD lock function press the Control key When the message appears on the screen select Yes to confirm ...

Page 34: ...FF When this function is enabled the monitor will automatically turn off after a certain amount of time LED Indicator By default the LED indicator is set to Always ON Always ON The Power LED lights white during operation Always OFF Turn off the Power LED Standby ON The Power LED lights white in standby mode When the power supply is switched off the Power LED will remain off Type C Compatibility Tu...

Page 35: ... Select an available language for the OSD menu Save Settings Set the personalized OSD configurations for Setting1 Setting2 or Setting3 Item Description Save Save the customized settings Load Load the saved settings ...

Page 36: ... 36 Reset all Restore the monitor to its factory default settings ...

Page 37: ... 178 V Input Output Terminals 2x HDMI 2 0 2x USB 3 2 downstream 1x DP1 4 5V 1 5A 1x Headphone 1x USB Type C 5V 3A 1x USB upstream 9V 2A 12V 1 5A 15V 1A Power Supply AC 100 240V at 50 60Hz Power Consumptions On Mode 28W Standby 0 5W Off 0 3W Note The test condition follows CEC standards Dimensions W x H x D 615 7 x 517 49 x 229 33 mm with stand Weight 6 7 0 5 kgs with stand 4 8 0 5 kgs without stan...

Page 38: ...x768 60Hz 1024x768 60Hz 1024x768 75Hz 1024x768 75Hz 1280x720 60Hz 1280x720 60Hz 1280x720 120Hz 1280x720 120Hz 1920x1080 24Hz 1920x1080 60Hz 1920x1080 60Hz 1920x1080 120Hz 1920x1080 120Hz 1920x1080 144Hz 1920x1080 144Hz 2560x1440 60Hz 2560x1440 60Hz 2560x1440 120Hz 2560x1440 120Hz 2560x1440 140Hz 2560x1440 144Hz 2560x1440 165Hz 1280x1440 60Hz PBP mode 2560x1440 170Hz OC 1280x1440 60Hz PBP mode ...

Page 39: ...ut source Refer to page 16 or 30 Adjust the Brightness and Contrast settings Refer to page 28 The image does not fill the entire screen Try different Display Mode aspect ratio setting Refer to page 27 The colors are distorted Make sure the input signal cable is properly connected Configure the image related settings Refer to the Picture section No sound or volume is low Make sure the headphone cab...

Page 40: ...avoid applying excessive pressure on the screen Acidic or abrasive cleaners can damage the screen Notes on USB Charging The following devices are not compatible with BC 1 2 of CDP mode When the Hub is connected to a PC these devices cannot be charged using the USB cable Vendor Device PID VID Apple iPad PID_129A VID_05AC Samsung GALAXY Tab2 10 1 PID_6860 VID_04E8 Samsung GALAXY TabPro PID_6860 VID_...

Page 41: ...iagonally measured active display area with QHD resolution 2560 horizontal by 1440 vertical pixel array Each pixel is divided into red green and blue sub pixels or dots which are arranged in vertical stripes Gray scale or the brightness of the sub pixl color is determined with a 8 bit gray scale signal for each dot thus presenting a palette of more than 16 78 Million colors It has been designed to...

Page 42: ...hat may cause undesired operation This equipment has been tested and found to comply with the limits for a Class B digital device pursuant to Part 15 of the FCC Rules These limits are designed to provide reasonable protection against harmful interference in a residential installation This equipment generates uses and can radiate radio frequency energy and if not installed and used in accordance wi...

Page 43: ... recast 2011 65 EU the 2015 863 Statement This product has been tested and found to comply with all essential requirements of the Directives European Union EU RoHS recast Directive 2011 65 EU the European Commission Delegated Directive EU 2015 863 Statement GIGABYTE products have not intended to add and safe from hazardous substances Cd Pb Hg Cr 6 PBDE PBB DEHP BBP DBP and DIBP The parts and compo...

Page 44: ...opean Union EU CE Konformitätserklärung Dieses Produkte mit CE Kennzeichnung erfüllen folgenden EU Richtlinien EMV Richtlinie 2014 30 EU Niederspannungsrichtlinie 2014 30 EU Ökodesign Richtlinie 2009 125 EC RoHS Richtlinie 2011 65 EU erfüllt und die 2015 863 Erklärung Die Konformität mit diesen Richtlinien wird unter Verwendung der entsprechenden Standards zurEuropäischen Normierung beurteilt The ...

Page 45: ...no conformi con una o più delle seguenti Direttive UE come applicabile Direttiva EMC 2014 30 UE Direttiva sulla bassa tensione 2014 35 UE Direttiva Ecodesign EMC 2009 125 EC Direttiva RoHS 2011 65 EU e Dichiarazione 2015 863 La conformità con tali direttive viene valutata utilizzando gli Standard europei armonizzati applicabili Deklaracja zgodności UE Unii Europejskiej Urządzenie jest zgodne z nas...

Page 46: ...τω Οδηγιών της Ευρωπαϊκής Κοινότητας Οδηγία 2014 30 ΕΕ σχετικά με την ηλεκτρομαγνητική συμβατότητα Οοδηγία χαμηλή τάση 2014 35 EU Οδηγία 2009 125 ΕΚ σχετικά με τον οικολογικό σχεδιασμό Οδηγία RoHS 2011 65 ΕΕ και 2015 863 Η συμμόρφωση με αυτές τις οδηγίες αξιολογείται χρησιμοποιώντας τα ισχύοντα εναρμονισμένα ευρωπαϊκά πρότυπα Japan Class 01 Equipment Statement 安全にご使用いただくために 接地接続は必ず電源プラグを電源につなぐ前に行っ...

Page 47: ...有害物质 铅 Pb 汞 Hg 鎘 Cd 六价铬 Cr 6 多溴联苯 PBB 多溴二苯醚 PBDE 印刷电路板及其 电子组件 X O O O O O 液晶面板 X O O O O O 外壳 O O O O O O 外部信号连接头 及线材 X O O O O O 本表格依据 SJ T 11364 的规定编制 This table is prepared in compliance with the requirements of SJ T 11364 表示该有害物质在该部件所有均质材料中的含量均在 GB T 26572 规定 的限量要求以下 X 表示该有害物质至少在该部件的某一均质材料中的含量超出 GB T 26572 规定的限量要求 此标识指期限 十年 电子电气产品中含有的有害物 质在正常使用的条件下不会发生外泄或突变 电子电气 产品用户使用该电子电气产品不会对环境造成严重污染 或对其人身 ...

Page 48: ... 後殼 O O O O O O 液晶面板 O O O O O 電路板組 件 O O O O O 底座 O O O O O O 電源線 O O O O O 其他線材 O O O O O 備考1 超出0 1 wt 及 超出0 01 wt 係指限用物質之百分比含量超出百分比 含量基準值 Note 1 Exceeding 0 1 wt and exceeding 0 01 wt indicate that the percentage content of the restricted substance exceeds the reference percentage value of presence condition 備考2 O 係指該項限用物質之百分比含量未超出百分比含量基準值 Note 2 O indicates that the percentage content of the r...

Reviews: