9
I
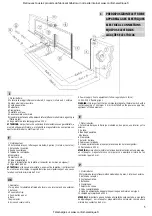
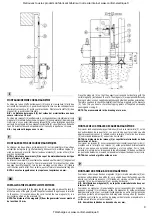
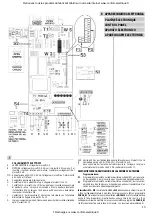
MONTAGGIO DEI FINE CORSA MAGNETICI
Posizionare le due staffe portamagneti (5) sopra la cremagliera (3) alle due
estremità del cancello (4) in posizione di cancello chiuso e cancello aperto con
riferimento al sensore (1) posto sopra la scheda. Montare sulle staffe (5) i due
magneti (2) in posizione orizzontale.
N.B.: La distanza dei magneti (2) dal cofano del motoriduttore non deve
essere inferiore a 15 mm.
Posizionare i magneti (2) esattamente in corrispondenza orizzontale del piccolo
magnete (1) montato sulla scheda. I magneti (2) sono polarizzati diversamente
tra di loro, uno con polarizzazione negativa e l’altro con polarizzazione positiva,
pertanto il montaggio dei due magneti sulle staffe (5) va verificato controllando
i punti d’arresto muovendo manualmente il cancello in apertura e chiusura.
N.B.: Le quote sul disegno sono in mm.
F
MONTAGE DES FINS DE COURSE MAGNETIQUES
Positionner les deux étriers porte-aimants (5) sur la crémaillère (3) aux deux
extrémités de la grille (4) (grille fermée et grille ouverte). Se référ au capteur (1)
situé au-dessus de la carte. Monter les deux aimants (2) sur les étriers (5) en
position horizontale.
NOTA: La distance des aimants (2) du capot du motoréducteur ne doit pas
être inférieure à 15 mm.
Positionner les aimants (2) exactement au niveau du petit aimant (1) (alignement
horizontal) monté sur la carte. Comme les aimants (2) présentent del pôles
oppsées (positif et négatif), lors de leur montage sur les étriers (5) il faudra
contrôller les point d’arrêt. Pour ce faire, ouvrir et fermer manuellement la grille.
NOTA: Les cotes rappelées sur le croquis sont exprimées en mm.
UK
INSTALLING THE MAGNETIC LIMIT SWITCHES
Place the two brackets that the magnets (5) are mounted on, above the rack (3)
at the two ends of the gate (4) with the gate closed and the gate open in relation
to the sensor (1) located above the card. Install the two magnets (2) in a
horizontal position on the brackets (5).
NOTE: The distance of the magnets (2) from the gearmotor’s cover must not
be less than 15 mm.
Place the magnets (2) so that they exactly correspond horizontally with the
small magnet (1) installed on the card. The magnets (2) are polarized differently
from each other: one has negative polarization and other has positive polarization.
Therefore you have to check the installation of the two magnets on the brackets
(5). To do this you have to check the stopping points of the gate by manually
opening and closing it.
NOTE: The measurements in the drawing are in mm.
E
MONTAJE DE LOS FINALES DE CARRERA MAGNÉTICOS
Posicionar las dos abrazaderas portaimanes (5) sobre la cremallera (3), en las
dos extremidades de la puerta (4), con posición de puerta cerrada y puerta
abierta respecto al sensor (1) ubicado sobre la tarjeta. Montar los dos imanes
(2) sobre las abrazaderas (5) en posición horizontal.
NOTAS: La distancia de los imanes (2) al capot del motorreductor no debe
ser inferior a 15 mm.
Posicionar los imanes (2) en correspondencia horizontal respecto al imán (1)
montado sobre la tarjeta. Los imanes (2) están polarizados diferentemente
entre sí, uno posee una polaridad negativa y el otro positiva. Por lo tanto,
durante el montaje de los imanes sobre las abrazaderas (5) deben verificarse
los puntos de detención, moviendo manualmente la puerta en apertura y cierre.
NOTAS: Las cotas del gráfico están en mm.
P
MONTAGEM DOS FINS-DE-CURSO MAGNÉTICOS
Posicionar os dois suportes dos magnetes (5) por cima da cremalheira (3) em
ambas as extremidades do portão (4), em posição de portão fechado e portão
aberto com referência ao sensor (1) situado em cima do cartão. Montar nos
suportes (5) os dois magnetes (2) em posição horizontal.
N.B. A distância dos magnetes (2) ao capot do motorredutor não deve ser
inferior a 15 mm.
Posicionar os magnetes (2) exactamente em correspondência horizontal do
pequeno magnete (1) montado no cartão. Os magnetes (2) estão polarizados
diversamente entre si, um com polarização negativa e o outro com polarização
positiva e portanto a montagem dos dois magnetes nos suportes (5) deve ser
verificada controlando os pontos de paragem deslocando manualmente o
portão em abertura e em encerramento.
N.B. As medidas indicadas no desenho são em mm.
Retrouvez tous les produits du fabricant Gibidi sur notre site internet www.confort-electrique.fr
Téléchargé sur www.confort-electrique.fr


