To Dismantle Gear
After removing the valve casing and plunger pipes, drain the oil. Screw off gear cover (4) and bearing
cover (14).
Take off the connecting rod screws and push the front of the connecting rods as far as possible into the
crosshead guide.
Important!
Connecting rods are marked for identification. Do not twist conrod halves. The conrods
must be remounted on to the shaft journals in their exact original position.
Turning the crankshaft slightly, hit it out carefully using a rubber hammer.
Important!
Do not bend the conrod shanks. Check shaft and conrod mounting surfaces as well as the
shaft seal rings and roller bearings.
Reassembling
Using a soft tool, press in the outer bearing ring on one side until the outer edge lines up with the outer
edge of the bearing bore. Screw on the bearing cover together with the shaft seal and O-ring.
Insert the shaft through the bearing bore on the opposite side. Press in the outer bearing ring and fix
this with the bearing cover, keeping the shaft in a vertical position and turning it slowly so that the taper
rollers of the bearings touch the edge of the outer bearing ring.
Adjust axial bearing clearance to at least 0.1mm, but less than 0.15mm by placing fitting discs (20A)
under the bearing cover.
Important!
After assembly has been completed, the shaft should turn easily with very little clearance.
Tighten conrod screws at 22 ft.-lbs. (30 Nm).
9
LP460 REPAIR INSTRUCTIONS
Summary of Contents for LP460
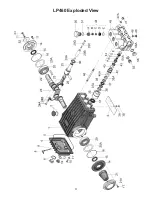
Page 4: ...4 LP460 Exploded View...
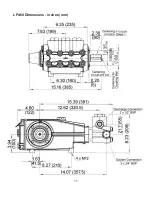
Page 11: ...LP460 Dimensions inches mm 11...


